
Introduction
During a penetration test (Pentest) that involves the Microsoft Active Directory environment (aka AD), various tools are often used to automate and transform data into actionable insights. One such tool is BloodHound. The unique feature of BloodHound is its ability to gather a plethora of information from an Active Directory environment and present it in a manner that isn’t just a collection of isolated data points. Instead, it relates them in ways that provide value, creating hypotheses for potential paths to be explored.
BloodHound represents various AD objects as nodes, for example, Users, Computers, GPOs, ACLs, ACEs, and more. Their respective relationships are represented as edges, for instance, MemberOf, Owns, CanRDP, GenericWrite, etc. This makes it possible to identify potential paths for an exploitation chain.
In this post, I will share my experience using BloodHound, including the primary challenge I encountered when handling/importing large datasets. Additionally, I will demonstrate how I tackled the main issue of “slow data import in BloodHound” by creating a tool to manipulate, process, and import BloodHound data.
BloodHound’s GitHub describes it as:
BloodHound uses graph theory to reveal hidden and often unintended relationships in an Active Directory or Azure environment. Attackers can use BloodHound to easily identify complex attack paths that would otherwise be impossible to quickly discern. Both Red Team (attack) and Blue Team (defense) can use it to identify and eliminate those same attack paths. Teams can use BloodHound to gain a deeper understanding of privilege relationships in an Active Directory or Azure environment.
Currently, BloodHound supports data extraction and processing from Microsoft Active Directory On-Premises and Azure AD. However, this post focuses on the process for AD On-Premises.
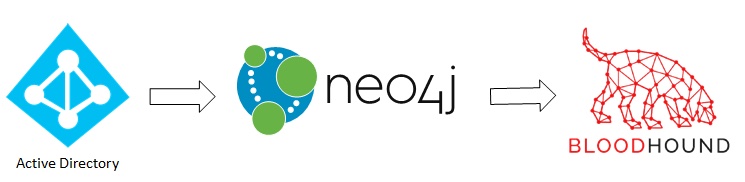
The first phase of using BloodHound is to collect data from Active Directory servers via the LDAP protocol using one of the available collectors, like SharpHound (or AzureHound’s APIs for Azure). These data are then stored in compressed JSON files to reduce file size. Next, these files can be moved to the system where analysis will be performed and imported into a Neo4j database. Finally, queries can be conducted, either using the BloodHound tool, other third-party tools, or directly using Neo4j’s Cypher language. This article will walk through these three stages.
Collectors
The primary tool provided with BloodHound to gather Active Directory information is SharpHound. SharpHound is a .NET 4 executable with various parameters to specify what data needs to be collected. These parameters influence the amount of data gathered and how stealthily the tool operates. SharpHound collects information from an LDAP/LDAPS domain controller. Depending on the specified collection/enumeration parameters, it might also connect to individual hosts via the RPC protocol using a named pipe (ncacn_np) on the Microsoft-DS port (445/TCP) to fetch details about local group members and logged-in users.
Apart from SharpHound, there are several other options for data collection, as listed in the table below:
| Tool | Language | URL | Notes |
|---|---|---|---|
| SharpHound | .NET | SharpHound GitHub | Can also be reflected/run in memory |
| AzureHound | PowerShell | AzureHound GitHub | Specifically for Azure environments |
| SharpHound.ps1 | PowerShell | BloodHound GitHub | Reflectively runs SharpHound.exe in memory |
| BloodHound.py | Python | BloodHound.py GitHub | Python implementation of SharpHound |
| ADExplorerSnapshot.py | Python | ADExplorerSnapshot.py GitHub | Converts Sysinternals ADExplorer snapshots into BloodHound compatible JSON files |
| BOFHound | Python | BOFHound GitHub | Converts logs from ldapsearch BOF and pyldapsearch into BloodHound compatible JSON files |
Once the necessary input files are gathered, we can move on to the next step: importing the files into BloodHound.
Importing
After setting up BloodHound with Neo4j’s database backend, as detailed in the Installation section at BloodHound Docs, the gathered data can be imported.
The standard method of importing is simply starting the BloodHound GUI and dragging the JSON and/or zip files onto the application’s main window. Alternatively, the Import button on the right can be used to select the files you wish to import.
During the import process, BloodHound reads the JSON data and translates them into Cypher CREATE commands that create the various nodes and edges in the Neo4j graph database. Nodes represent objects such as Computers, Users, Groups, GPOs, etc., with their respective attributes, while edges represent relationships like MemberOf, Owns, WriteDacl, CanRDP, etc.
Importing generally works well, but sometimes it fails. In such cases, trying a different BloodHound version might magically solve the import issues. Multiple BloodHound versions can be installed side-by-side. If files still won’t import, there might be some other underlying problem.
Mock Data
If you don’t have access to an Active Directory environment but still want to perform Cypher queries (discussed in the Queries section), you can also load some mock data into BloodHound using one of the two methods below.
Option 1 - Using the DBCreator.py tool, which can be installed as follows:
1
2
3
git clone https://github.com/BloodHoundAD/BloodHound-Tools/
cd BloodHound-Tools/DBCreator
pip install -r requirements.txt
Once installed, simply start the script to open an interactive prompt. In this prompt, the dbconfig command can be used to set up the URL, username, and password for your Neo4j instance. After this configuration, connect to the database using the connect command. To generate and insert mock data, use the generate command.
Option 2 - Importing from the Neo4J database:
Source: https://github.com/BloodHoundAD/BloodHound/issues/336
1
2
3
4
5
6
7
cd /tmp/
curl -LO https://github.com/BloodHoundAD/BloodHound/archive/ec277d027cb2cf1e690c3afeb437f9f7fae39fef.zip
unzip ec277d027cb2cf1e690c3afeb437f9f7fae39fef.zip
DATA=$(grep -oE '^dbms.directories.data[ =]{1,3}(.*)$' /etc/neo4j/neo4j.conf | cut -d'=' -f2 | tr -d ' ')
mkdir -p "${DATA}/databases/bloodhoundexampledb.db"
rm -rf "${DATA}/transactions/bloodhoundexampledb.db/"
rsync -av BloodHound-ec277d027cb2cf1e690c3afeb437f9f7fae39fef/BloodHoundExampleDB.db/* "${DATA}/databases/bloodhoundexampledb.db"
Edit the configuration file /etc/neo4j/neo4j.conf, and include/edit the line below:
1
2
dbms.default_database=bloodhoundexampledb.db
dbms.databases.allow_upgrade=true
Restart Neo4J.
Large Files/Environments
I frequently encounter large AD environments during my tests, which subsequently produce large volumes of data and correspondingly large JSON files. As mentioned above, the standard method of import is to start the BloodHound GUI and drag the JSON and/or zip files onto the main app window. However, due to the way the importer is structured and designed, it consumes a significant amount of memory and is extremely slow, especially with larger files.
My first attempt to address the import problem was to use the bloodhound-importer.py script. However, it currently only supports the BloodHound v3 data format, while the files we generate are usually from newer versions (typically v4 or higher).
I later found out that the file format doesn’t differ much, but initially, I looked for other solutions to my problem. I came across the original article (Dealing with large BloodHound datasets), written by Arris Huijgen, which I used as a basis for this post. The author basically splits the JSON file into several smaller ones. This strategy didn’t help me much since I still faced import slowness issues.
Creation of KnowsMore
Given the import slowness and solutions that weren’t much help, I decided to delve deeper into the structure of the JSON files and create my own importer.
During my penetration tests
, I always follow the procedure below after compromising the AD:
- Extract all hashes using
ntds.ditorDCSync; - Create a custom wordlist with the client’s name (including common passwords, e.g.,
Client@2023); - Crack the hashes (using hashcat) with the
custom wordlist+passwords found during the test+ common marketwordlists(listed below).
My favorite wordlists
- Custom wordlist created with the command
knowsmore --word-list -o my_list.txt --batch --name sec4us; - hashesorg2019;
- weakpass_2.
I always do this to generate data on the client’s general security/entropy status. Even though it’s a simple task, clients are always surprised and love this information.
1
2
3
4
5
6
7
8
9
10
11
12
13
14
15
16
17
18
19
20
21
22
23
24
25
26
27
28
29
30
31
32
33
34
35
36
37
38
39
40
41
[?] General Statistics
+-------+----------------+-------+
|   top | description    |   qty |
|-------+----------------+-------|
|     1 | Total Users    | 95369 |
|     2 | Unique Hashes  | 74299 |
|     3 | Cracked Hashes | 23177 |
|     4 | Cracked Users  | 35078 |
+-------+----------------+-------+

[?] General Top 10 passwords
+-------+-------------+-------+
|   top | password    |   qty |
|-------+-------------+-------|
|     1 | password    |  1111 |
|     2 | 123456      |   824 |
|     3 | 123456789   |   815 |
|     4 | guest       |   553 |
|     5 | qwerty      |   329 |
|     6 | 12345678    |   277 |
|     7 | 111111      |   268 |
|     8 | 12345       |   202 |
|     9 | secret      |   170 |
|    10 | sec4us      |   165 |
+-------+-------------+-------+

[?] Top 10 weak passwords by company name similarity
+-------+--------------+---------+----------------------+-------+
|   top | password     |   score |   company_similarity |   qty |
|-------+--------------+---------+----------------------+-------|
|     1 | company123   |    7024 |                   80 |  1111 |
|     2 | Company123   |    5209 |                   80 |   824 |
|     3 | company      |    3674 |                  100 |   553 |
|     4 | Company@10   |    2080 |                   80 |   329 |
|     5 | company10    |    1722 |                   86 |   268 |
|     6 | Company@2022 |    1242 |                   71 |   202 |
|     7 | Company@2024 |    1015 |                   71 |   165 |
|     8 | Company2022  |     978 |                   75 |   157 |
|     9 | Company10    |     745 |                   86 |   116 |
|    10 | Company21    |     707 |                   86 |   110 |
+-------+--------------+---------+----------------------+-------+
It was at this point that I decided to aggregate BloodHound data in the same tool, allowing clients to verify information such as weak passwords pointed out in a previous report that haven’t yet been changed (since one of the data points from BloodHound indicates the date of password change).
KnowsMore
During the development of KnowsMore, various challenges arose:
- Gaining an up-to-date understanding of how data is imported and related (as the importer creates the nodes and edges);
- Handling non-ASCII characters in the JSON (which broke the import);
- Working with large files;
- Dealing with different versions of collectors (v3, v4), since minor differences appear in the JSON files between versions.
As a result, I heavily based my research on the BloodHound’s source code, particularly the util.js file, to create my own importer. I laid out the following criteria for the importer:
- Fast (because slow speed was the main issue that motivated me);
- Import data accurately (to avoid missing potential compromise paths due to a software fault
);
- Backwards compatible with at least one previous version (v3, for example, if using v4);
- As an enhancement, have the ability to import cracked passwords from the
ntds.ditfile and relate this data with BloodHound.
I followed a procedure similar to the standard BloodHound import process, using the same node and edge creation Cypher queries. However, I developed a multithreaded importer with Python that chunks and processes data simultaneously, ultimately producing a noticeable speed increase. As a bonus, my importer auto-detects the BloodHound version and correctly processes the data accordingly.
The tool processes the standard collections (Group, Session, Trusts, and ACL) and the corresponding JSON or ZIP files. The processing is done as follows:
- For Groups: Import the
users,computers, andgroupsdata; - For Sessions: Import the
users,computers,groups, andsessionsdata; - For Trusts: Import the
domainsandtrustsdata; - For ACLs: Import the
users,computers,groups,aces, andgposdata.
In addition to the above, KnowsMore has a unique feature: It can associate cracked hashes from an ntds.dit dump with their corresponding user nodes in the BloodHound database. The process to achieve this is as follows:
- Dump the
ntds.ditdatabase using a tool likemimikatzorsecretsdump.py; - Crack the hashes using
hashcator another similar tool; - Use
KnowsMoreto associate the cracked passwords with their respective nodes.
The KnowsMore tool, when associating passwords, will also calculate password entropy and compare them against common weak passwords, identifying users with weak credentials. This information will then be shown in the Neo4j graph, providing a holistic overview of an organization’s AD security posture.
How to Use KnowsMore
To use the KnowsMore tool, follow the steps below:
Data Collection: Gather data from the Active Directory using one of the collectors mentioned earlier in the article.
Setting up KnowsMore: Clone the
KnowsMorerepository and set it up.
1
2
3
git clone https://github.com/username/knowsmore.git
cd knowsmore
pip install -r requirements.txt
- Importing Data with KnowsMore:
1
python knowsmore.py --file /path/to/data.zip --neo4j-url bolt://localhost:7687 --neo4j-user neo4j --neo4j-pass password
Optionally, if you want to incorporate cracked hashes:
1
python knowsmore.py --file /path/to/data.zip --ntds /path/to/cracked_ntds.txt --neo4j-url bolt://localhost:7687 --neo4j-user neo4j --neo4j-pass password
- Analyzing Data: After importing the data, start the BloodHound interface and begin your analysis.
The KnowsMore tool effectively reduces the time required to import large datasets, ensuring you can quickly and effectively identify potential compromise paths in large AD environments. Additionally, the ability to integrate cracked password hashes directly into the graph provides an invaluable feature for red teams, security assessors, and even blue teams, giving a comprehensive view of the organization’s AD security posture.
Installing KnowsMore
1
pip3 install --upgrade knowsmore
Creating a local database
1
knowsmore --create-db
Importing JSON files
Although you can import a JSON file directly, I recommend doing the import through the entire ZIP file, as KnowsMore will optimize the import order aiming for a better correlation of data.
1
2
3
4
5
# Bloodhound ZIP File
knowsmore --bloodhound --import-data ~/Desktop/client.zip

# Bloodhound JSON File
knowsmore --bloodhound --import-data ~/Desktop/20220912105336_users.json
Exporting (synchronizing) data to BloodHound’s Neo4J database
1
knowsmore --bloodhound --sync 10.10.10.10:7687 -d neo4j -u neo4j -p 12345678
In order for you to interact with Neo4J remotely, you need to change your configuration file
/etc/neo4j/neo4j.confas shown below and restart its service.
1
server.bolt.listen_address=0.0.0.0:7687
Marking a user as compromised
Regardless of how, once you’ve identified a user’s password, you can inform KnowsMore that this user has been compromised using the command below:
1
2
3
4
knowsmore --user-pass --username administrator --password Sec4US@2023

# or by adding the company name
knowsmore --user-pass --username administrator --password Sec4US@2023 --company sec4us
Subsequently, it’s possible to synchronize with Neo4J
1
knowsmore --bloodhound --mark-owned 10.10.10.10 -d neo4j -u neo4j -p 123456
Multiple databases
You may be working on several tasks for which you are using BloodHound. Although it is possible to simply import the domains of all the assignments into a single database and query the data individually, this can become slow and confusing quickly.
For this reason, it’s helpful to use multiple Neo4j databases. This is possible simply by using different database folders for different projects, which can be done using the steps below. This procedure works in both Windows and Linux environments.
- Stop the neo4j service in an elevated command prompt:
- Windows:
net stop neo4j(PowerShell:Stop-Service neo4j) - Linux:
systemctl stop neo4j
- Windows:
- Navigate to the
data\databasesfolder inside the Neo4j installation directory- Windows:
c:\Program Files\Neo4j - Linux: check with the command
grep -oE '^dbms.directories.data[ =]{1,3}(.*)$' /etc/neo4j/neo4j.conf | cut -d'=' -f2 | tr -d ' '
- Windows:
- Rename the existing
graph.dbfolder to something else, for examplegraph.db-ProjectX - Start the neo4j service again using the commands below; a new graph.db folder will be created automatically
- Windows:
net start neo4j(PowerShell:Start-Service neo4j) - Linux:
systemctl start neo4j
- Windows:
- Import your data into this clean database. Whenever you want to switch back, follow these steps again by renaming the existing graph.db folder to, for instance,
graph.db-ProjectYand renaming the previously renamed folder back tograph.db
An alternative way to switch between databases is to uncomment and update the line dbms.active_database=graph.db in the neo4j.conf file within Neo4j’s configuration directory. A third option is to start multiple instances of Neo4j using Docker, as described on the Neo4j with Docker page in the Neo4j developer documentation.
Conclusion
BloodHound is a very powerful tool for attackers and defenders to identify unintentional paths in Active Directory environments. This is facilitated by the Neo4j graph database, which can be queried directly using Cypher to efficiently extract and post-process any information so that it can be used by attackers, administrators, and defenders to escalate the continuous game of attack and defense.
In summary, KnowsMore not only tackles the main challenge of “slow data import in BloodHound” but also enhances the BloodHound experience by integrating additional valuable data. It’s a must-have for anyone regularly working with BloodHound and large AD datasets.
The KnowsMore source code can be found on my GitHub
https://github.com/helviojunior/knowsmore
Thank you for reading, and I hope you can use some of the tricks in your future Active Directory assignments!