
Introduction
In this article, we will dissect the Metasploit 32 bits library called Block API, responsible for dynamically locating the addresses of functions within the loaded modules in the application.
However, before we delve into the subject of this post, it’s interesting to conceptualize a few things. The first of them is the term “Shellcoding.”
Shellcoding is a term commonly used to refer to code written in assembly language during the process of binary exploitation (on Windows and Linux), whether for creating a reverse shell, bind shell, executing commands, running an application, and so on.
In the process of creating shellcode, we have the possibility to work with two strategies: the first one using syscalls, and the second one using APIs from the subsystems of the operating system.
Windows and Linux Architecture
In a simplified manner, the image below illustrates the architecture of the Linux operating system.
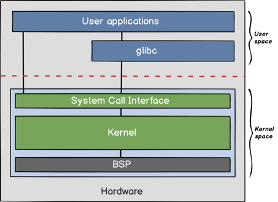
Source: https://infoslack.com/devops/linux-101-arquitetura
Similarly, the figure below illustrates the architecture of Windows.
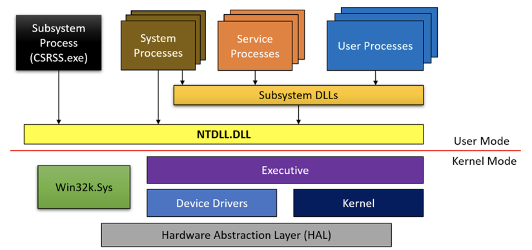
Source: Pavel, Y at all. Windows Internals Part 1: 1st ed. Washington: Microsoft, 2017. Pg 47
Syscall’s Problem
As observed in both architectures (Windows and Linux), there are two possibilities to make calls to the operating system. The first one is using the libraries and subsystems of the operating system (glibc, kernel32.dll, user32.dll, etc.), and the second methodology is using system calls (also known as syscalls).
In Linux, it is very common and easy to use syscalls because the syscall IDs do not change with new releases, versions, and are extensively documented. In a Windows environment, on the other hand, there is no official documentation on this topic, and its use is highly discouraged because the syscall IDs change with each OS release. Therefore, a shellcode does not become reliable.
It’s worth noting that there are techniques to identify syscall IDs and use them, but that’s a topic for another article.
In a Windows environment, it’s common for shellcoders to use functions exposed directly by the Windows APIs (also known as subsystems), such as Kernel32.dll and user32.dll, etc.
For a deeper dive into this topic, I recommend watching Rafael Salema’s video Stop calling APIs! Demystifying direct syscall.
Objective of this Article
In Windows shellcoding, we usually use operating system APIs, and these APIs typically run on the operating system with Address Space Layout Randomization - ASLR. This means that with each execution, reboot of the operating system, or compilation of the DLL, there is a different address for function calls.
Therefore, for a shellcode to be reliable, it needs to have a method to dynamically identify the address of a function.
In our training, we teach how to use the Metasploit libraries called Block API for this purpose. These libraries are available at:
- 32 bits: https://github.com/rapid7/metasploit-framework/blob/master/external/source/shellcode/windows/x86/src/block/block_api.asm
- 64 bits: https://github.com/rapid7/metasploit-framework/blob/master/external/source/shellcode/windows/x64/src/block/block_api.asm
By the way, I made some optimizations to ensure that the 64-bit version of the ASM code doesn’t contain null bytes, and as a bonus, there was a reduction in size. Due to internal reasons, and as explained in the Pull Request comments, it wasn’t merged, but for those interested, here is the reference: Pull Request #17934.
We also have a mini-training available on our YouTube channel about 64-bit Shellcoding (In Brazilian Language): https://www.youtube.com/watch?v=ySKEF8MHcZA, using this library.
In this article, we will step-by-step dissect what this library does, which structures, tables, and application data it analyzes to precisely identify the exact address of a function within Windows. Therefore, this article will focus solely on the Windows operating system.
Concepts and Additional References
During this study, we will discuss various topics and emphasize or delve deeper into only what is relevant to our study. For a better understanding and in-depth knowledge, I recommend referring to the following materials:
- Windows PE Format: PE stands for Portable Executable, which, in practice, refers to any executable binary on Windows, including .exe and .dll files. Technical specifications can be found here: https://docs.microsoft.com/en-us/windows/win32/debug/pe-format and https://www.aldeid.com/wiki/PE-Portable-executable.
- Intel® 64 and IA-32 Architectures Software Developer Manuals: This manual provides detailed information on various development aspects for Intel processors. In this article, we focus on understanding the main assembly instructions used. You can find the manual here: https://software.intel.com/content/www/us/en/develop/articles/intel-sdm.html.
- WinDBG: In this article, we will use WinDBG as a debugger, which is available here: https://docs.microsoft.com/en-us/windows-hardware/drivers/debugger/debugger-download-tools.
- https://www.youtube.com/watch?v=ySKEF8MHcZA
If you are not familiar with assembly instructions, pointers, and the stack, I recommend watching this YouTube lecture https://www.youtube.com/watch?v=ySKEF8MHcZA before continuing with this article, as it covers many essential concepts necessary for understanding this article.
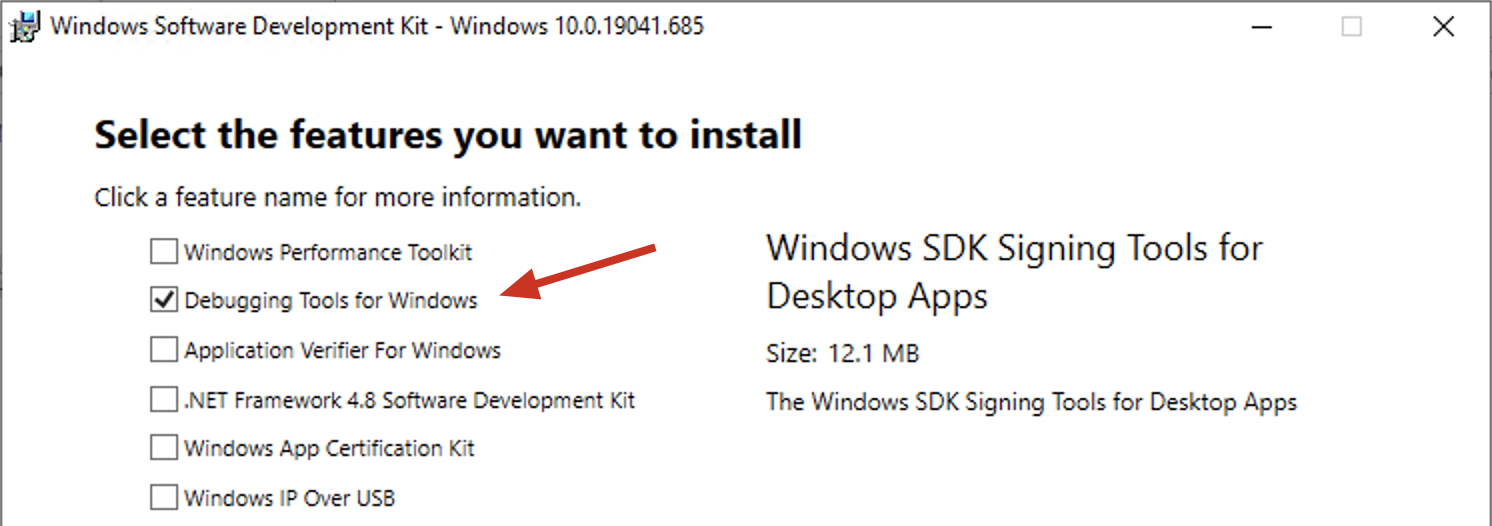
Installing WinDbg
To install WinDBG, download the Windows 10 SDK from the following link: https://docs.microsoft.com/en-us/windows-hardware/drivers/debugger/debugger-download-tools
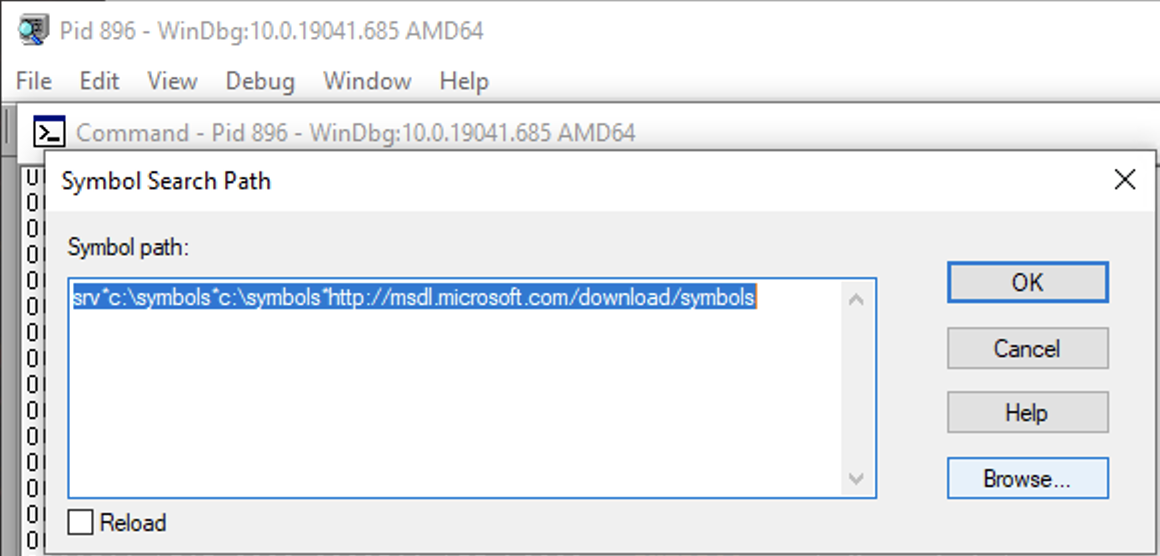
After installation, configure the storage location and download of debug symbols.
Open WinDBG x68 and go to File > Symbol File Path, then add the following content:
1
srv*c:\symbols*http://msdl.microsoft.com/download/symbols
Load any 32-bit application like:
1
C:\Windows\SysWOW64\notepad.exe
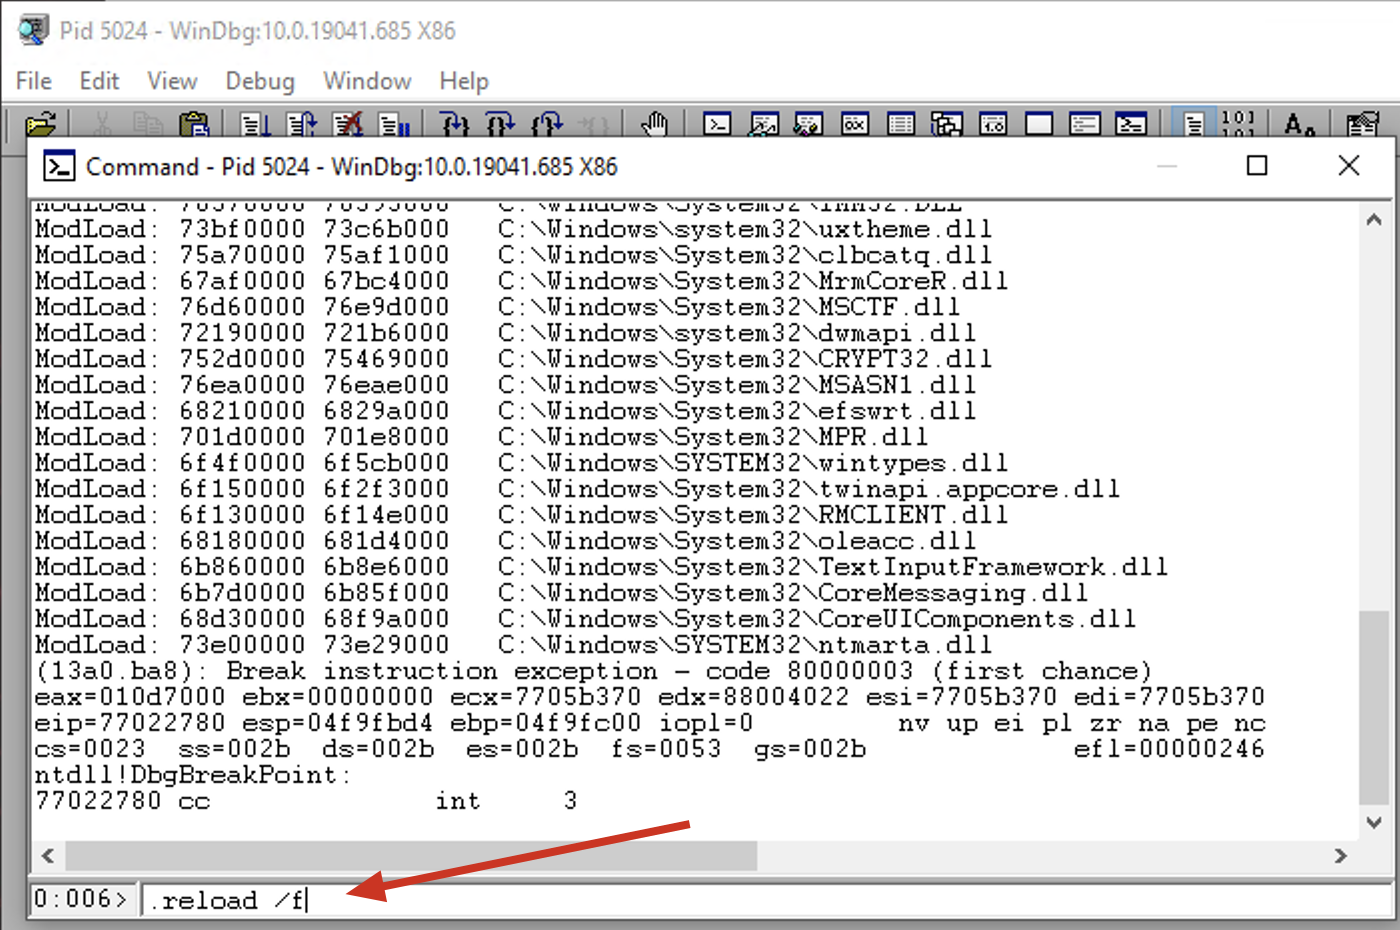
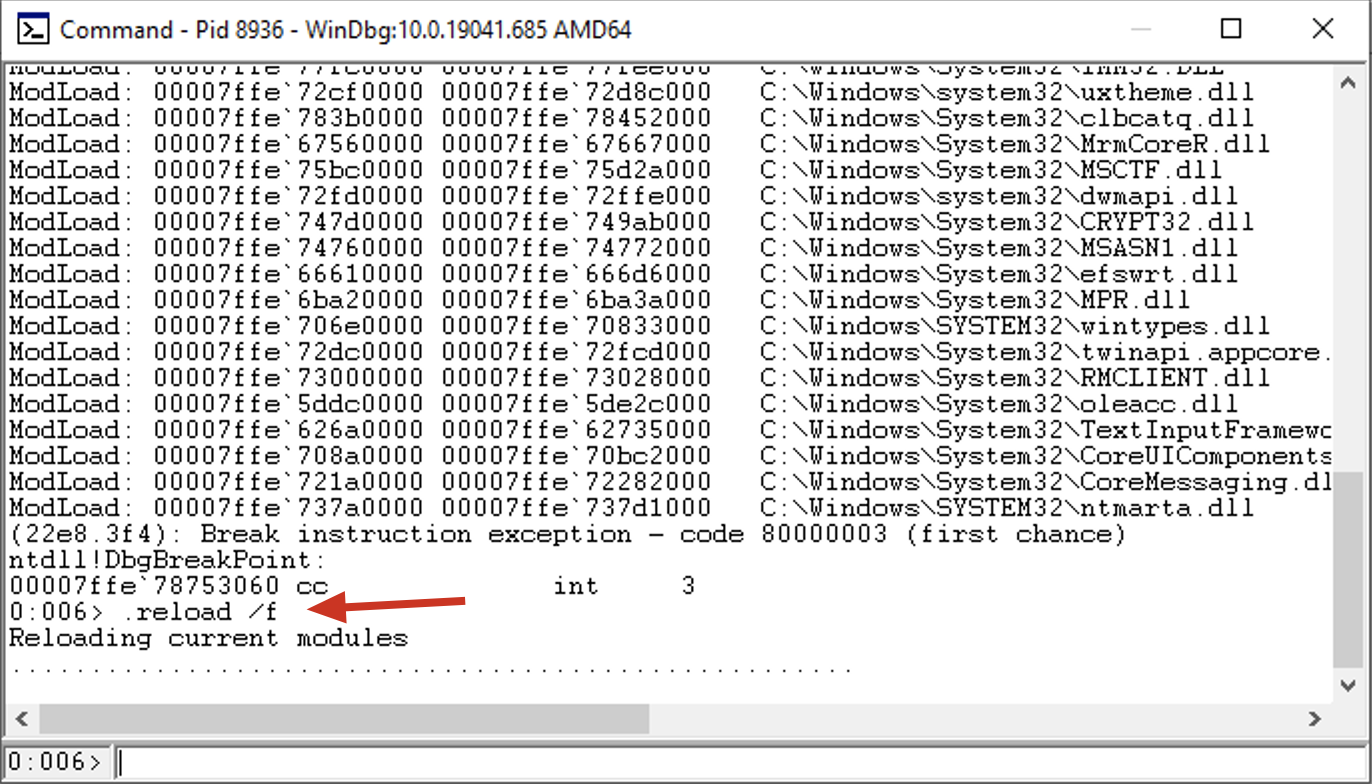
Reload all symbols:
1
.reload /f
Process Internals
Each Windows process is represented by an EPROCESS (Executive Process) block. The EPROCESS block contains a series of pointers to a large number of other structures, such as ETHREADS, TEB, PED, and more.
The figure below simplifies the diagram of process and thread structures.
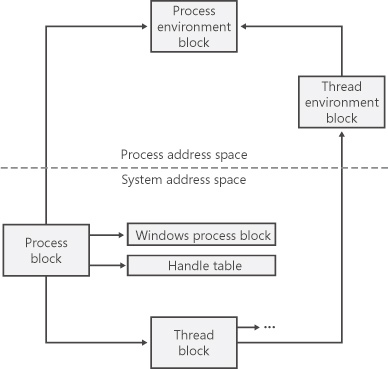
Source: Russinovich, M at all. Windows Internals: 5th ed. Washington: Microsoft, 2009. Pg 336
For our study, it’s worth noting an extremely important table known as the TEB (Thread Environment Block), also referred to as TIB (Thread Information Block) for compatibility reasons. The TEB can be used to obtain various pieces of information about the process without the need to make Win32 API calls. Among other information, it stores the address of the SEH (Structured Exception Handling) and the address of the PEB (Process Environment Block) table, which in turn can provide access to the IAT (Import Address Table) and more. The TEB can be accessed through the FS segment register.
Loader
During the initialization of an application, a series of activities take place. In practice, the loader runs before the application’s own code, making it transparent to the user. Among the activities for which the loader is responsible, we will highlight two that are important for our study:
- Handling the IAT (Import Address Table) of the application and examining all the DLLs that the application needs, as well as recursively analyzing the IAT of all loaded DLLs, followed by an examination of the export table of the DLLs to ensure that the desired functions are present.
- Loading and unloading DLLs at runtime, including those loaded on demand, and maintaining a list of all modules, known as the Modules Database or also as LDR (Loader Data Table).
Analysis of the Block API 32 bits
The Block API library is available on the Metasploit GitHub at https://github.com/rapid7/metasploit-framework/blob/master/external/source/shellcode/windows/x86/src/block/block_api.asm.
Usage
Before we delve into the analysis of the Block API code, let’s look at an example of its usage.
In this example, we will use the ExitProcess function documented at https://docs.microsoft.com/en-us/windows/win32/api/processthreadsapi/nf-processthreadsapi-exitprocess, which has the following syntax:
1
2
3
void ExitProcess(
  UINT uExitCode
);
C Code
1
2
3
4
5
6
#include <Windows.h>
#include <stdio.h>

void main() {
  ExitProcess(0);
}
API Hash
The block_api expects, as input at the top of the stack, the hash of the desired function followed by the function’s parameters.
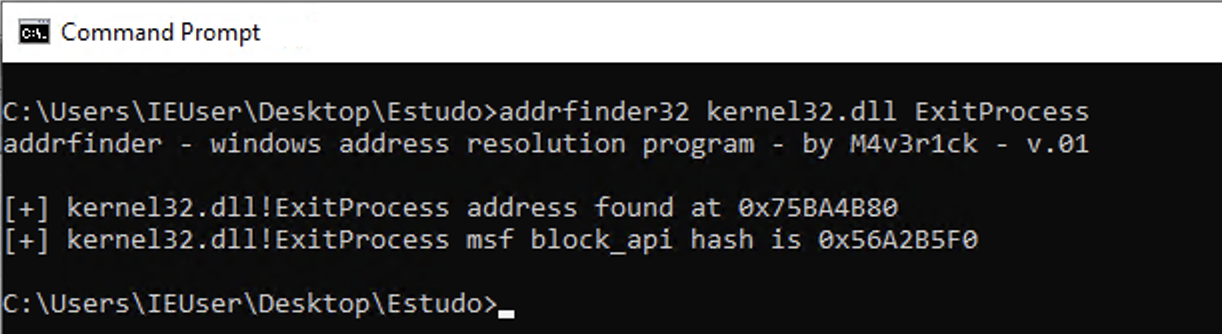
To calculate the hash of the function, we will use an application developed by me, available at https://github.com/helviojunior/addrfinder.
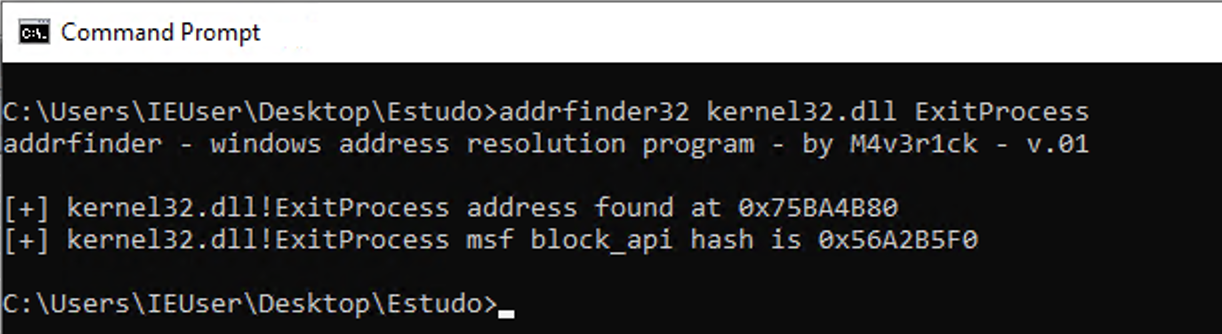
Note that the hash of the ExitProcess function is 0x56A2B5F0, and this hash remains the same even in different releases of Windows.
Assembly - Using the block_api
1
2
3
4
5
6
7
8
9
10
11
12
13
14
15
16
17
18
19
20
21
[BITS 32]

global _start

_start:
jmp short block_api

get_block_api:
pop edi ; Copy the address of block_api to the edi register

; Exit the application without displaying an error
xor eax, eax ; Clear EAX
push eax ; Push the "exit code" = 0x00 onto the stack

; Call the ExitProcess function
push 0x56A2B5F0 ; Push the hash address of the ExitProcess function onto the stack
call edi ; Execute the block_api to locate and execute the function

block_api:
call get_block_api
%include "../block_api.asm"
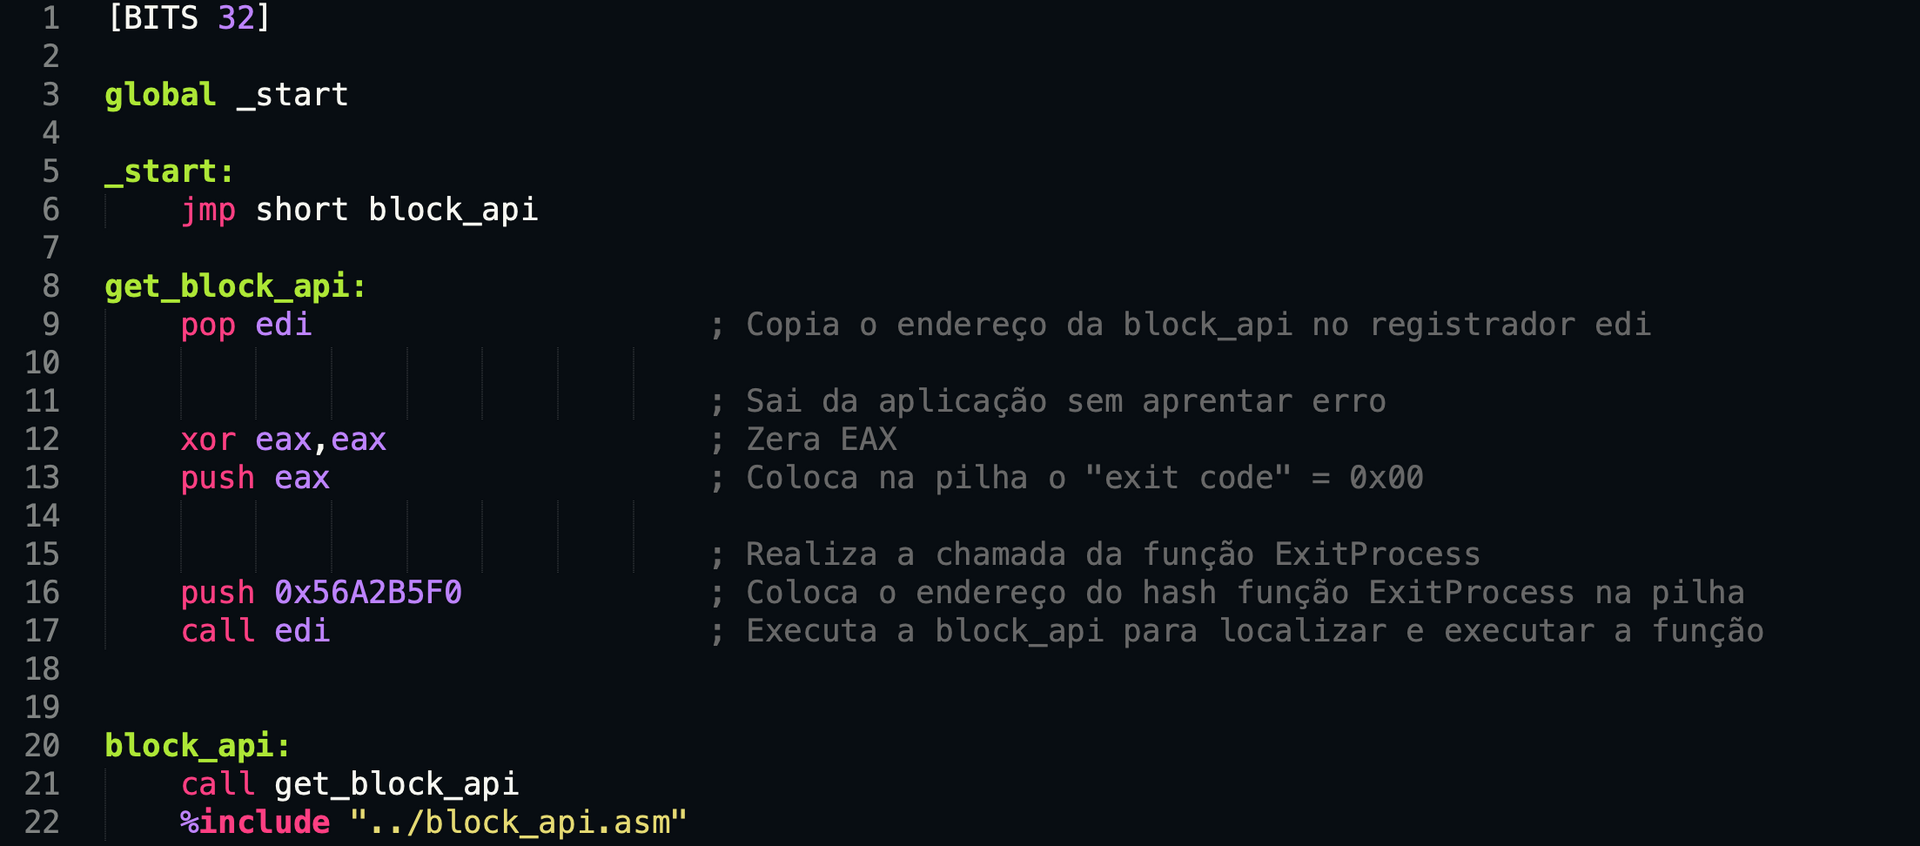
As we can see in the code above, on line 22, we include the library file (exactly the same file listed on the GitHub link above).
Using the JMP; Call; POP strategy, we save the address of the first instruction of block_api in the EDI register. This allows us to push the following onto the stack:
- ESP + 0x00 = 0x56A2B5F0
- ESP + 0x04 = 0x00000000
We then execute the block_api using the instruction call edi.
Assembly - Assembling and Running
We will use the
shellcodetesterapplication developed by me for testing. You can install it directly via PyPi with the commandpip3 install shellcodetester.
For assembly (conversion of ASM mnemonics to binary/hex), we will use ShellcodeTester (Available at https://github.com/helviojunior/shellcodetester)
To install it, simply use the following command:
1
pip3 install --upgrade shellcodetester
After installation, assemble and compile an EXE using the command:
1
shellcodetester -asm exit.asm --break-point
Open WinDbg and execute the generated file st-exit.exe.
Now, in the WinDbg console, enter the go command.
Analysis of Our Shellcode
Before we reach the block api library itself, we have some instructions that we can compare side by side with our code.
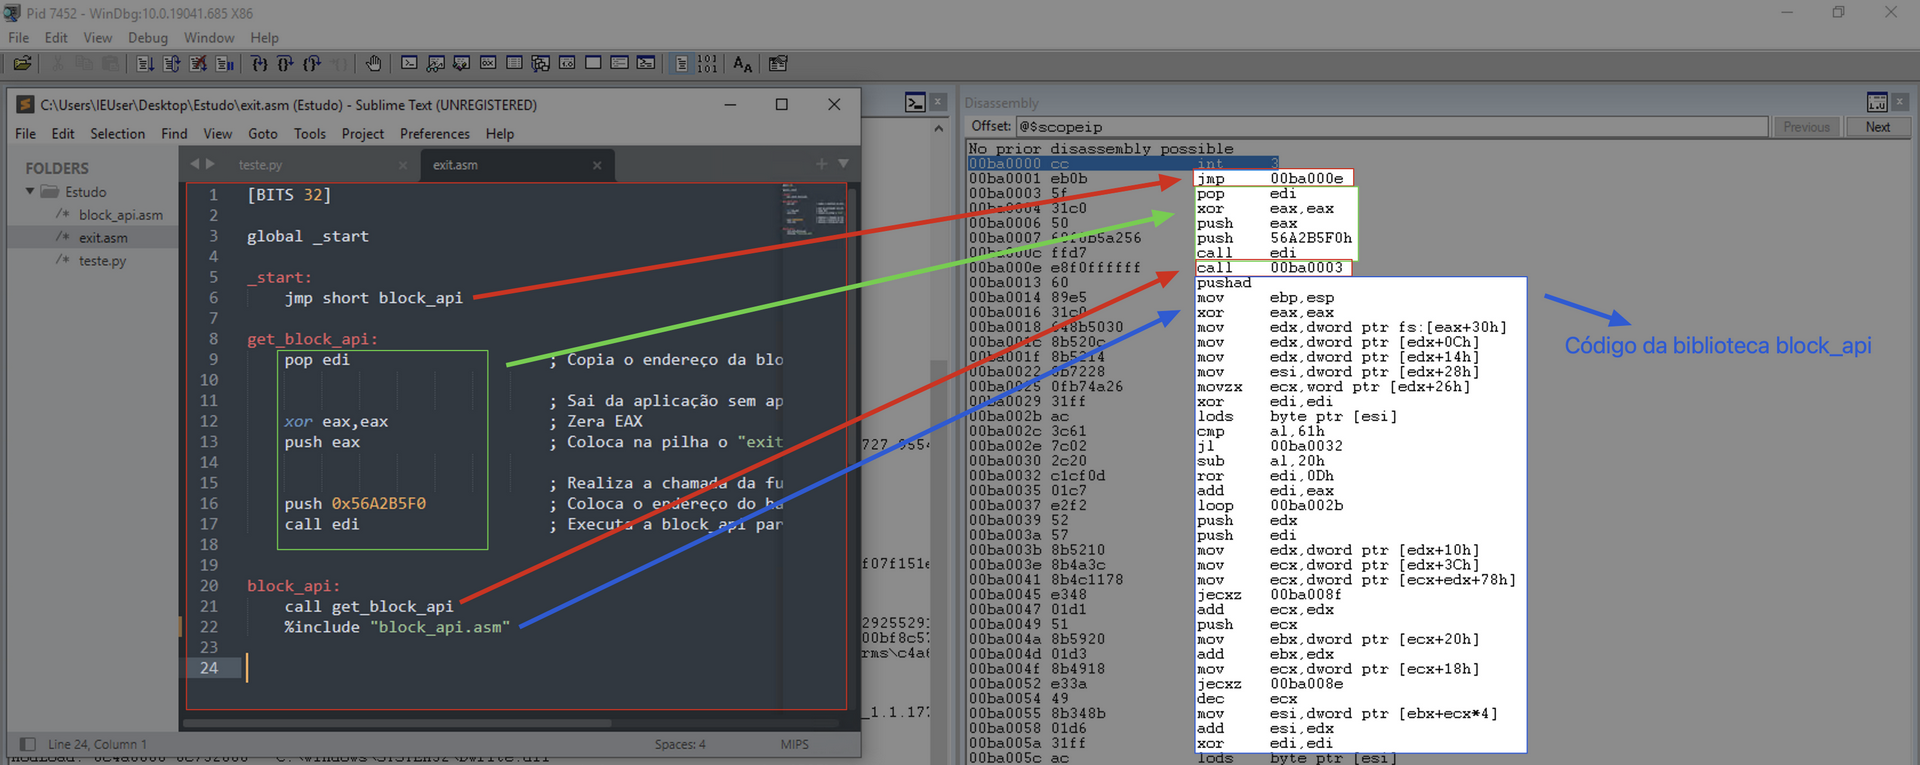
Since the focus is on the execution of the block_api itself, let’s go to the point of the call edi instruction.
At this point, the EDI register contains the address of the block_api.

We will start our analysis from this point.
Analysis of block_api
To facilitate the analysis process, I will provide the code of the block_api as we progress through it.
Tables
As mentioned earlier, there are several tables that exist and are used in our application. Therefore, here is a diagram showing the flow we will follow in the upcoming instructions.
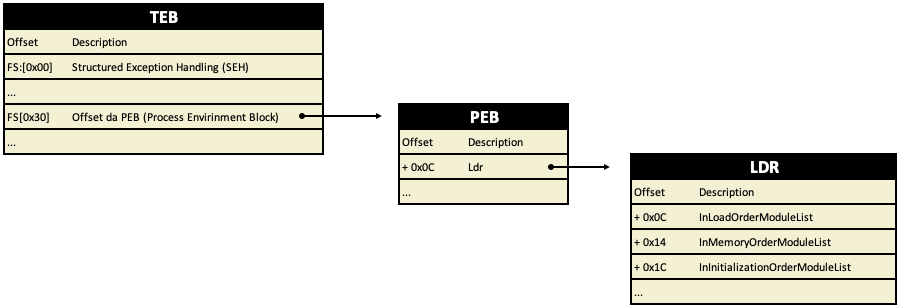
First, we will use the FS segment register at offset 0x30 to obtain the relative memory address (offset) of the TEB table. Next, we will retrieve from inside the TEB at offset 0x0C the address of the LDR table. Finally, within the LDR table, we will obtain the memory address of the first element of the InMemoryOrderModuleList array.
Memory Terms
VRA (Virtual Relative Address)
From now on, we will use the term VRA (Virtual Relative Address). This term refers to a memory address relative to the Base Address (also known as Offset). The offset of a DLL only changes if the DLL is recompiled. What ASLR affects is the Base Address, which does change with each machine reboot or each application execution.
VMA (Virtual Memory Address)
VMA is equal to VRA + BaseAddress, which means it’s the virtual address that can be used within the application.
api_call Function
Here is the code snippet of the first api_call function:
1
2
3
4
5
6
7
api_call:
pushad ; We preserve all the registers for the caller, bar EAX and ECX.
mov ebp, esp ; Create a new stack frame
xor edx, edx ; Zero EDX
mov edx, [fs:edx+0x30] ; Get a pointer to the PEB
mov edx, [edx+0xc] ; Get PEB->Ldr
mov edx, [edx+0x14] ; Get the first module from the InMemoryOrder module list
pushad
The pushad instruction pushes all registers onto the stack, saving the values of all registers on the stack. This process consumes 20 bytes of stack space.
mov ebp, esp
This instruction copies the address of the top of the stack to ebp. This process is known as the prologue of a function, which means it sets ESP and EBP equal to start a new stack frame.
xor edx, edx
The XOR mathematical operation of a value with itself always results in zero. Therefore, this instruction zeroes the value of the EDX register.
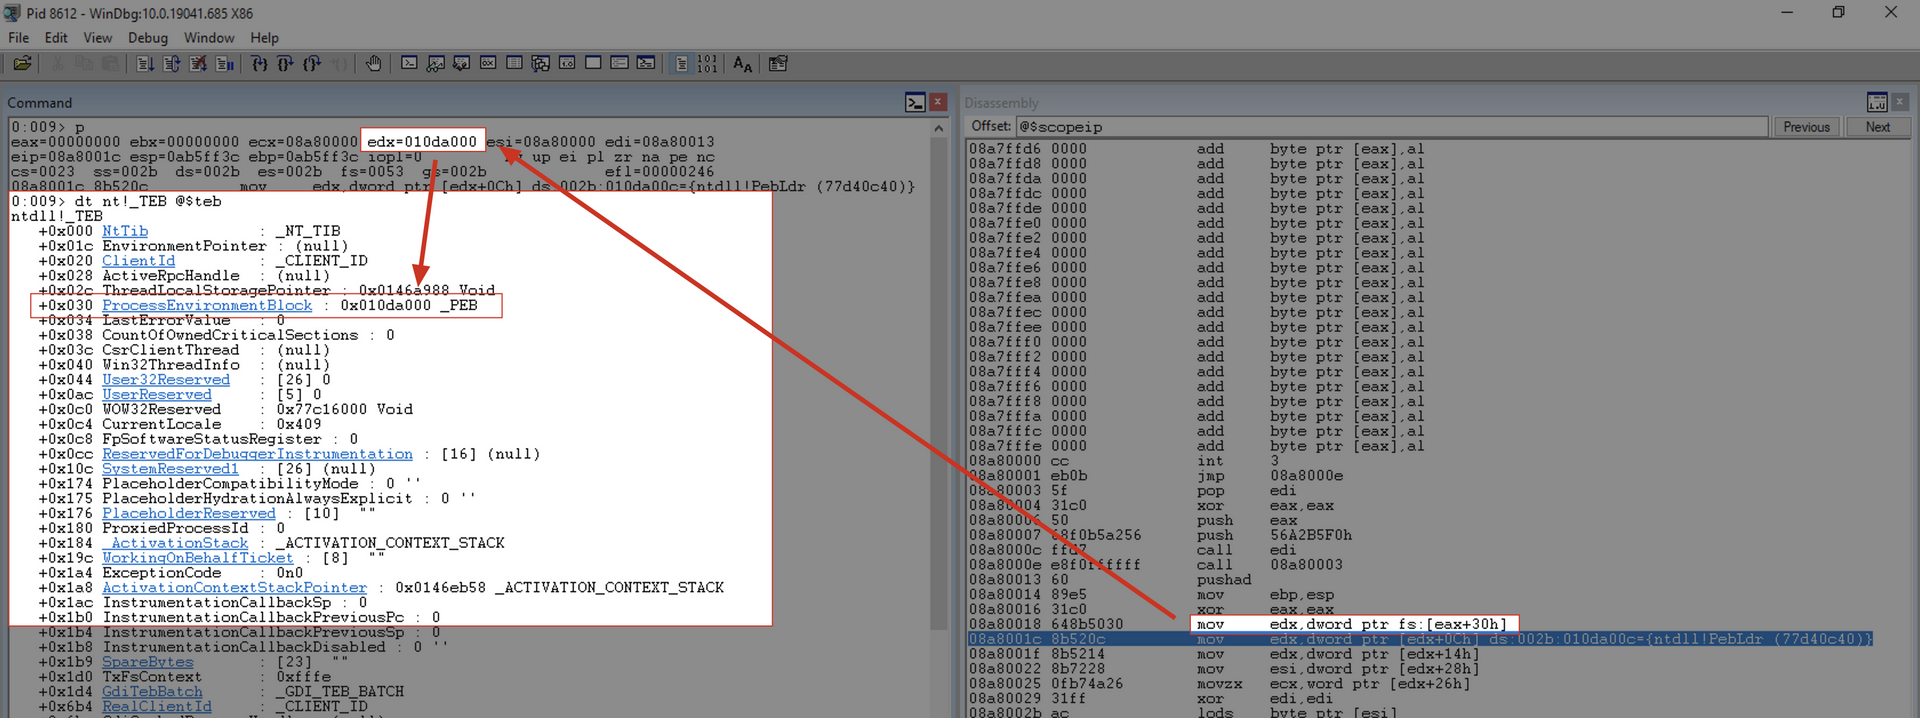
mov edx, [fs:edx+0x30]
This instruction copies the VRA of the PEB into the EDX register.
Within Windbg, we can view this information using the following command:
1
2
3
4
5
6
7
8
9
10
11
12
13
14
15
16
17
18
19
20
21
22
23
0:009> dt nt!_TEB @$teb
ntdll!_TEB
+0x000 NtTib : _NT_TIB
+0x01c EnvironmentPointer : (null)
+0x020 ClientId : _CLIENT_ID
+0x028 ActiveRpcHandle : (null)
+0x02c ThreadLocalStoragePointer : 0x0146a988 Void
+0x030 ProcessEnvironmentBlock : 0x010da000 _PEB
+0x034 LastErrorValue : 0
+0x038 CountOfOwnedCriticalSections : 0
+0x03c CsrClientThread : (null)
+0x040 Win32ThreadInfo : (null)
+0x044 User32Reserved : [26] 0
+0x0ac UserReserved : [5] 0
+0x0c0 WOW32Reserved : 0x77c16000 Void
+0x0c4 CurrentLocale : 0x409
+0x0c8 FpSoftwareStatusRegister : 0
+0x0cc ReservedForDebuggerInstrumentation : [16] (null)
+0x10c SystemReserved1 : [26] (null)
+0x174 PlaceholderCompatibilityMode : 0 ''
+0x175 PlaceholderHydrationAlwaysExplicit : 0 ''
+0x176 PlaceholderReserved : [10] ""
+0x180 ProxiedProcessId : 0
After executing the instruction, we can confirm the information:
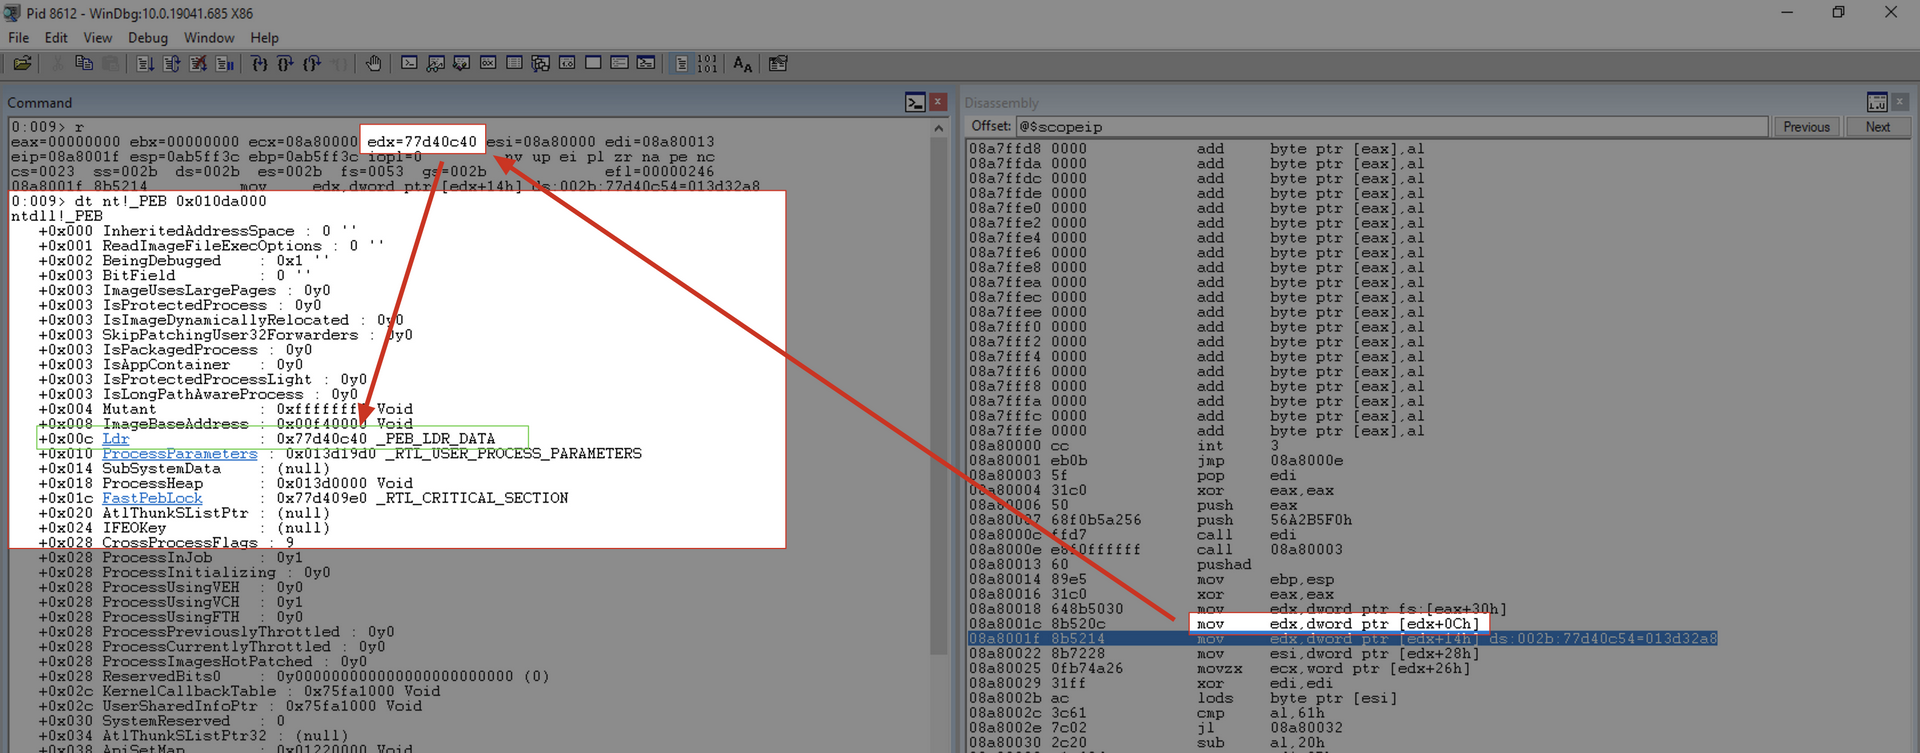
mov edx, [edx+0xc]
This instruction copies the VRA of the LDR into the EDX register.
1
2
3
4
5
6
7
8
9
10
11
12
13
14
15
16
17
18
19
20
21
22
23
24
25
26
0:009> dt nt!_PEB 0x010da000
ntdll!_PEB
+0x000 InheritedAddressSpace : 0 ''
+0x001 ReadImageFileExecOptions : 0 ''
+0x002 BeingDebugged : 0x1 ''
+0x003 BitField : 0 ''
+0x003 ImageUsesLargePages : 0y0
+0x003 IsProtectedProcess : 0y0
+0x003 IsImageDynamicallyRelocated : 0y0
+0x003 SkipPatchingUser32Forwarders : 0y0
+0x003 IsPackagedProcess : 0y0
+0x003 IsAppContainer : 0y0
+0x003 IsProtectedProcessLight : 0y0
+0x003 IsLongPathAwareProcess : 0y0
+0x004 Mutant : 0xffffffff Void
+0x008 ImageBaseAddress : 0x00f40000 Void
+0x00c Ldr : 0x77d40c40 _PEB_LDR_DATA
+0x010 ProcessParameters : 0x013d19d0 _RTL_USER_PROCESS_PARAMETERS
+0x014 SubSystemData : (null)
+0x018 ProcessHeap : 0x013d0000 Void
+0x01c FastPebLock : 0x77d409e0 _RTL_CRITICAL_SECTION
+0x020 AtlThunkSListPtr : (null)
+0x024 IFEOKey : (null)
+0x028 CrossProcessFlags : 9
+0x028 ProcessInJob : 0y1
+0x028 ProcessInitializing : 0y0
mov edx, [edx+0x14]
This instruction copies the VRA of the first element of the InMemoryOrderModuleList array from the LDR table into the EDX register.
1
2
3
4
5
6
7
8
9
10
11
0:009> dt _PEB_LDR_DATA 0x77d40c40
ntdll!_PEB_LDR_DATA
+0x000 Length : 0x30
+0x004 Initialized : 0x1 ''
+0x008 SsHandle : (null)
+0x00c InLoadOrderModuleList : _LIST_ENTRY [ 0x13d32a0 - 0x140d710 ]
+0x014 InMemoryOrderModuleList : _LIST_ENTRY [ 0x13d32a8 - 0x140d718 ]
+0x01c InInitializationOrderModuleList : _LIST_ENTRY [ 0x13d31c8 - 0x140d670 ]
+0x024 EntryInProgress : (null)
+0x028 ShutdownInProgress : 0 ''
+0x02c ShutdownThreadId : (null)
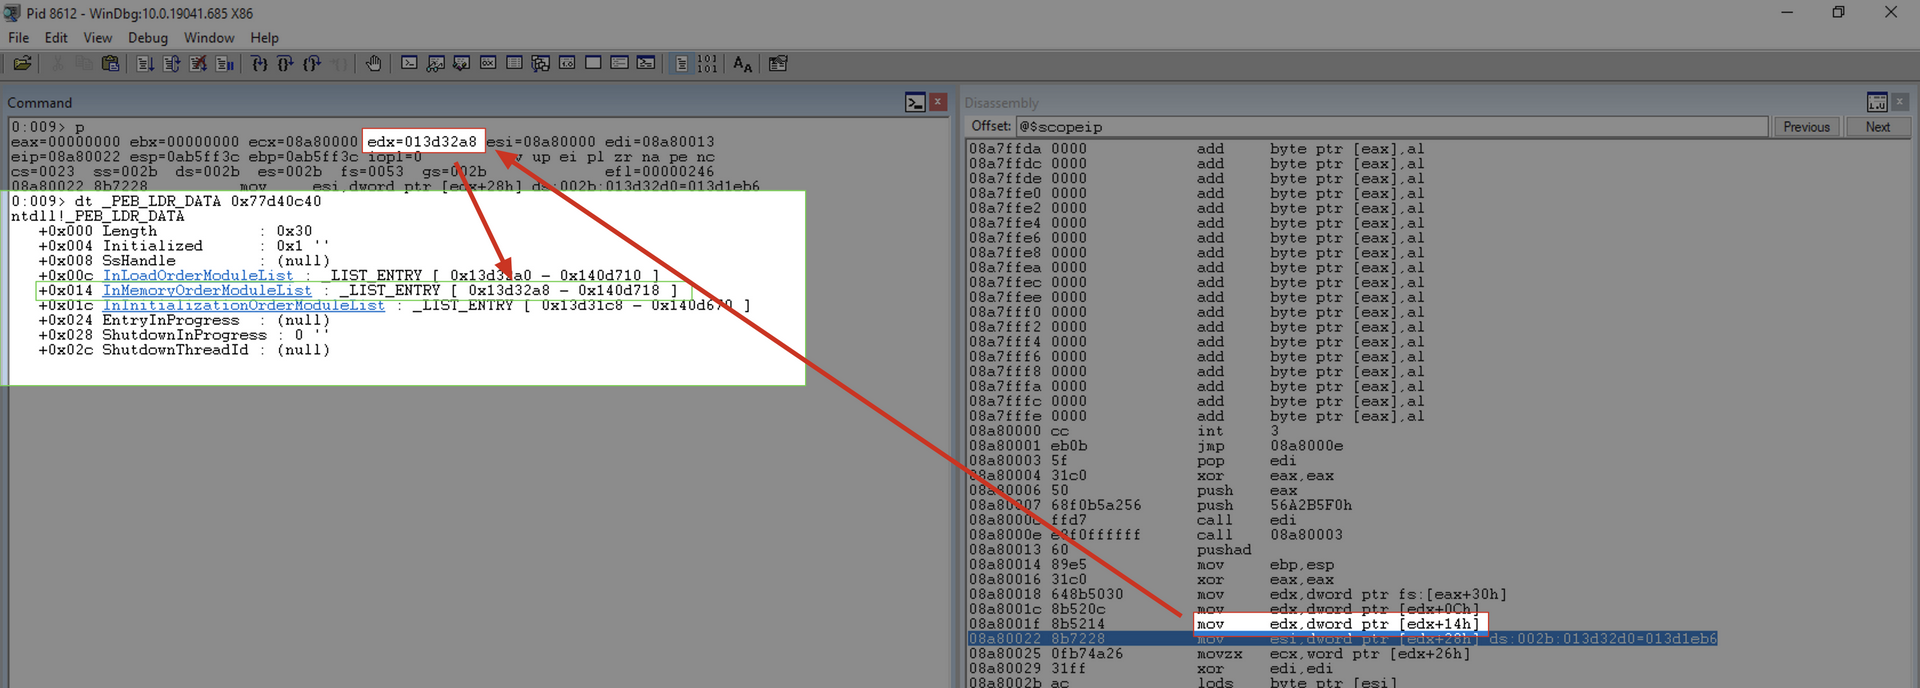
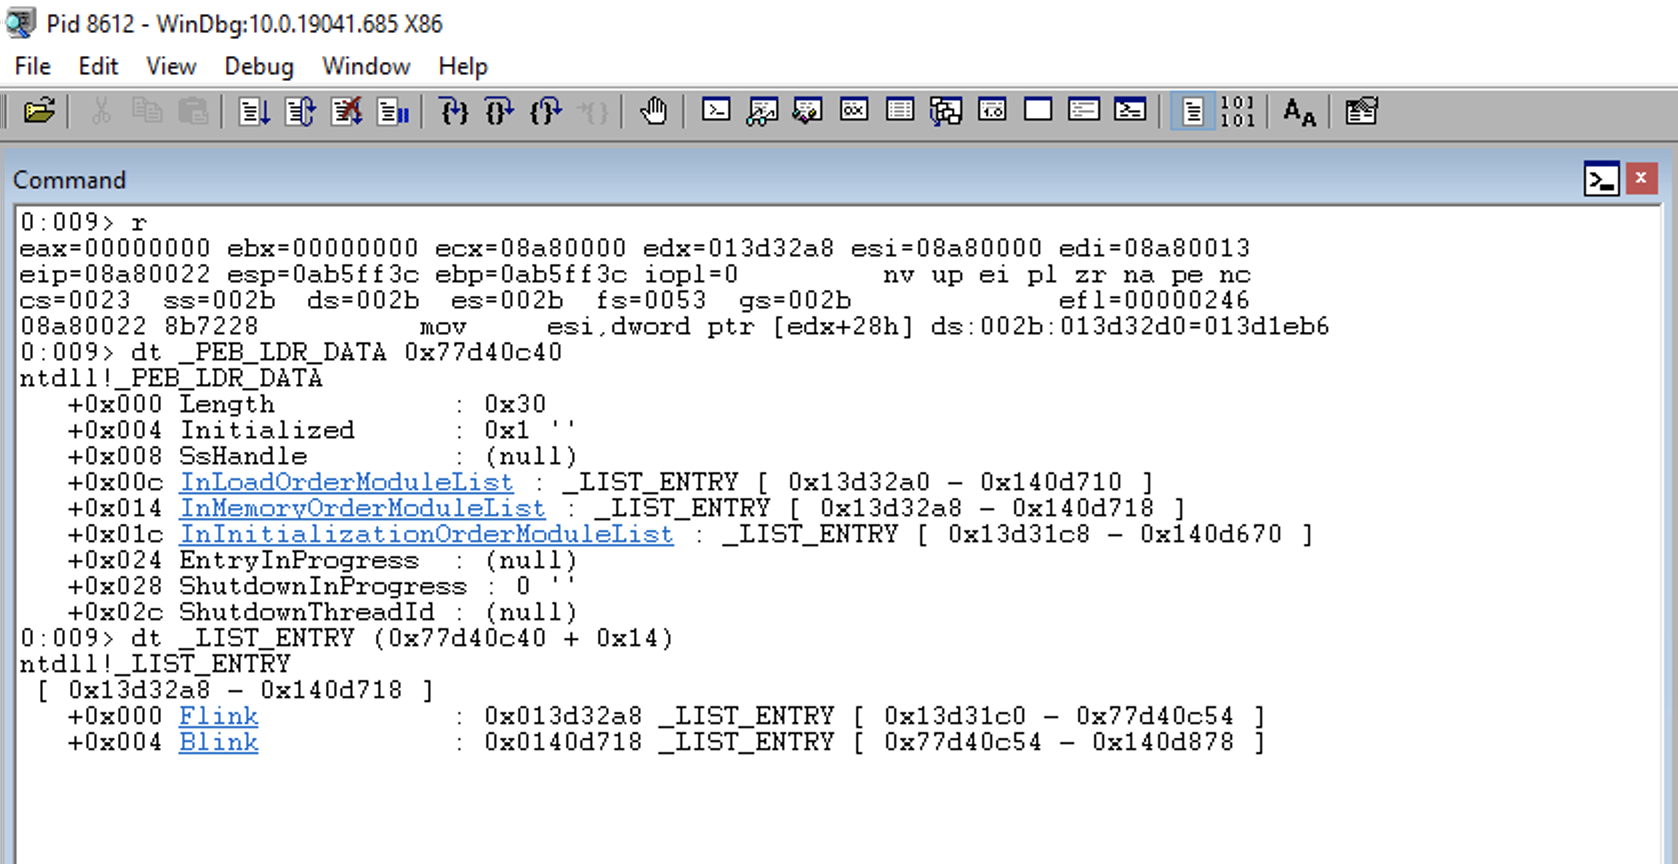
At this point, EDX contains the VRA of the first element in the doubly-linked list InMemoryOrderModuleList.
1
2
3
4
5
0:009> dt _LIST_ENTRY (0x77d40c40 + 0x14)
ntdll!_LIST_ENTRY
[ 0x13d32a8 - 0x140d718 ]
+0x000 Flink : 0x013d32a8 _LIST_ENTRY [ 0x13d31c0 - 0x77d40c54 ]
+0x004 Blink : 0x0140d718 _LIST_ENTRY [ 0x77d40c54 - 0x140d878 ]
This information may not seem very useful, but as we can see in the documentation (https://docs.microsoft.com/en-us/windows/win32/api/winternl/ns-winternl-peb_ldr_data), the LIST_ENTRY structure is part of a larger structure called _LDR_DATA_TABLE_ENTRY.
1
2
3
4
5
6
7
8
9
10
11
12
13
14
15
16
17
18
19
20
21
typedef struct _LIST_ENTRY {
struct _LIST_ENTRY *Flink;
struct _LIST_ENTRY *Blink;
} LIST_ENTRY, *PLIST_ENTRY, *RESTRICTED_POINTER PRLIST_ENTRY;

typedef struct _LDR_DATA_TABLE_ENTRY {
PVOID Reserved1[2];
LIST_ENTRY InMemoryOrderLinks;
PVOID Reserved2[2];
PVOID DllBase;
PVOID EntryPoint;
PVOID Reserved3;
UNICODE_STRING FullDllName;
BYTE Reserved4[8];
PVOID Reserved5[3];
union {
ULONG CheckSum;
PVOID Reserved6;
};
ULONG TimeDateStamp;
} LDR_DATA_TABLE_ENTRY, *PLDR_DATA_TABLE_ENTRY;
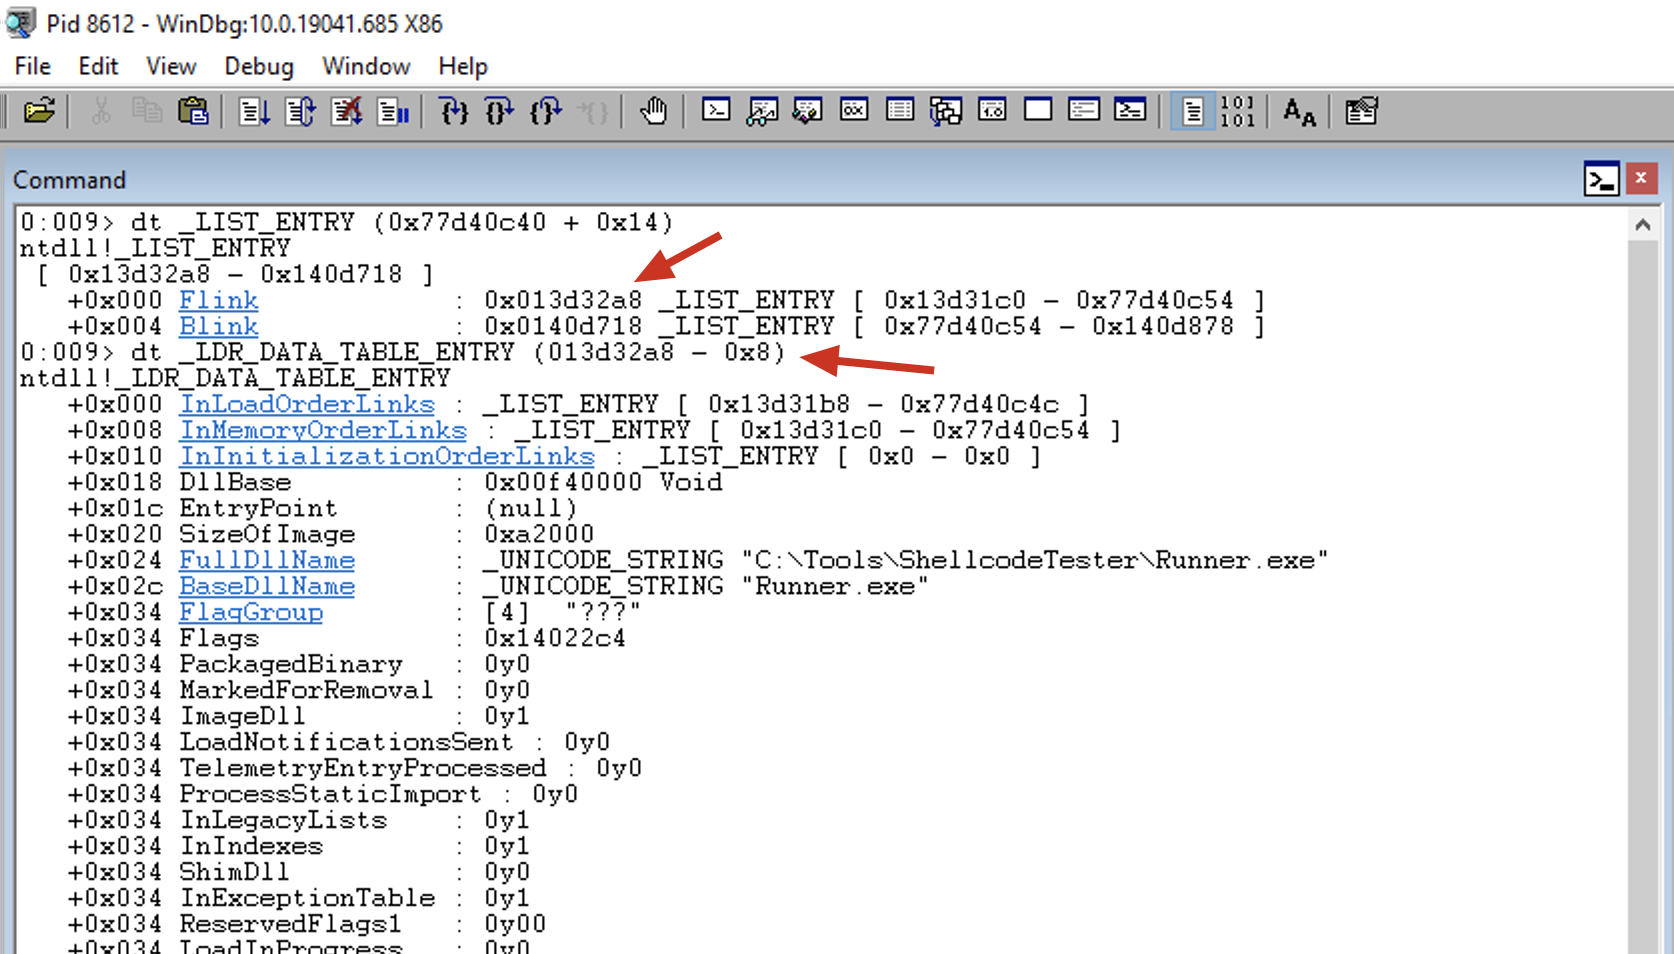
To dump the structure, we need to subtract 0x08 from the address of _LIST_ENTRY in order to find the start of the _LDR_DATA_TABLE_ENTRY structure.
1
2
3
4
5
6
7
8
9
10
11
12
0:009> dt _LDR_DATA_TABLE_ENTRY (013d32a8 - 0x8)
ntdll!_LDR_DATA_TABLE_ENTRY
+0x000 InLoadOrderLinks : _LIST_ENTRY [ 0x13d31b8 - 0x77d40c4c ]
+0x008 InMemoryOrderLinks : _LIST_ENTRY [ 0x13d31c0 - 0x77d40c54 ]
+0x010 InInitializationOrderLinks : _LIST_ENTRY [ 0x0 - 0x0 ]
+0x018 DllBase : 0x00f40000 Void
+0x01c EntryPoint : (null)
+0x020 SizeOfImage : 0xa2000
+0x024 FullDllName : _UNICODE_STRING "C:\Tools\ShellcodeTester\Runner.exe"
+0x02c BaseDllName : _UNICODE_STRING "Runner.exe"
+0x034 FlagGroup : [4] "???"
+0x034 Flags : 0x14022c4
Function next_mod
1
2
3
4
next_mod:
mov esi, [edx+0x28] ; Get pointer to module's name (unicode string)
movzx ecx, word [edx+0x26] ; Set ECX to the length we want to check
xor edi, edi ; Clear EDI which will store the hash of the module name
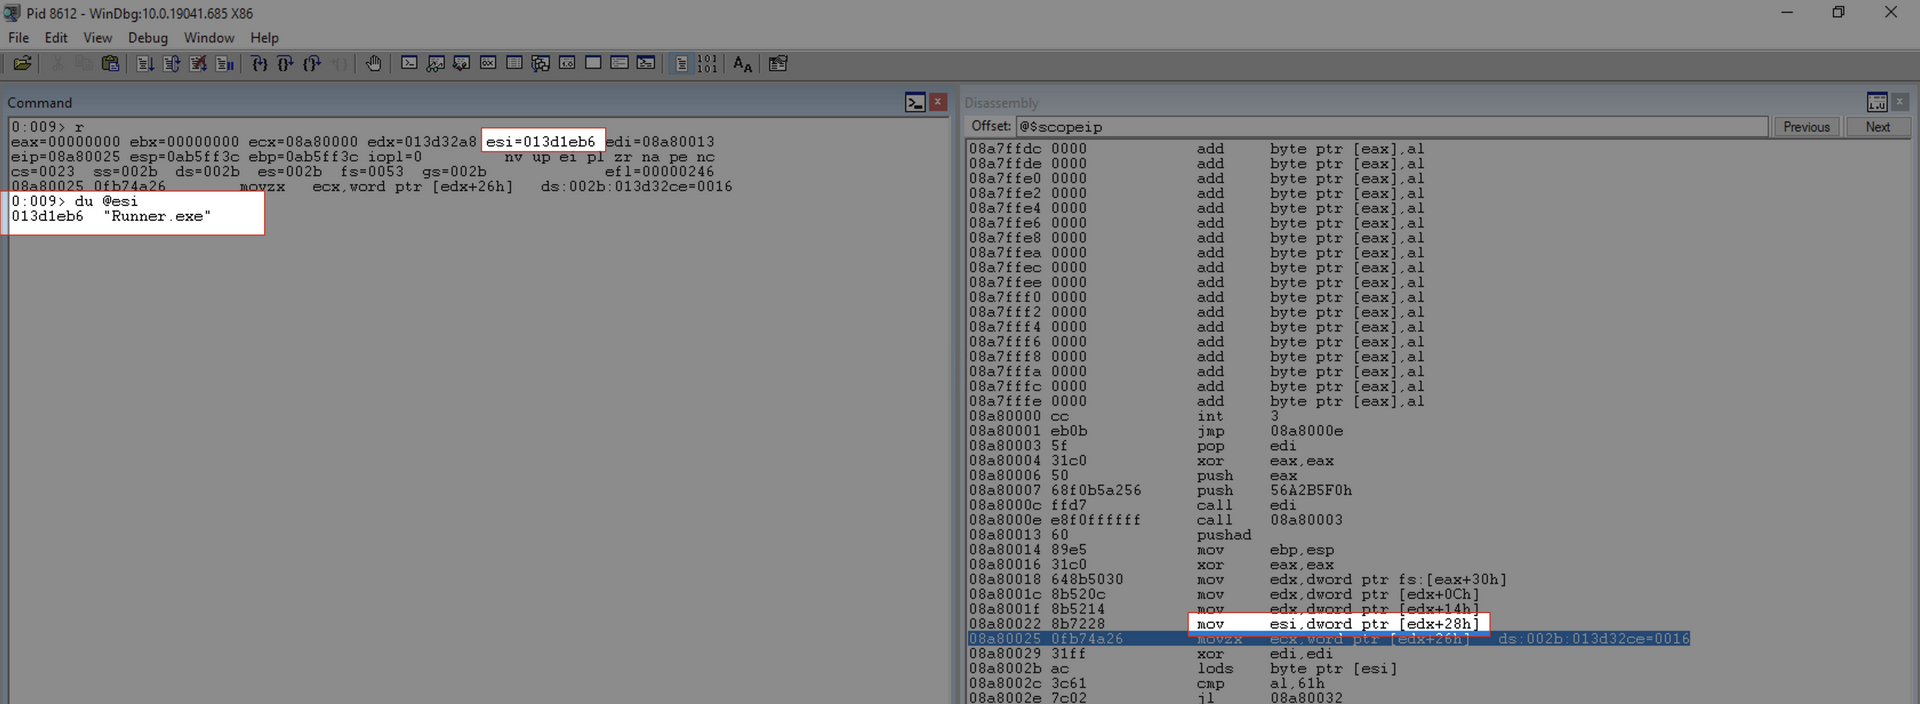
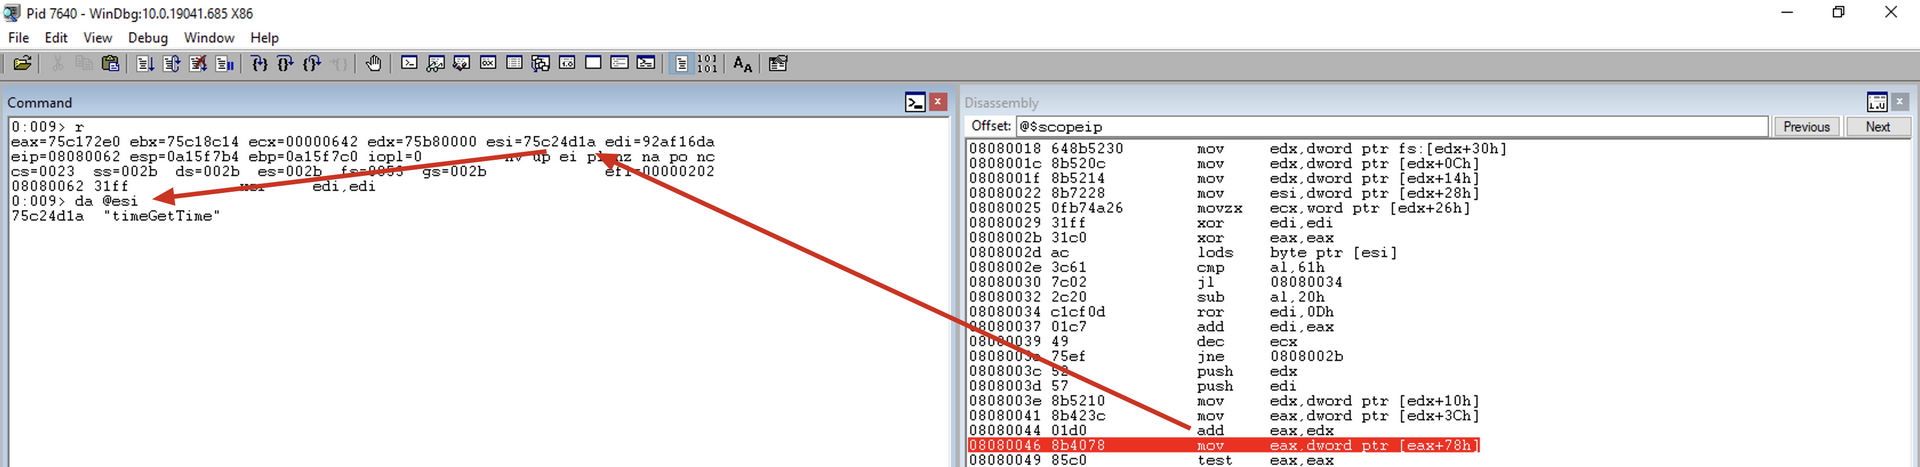
mov esi, [edx+0x28]
This instruction copies the VMA of the module name.
1
2
0:009> du @esi
013d1eb6 "Runner.exe"
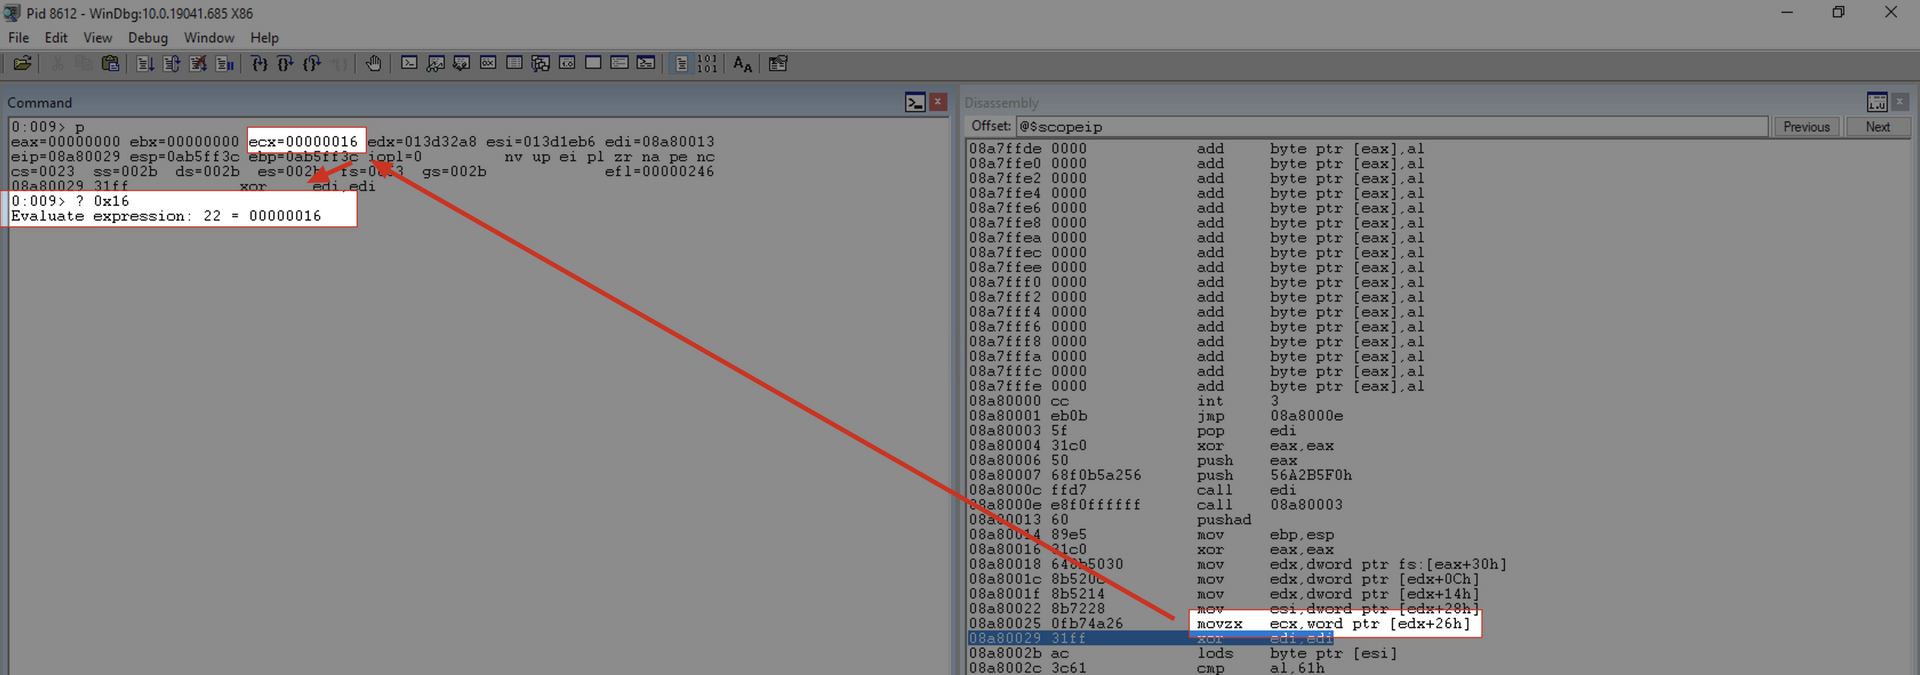
movzx ecx, word [edx+0x26]
This instruction retrieves the length of the module name. Keep in mind that each Unicode character corresponds to 2 bytes, and we also have 2 null bytes at the end. In our scenario:
- Runner.exe = 10 characters + 1 null byte
- 11 * 2 = 22
xor edi, edi
Clears EDI to use it as a storage location for the hash of the module name.
Function loop_modname
1
2
3
4
5
6
loop_modname:
xor eax, eax ; Clear EAX
lodsb ; Read in the next byte of the name
cmp al, 'a' ; Some versions of Windows use lower case module names
jl not_lowercase ;
sub al, 0x20 ; If so, normalize to uppercase
xor eax, eax
Clears EAX.
lodsb
Loads the next byte from ESI into the AL register.
cmp al, ‘a’
Compares the byte received with the character ‘a’.
jl not_lowercase
Before we look at the comparison itself, let’s analyze the ASCII table:
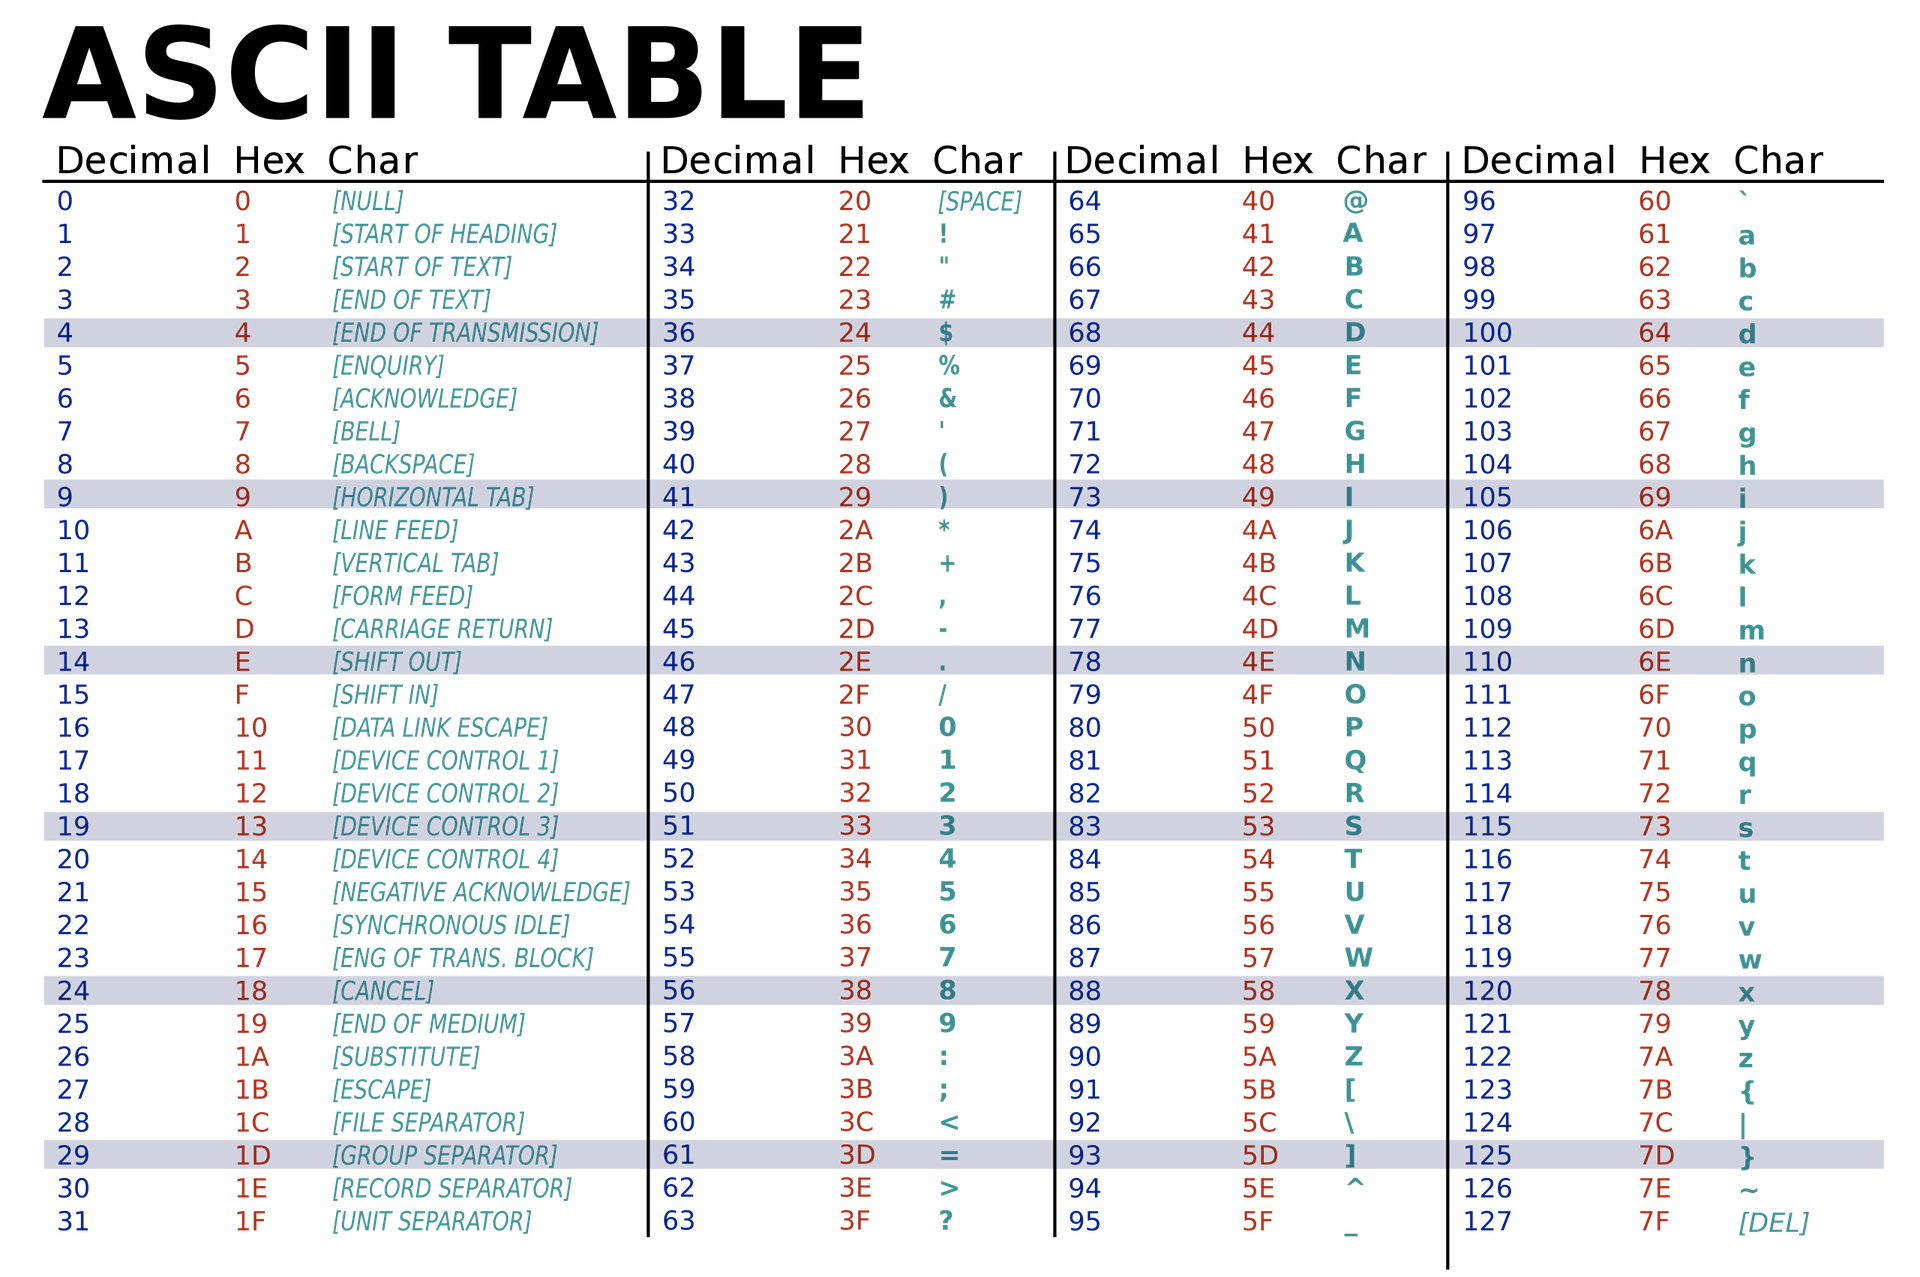
Observe in the ASCII table that lowercase letters range from hexadecimal 0x61 to 0x7a, and uppercase letters range from 0x41 to 0x5a. So:
- Lowercase is exactly 0x20 bytes more than their uppercase representation.
- The hexadecimal value of the lowercase character is greater than its uppercase representation.
The JL (Jump Short if Less) instruction checks if the character in question is less than the character ‘a’. Considering that the decimal/hexadecimal values of uppercase characters are less than those of lowercase characters, if it’s true, the character is uppercase, and in this scenario, it jumps to the not_lowercase function.
sub al, 0x20
If the character is lowercase, subtracting 0x20 will turn it into uppercase.
Function not_lowercase - Part 2 Continued
In this phase of the function, we are retrieving information about the exported functions from the current module.
1
2
3
4
5
6
7
8
9
10
11
12
; Proceed to iterate the export address table,
mov edx, [edx+0x10] ; Get this module's base address
mov eax, [edx+0x3c] ; Get PE header
add eax, edx ; Add the module's base address
mov eax, [eax+0x78] ; Get the export table's RVA
test eax, eax ; Test if no export address table is present
jz get_next_mod1 ; If no EAT present, process the next module
add eax, edx ; Add the module's base address
push eax ; Save the current module's EAT
mov ecx, [eax+0x18] ; Get the number of function names
mov ebx, [eax+0x20] ; Get the RVA of the function names
add ebx, edx ; Add the module's base address
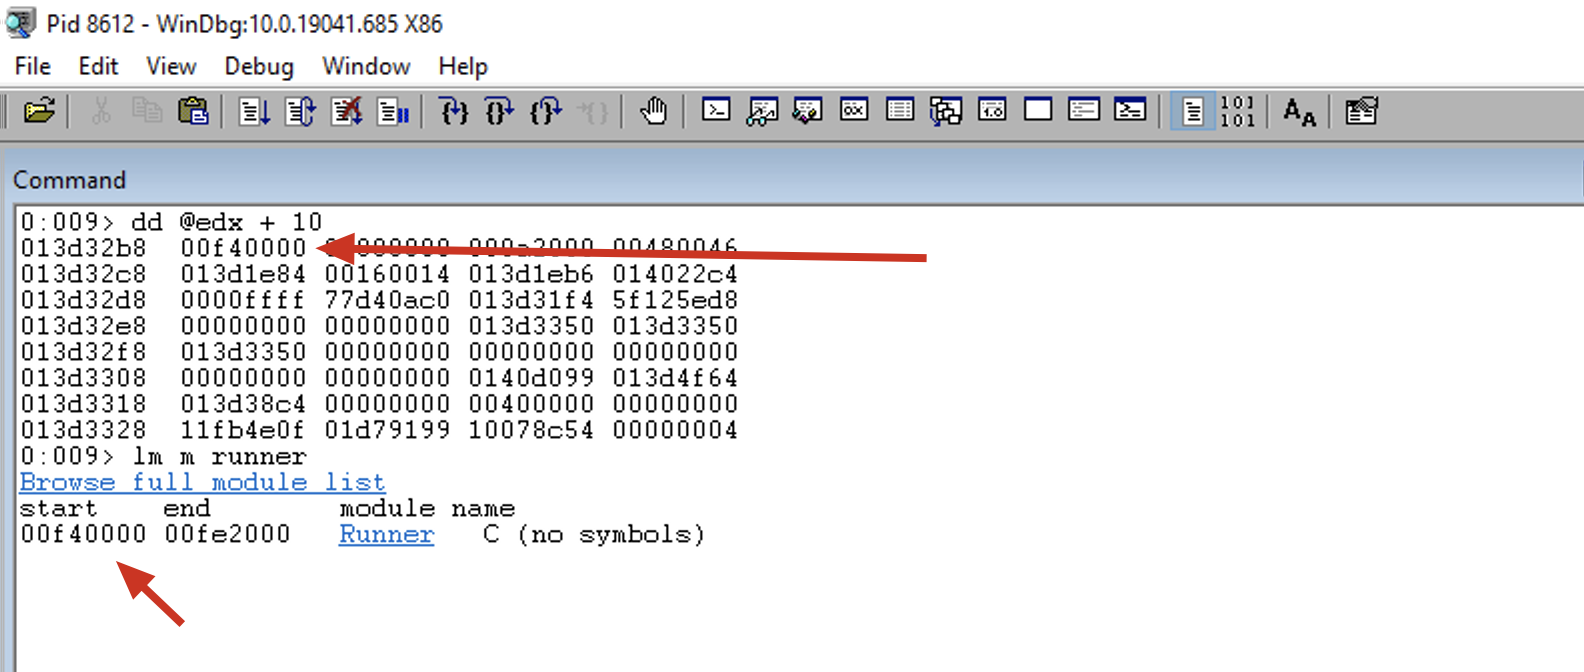
mov edx, [edx+0x10]
At this point, EDX still holds the address of the _LIST_ENTRY structure of the current module. So, at its offset 0x10, we have the BaseAddress of the module. This instruction copies the BaseAddress of the module being analyzed to the EDX register.
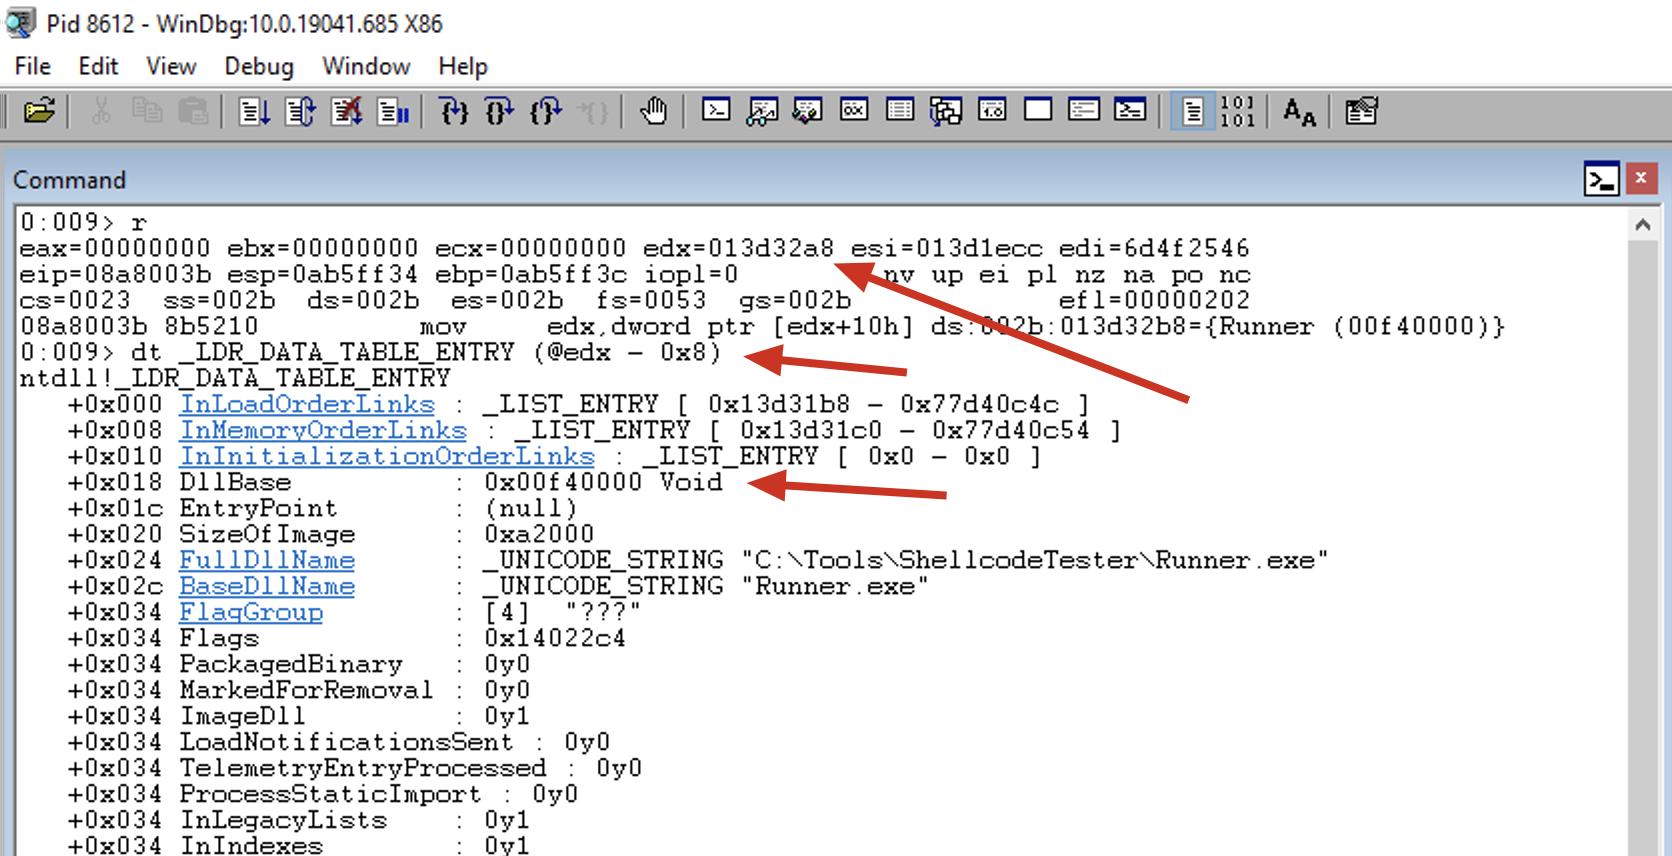
Note that to parse the _LDR_DATA_TABLE_ENTRY structure, we need to subtract 0x08, so the offset shown in the image is 0x18, which is 0x10 + 0x08. This corresponds to the value 0x00f40000.
We can also confirm this value in two more ways:
1
2
3
4
5
6
7
8
9
0:009> dd @edx + 10
013d32b8 00f40000 00000000 000a2000 00480046
013d32c8 013d1e84 00160014 013d1eb6 014022c4
013d32d8 0000ffff 77d40ac0 013d31f4 5f125ed8
013d32e8 00000000 00000000 013d3350 013d3350
013d32f8 013d3350 00000000 00000000 00000000
013d3308 00000000 00000000 0140d099 013d4f64
013d3318 013d38c4 00000000 00400000 00000000
013d3328 11fb4e0f 01d79199 10078c54 00000004
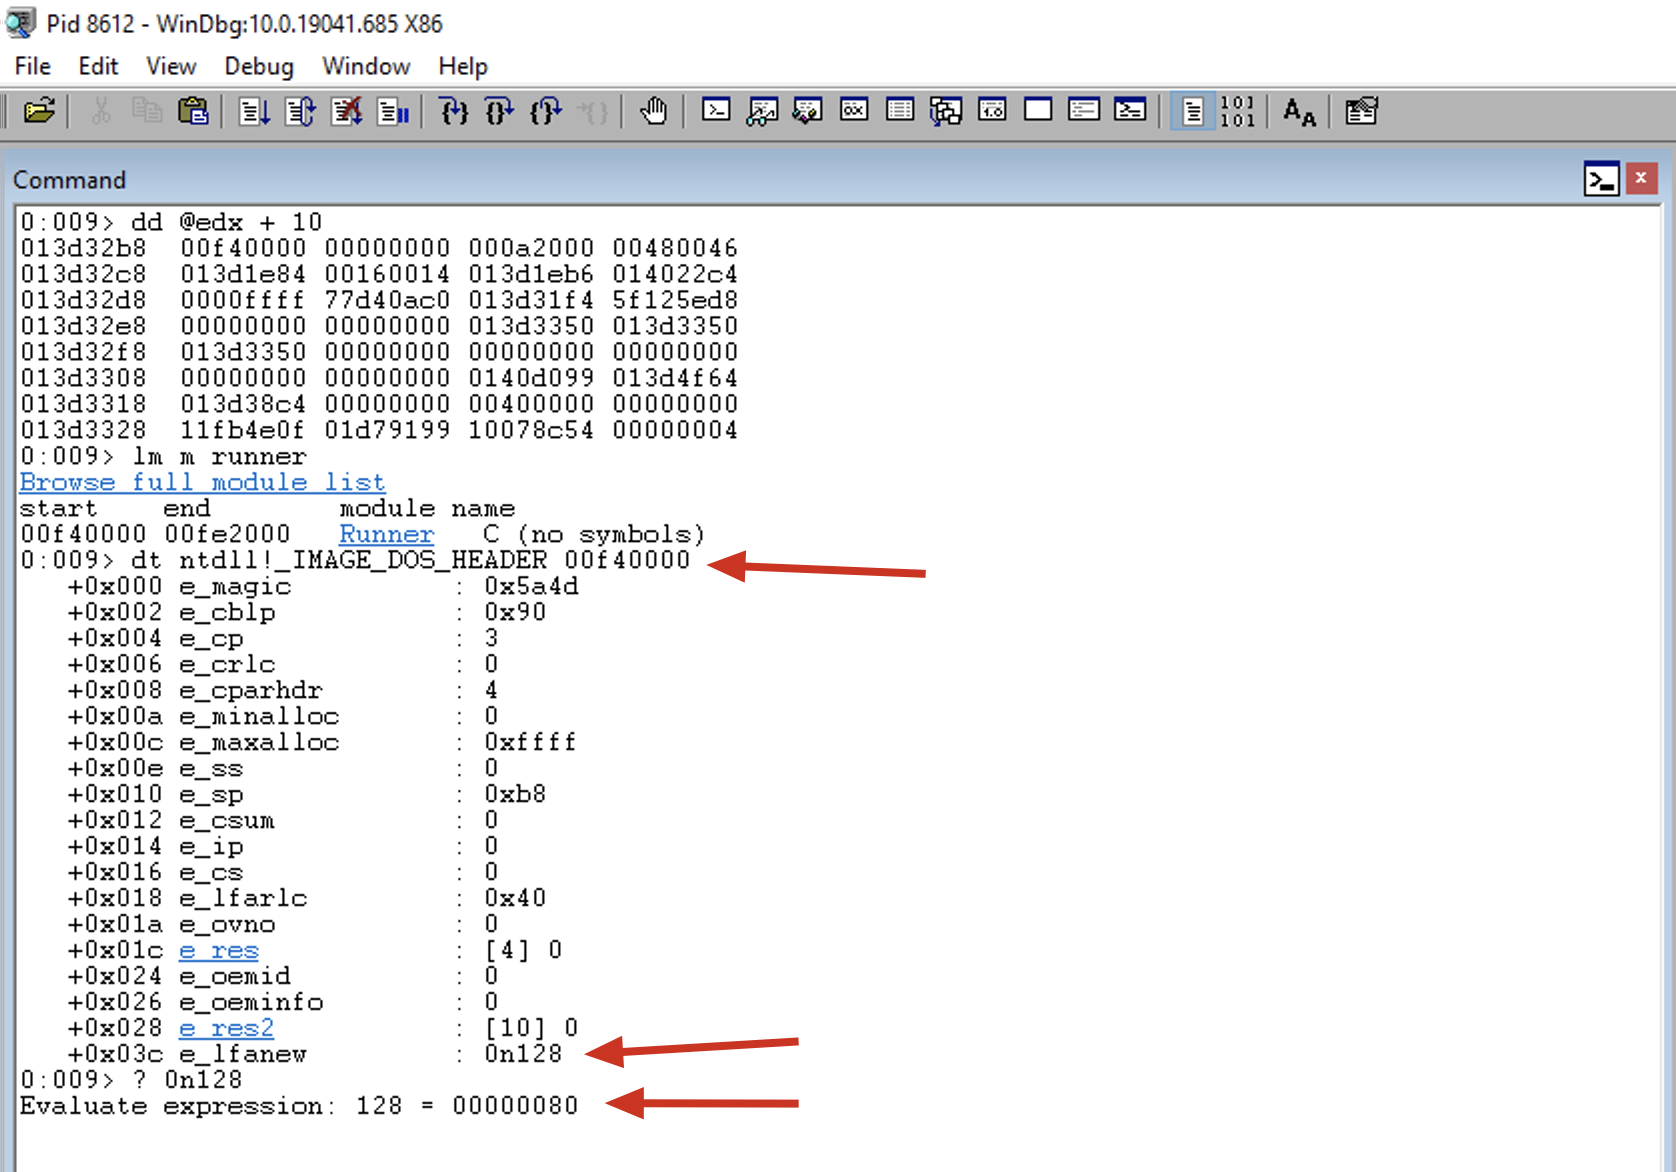
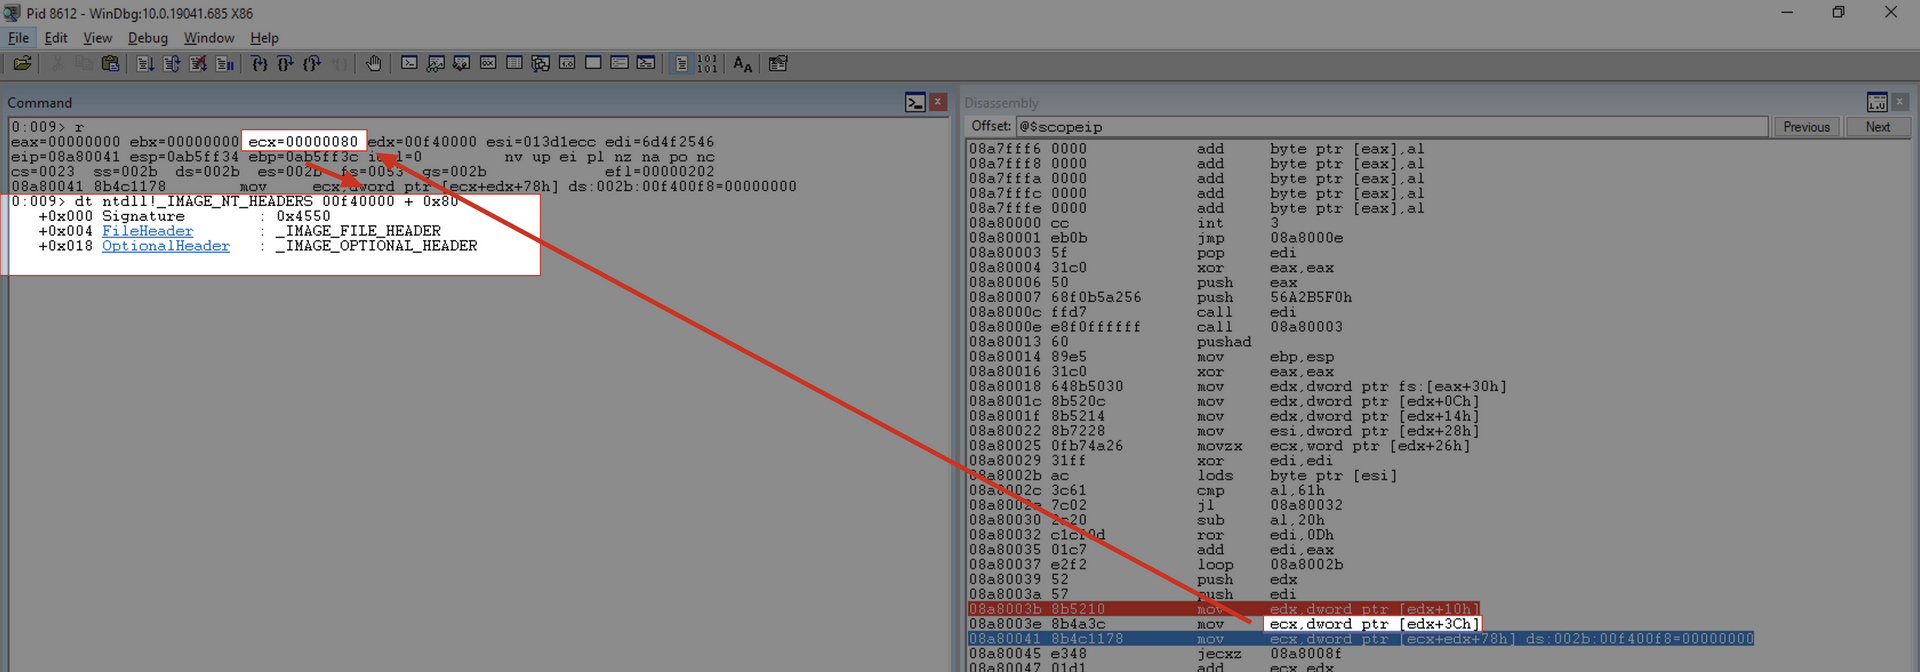
mov eax, [edx+0x3c]
This instruction copies the RVA of the PE Header to the EAX register.
We can see that EAX has been set to 0x80, which means the PE Header is at Base Address + 0x80, as shown in the following output:
1
2
3
4
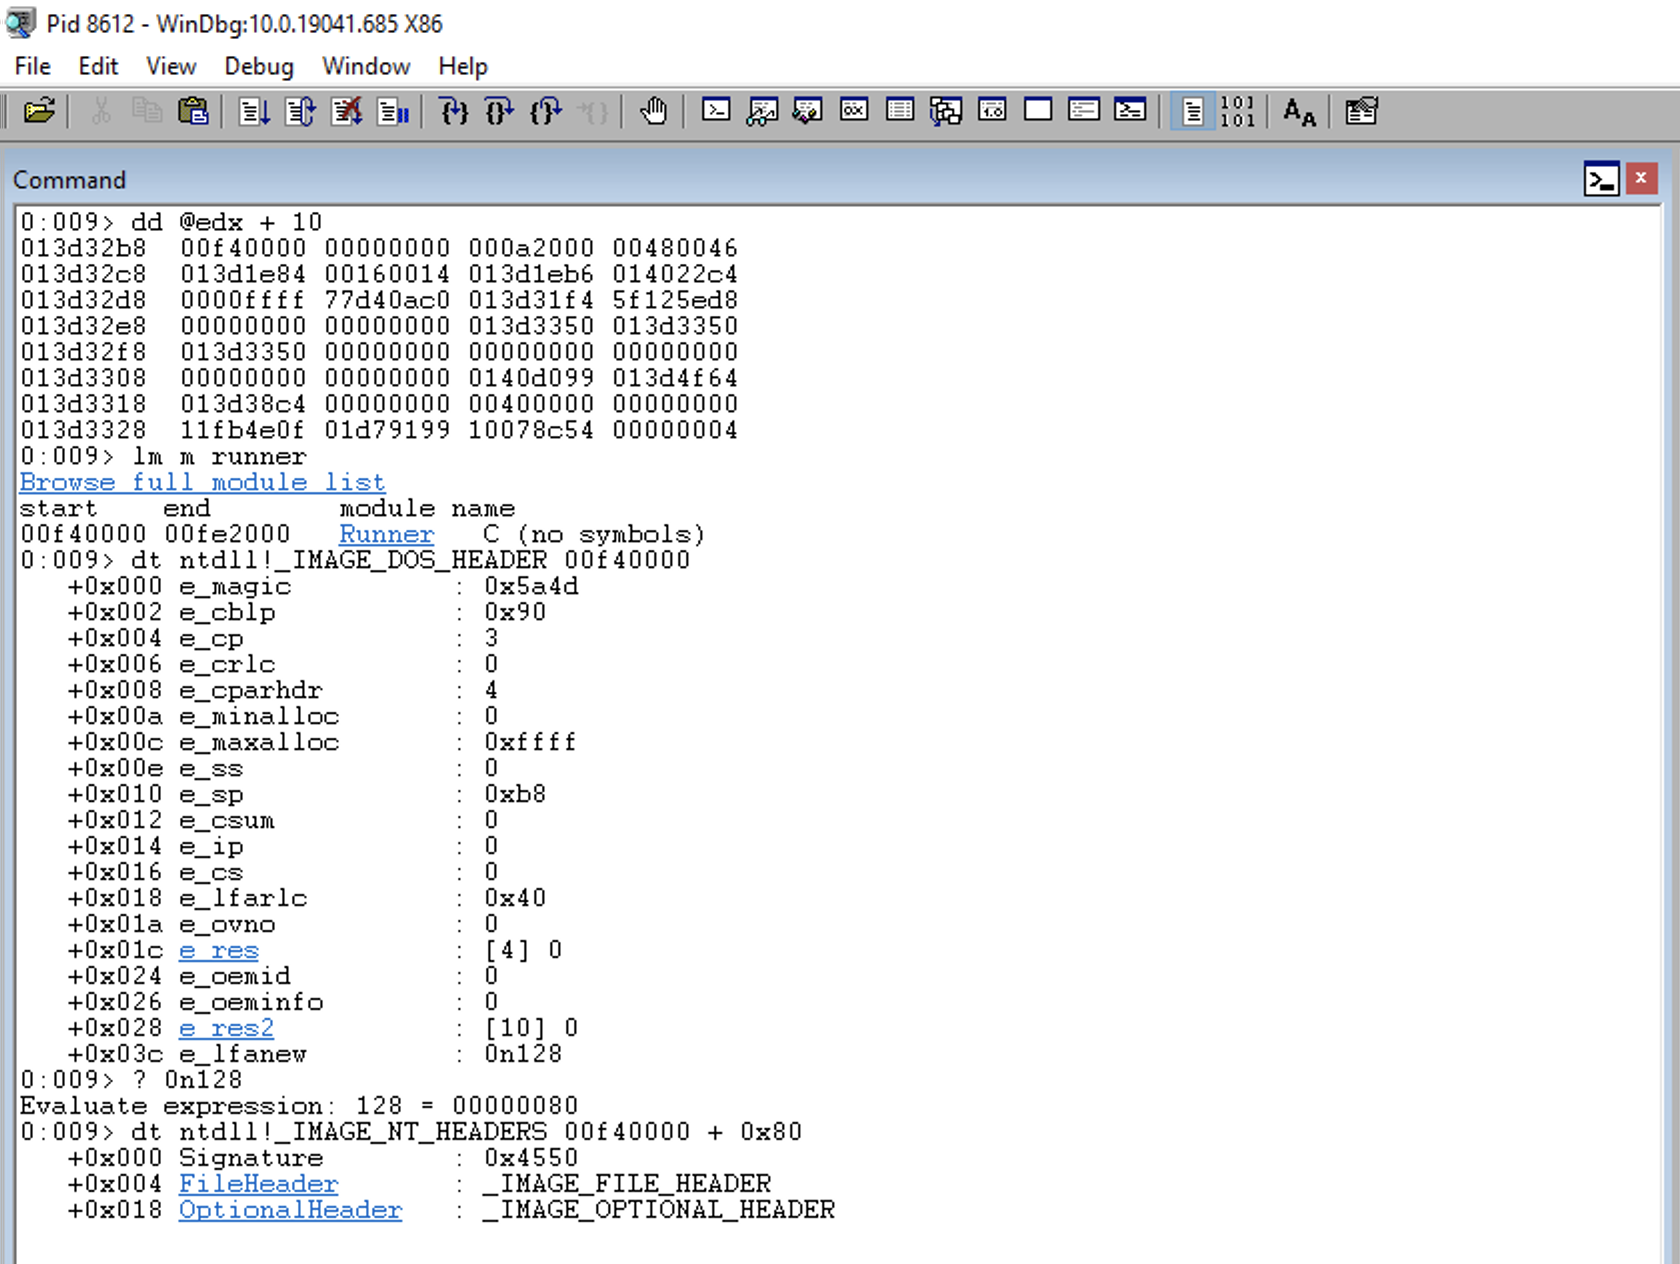
0:009> dt ntdll!_IMAGE_NT_HEADERS 00f40000 + 0x80
+0x000 Signature : 0x4550
+0x004 FileHeader : _IMAGE_FILE_HEADER
+0x018 OptionalHeader : _IMAGE_OPTIONAL_HEADER
Additionally, we can see the additional headers at Offset 0x80 relative to the PE Header:
1
2
3
4
5
6
7
8
9
10
11
12
13
14
15
16
17
18
19
20
21
22
23
24
25
26
27
28
29
30
31
32
33
34
0:009> dt ntdll!_IMAGE_OPTIONAL_HEADER 00f40000 + 0x80 + 0x18
+0x000 Magic : 0x10b
+0x002 MajorLinkerVersion : 0x30 '0'
+0x003 MinorLinkerVersion : 0 ''
+0x004 SizeOfCode : 0x51e00
+0x008 SizeOfInitializedData : 0x4b800
+0x00c SizeOfUninitializedData : 0
+0x010 AddressOfEntryPoint : 0x53cf2
+0x014 BaseOfCode : 0x2000
+0x018 BaseOfData : 0x54000
+0x01c ImageBase : 0x400000
+0x020 SectionAlignment : 0x2000


+0x024 FileAlignment : 0x200
+0x028 MajorOperatingSystemVersion : 4
+0x02a MinorOperatingSystemVersion : 0
+0x02c MajorImageVersion : 0
+0x02e MinorImageVersion : 0
+0x030 MajorSubsystemVersion : 4
+0x032 MinorSubsystemVersion : 0
+0x034 Win32VersionValue : 0
+0x038 SizeOfImage : 0xa2000
+0x03c SizeOfHeaders : 0x200
+0x040 CheckSum : 0
+0x044 Subsystem : 2
+0x046 DllCharacteristics : 0x8540
+0x048 SizeOfStackReserve : 0x100000
+0x04c SizeOfStackCommit : 0x1000
+0x050 SizeOfHeapReserve : 0x100000
+0x054 SizeOfHeapCommit : 0x1000
+0x058 LoaderFlags : 0
+0x05c NumberOfRvaAndSizes : 0x10
+0x060 DataDirectory : [16] _IMAGE_DATA_DIRECTORY

Within the additional headers, we can find that the Export table (DataDirectory) is located at Offset 0x60 relative to the additional headers.
Therefore, if we consider that the additional headers are at 0x18 in relation to the PE Header, we can infer that, with respect to the PE Header, the Export table is at (0x18 + 0x60) = 0x78.
add eax, edx
Adds the RVA with the BaseAddress of the current module to obtain the VMA of the PE Header and saves it in the EAX register.
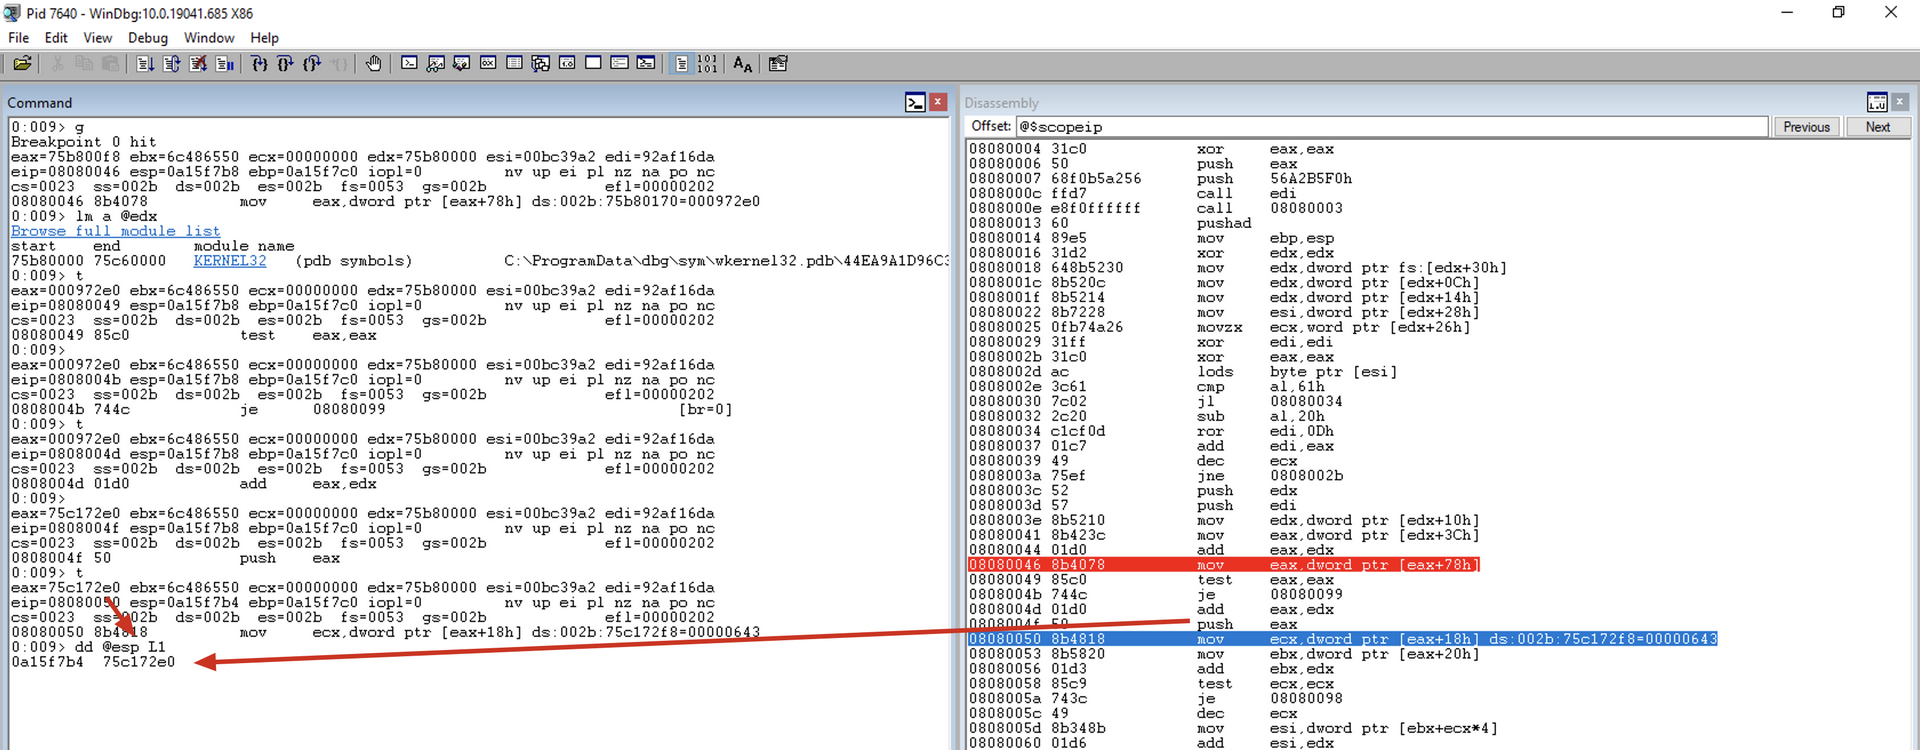
mov eax, [eax+0x78]
Copies the RVA of the export table to the EAX register.
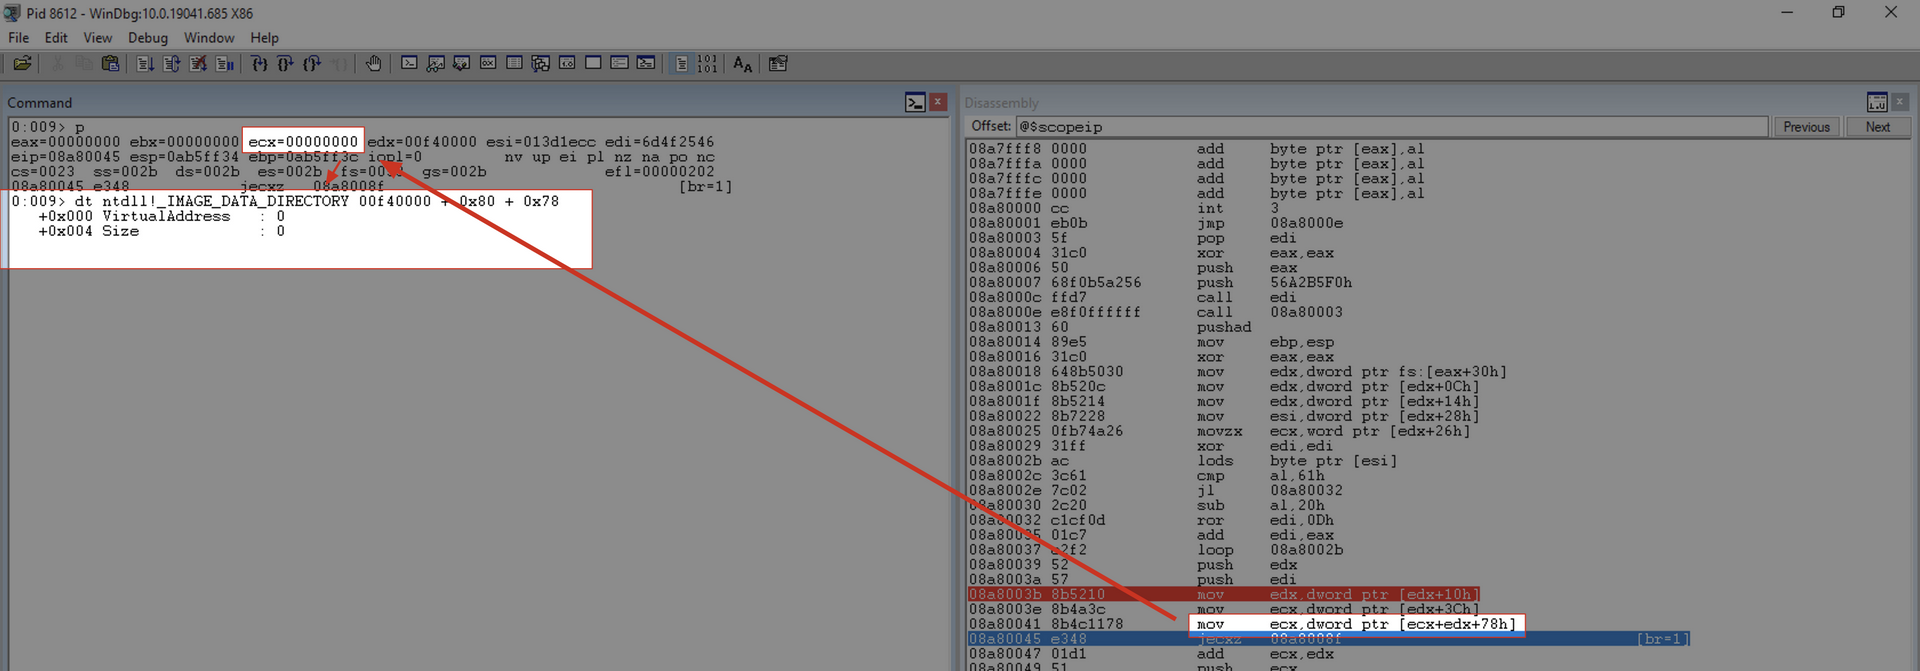
As you can see, this is a scenario where the current module does not have any exported functions. Therefore, we will add a breakpoint at this point in the code to execute the code until it reaches the desired module. Since the exitprocess function is within the kernel32.dll module, we will execute the code until it reaches this point within the kernel32.dll module.

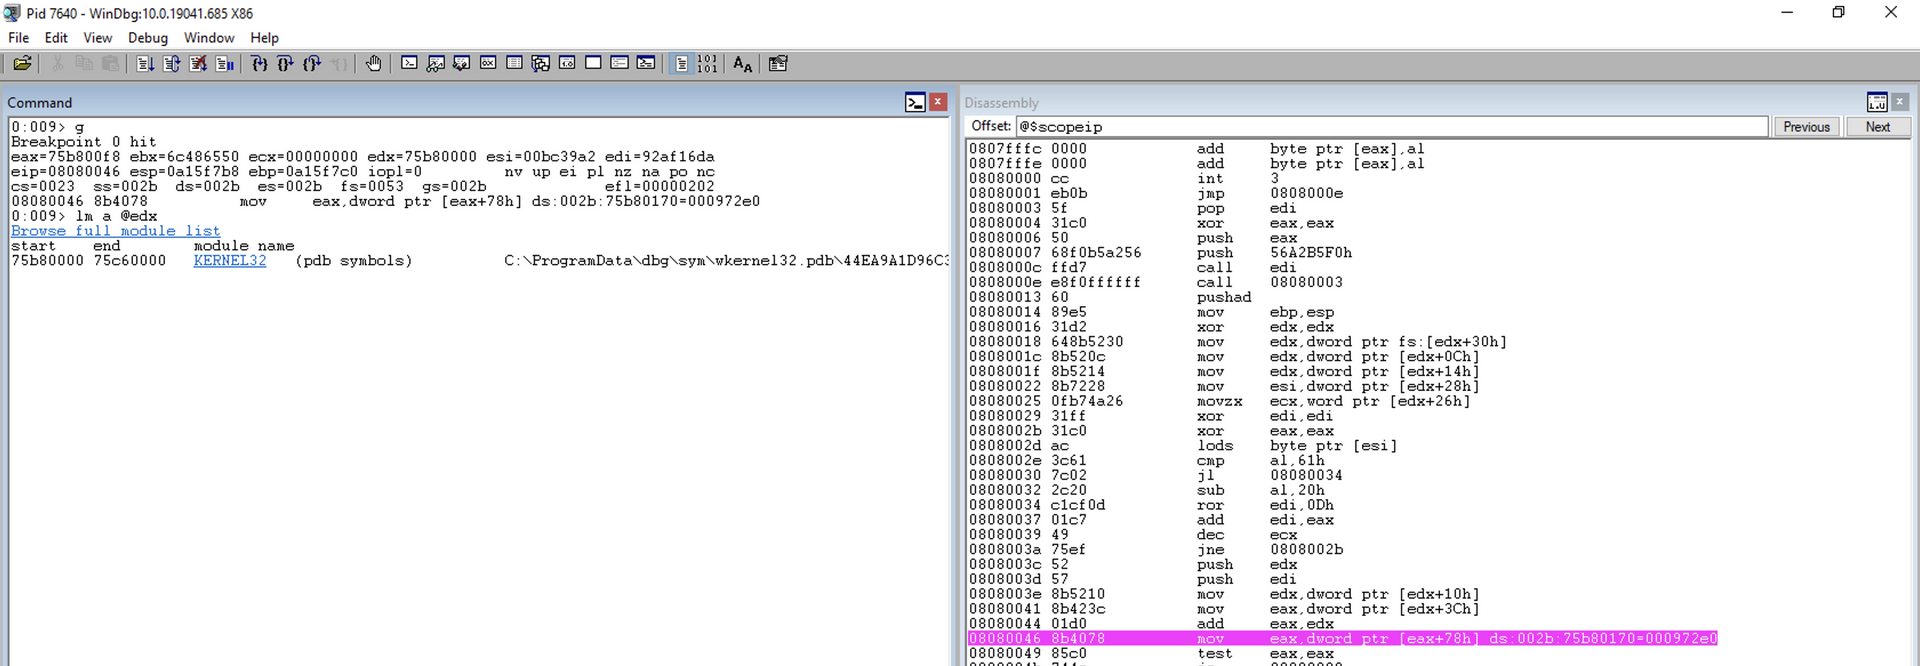
Note that now we will execute the “g” command, and the execution proceeds until our breakpoint. Subsequently, we can inspect which module we are dealing with using the lm a @edx command, as we have the BaseAddress of the current module in ECX.
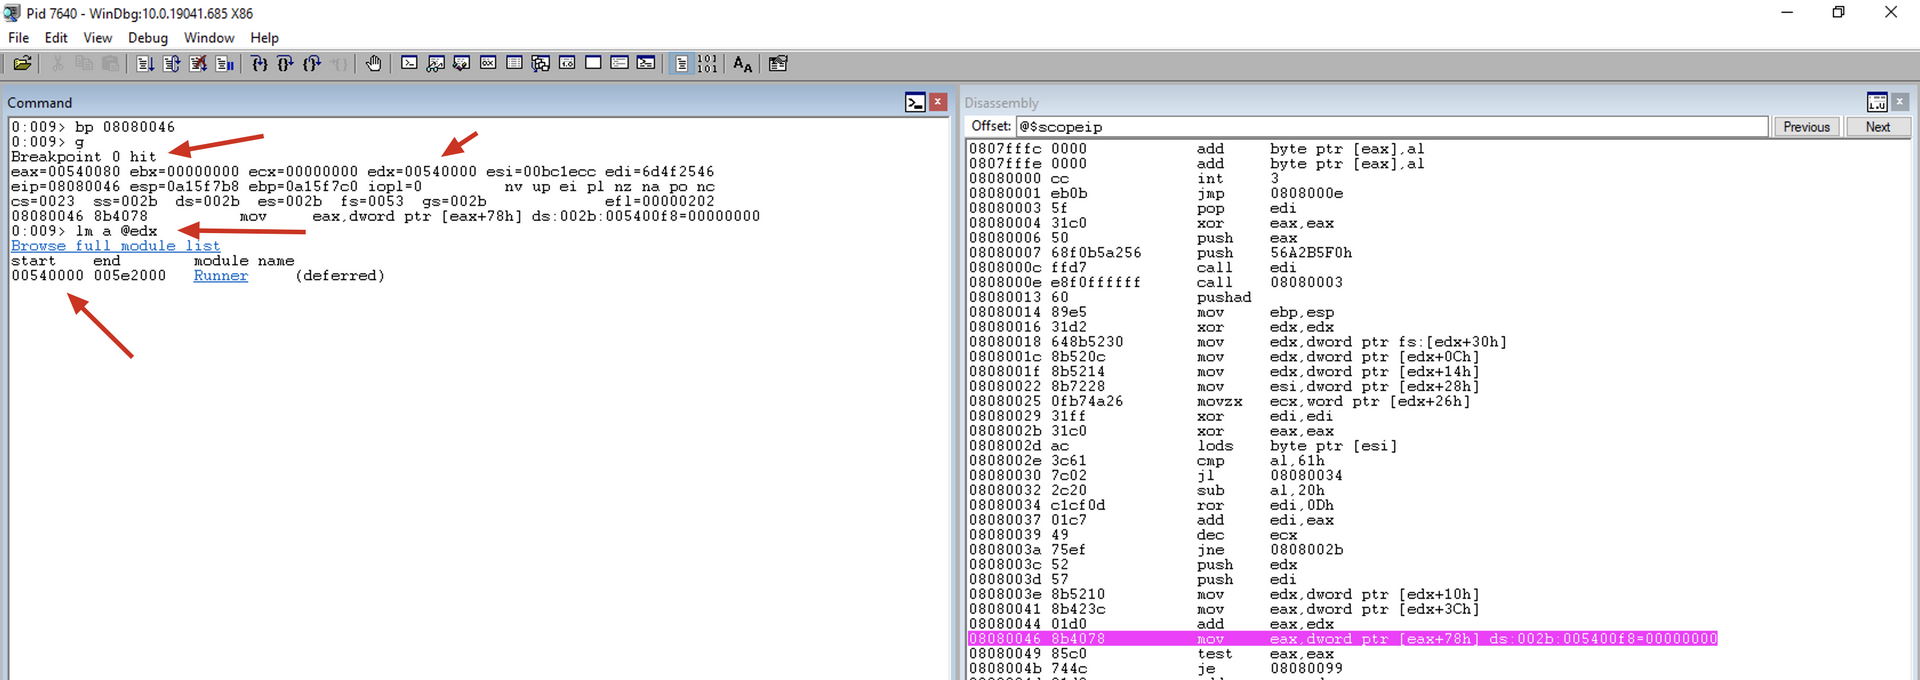
Once we have reached kernel32.dll, we can continue the inspection.
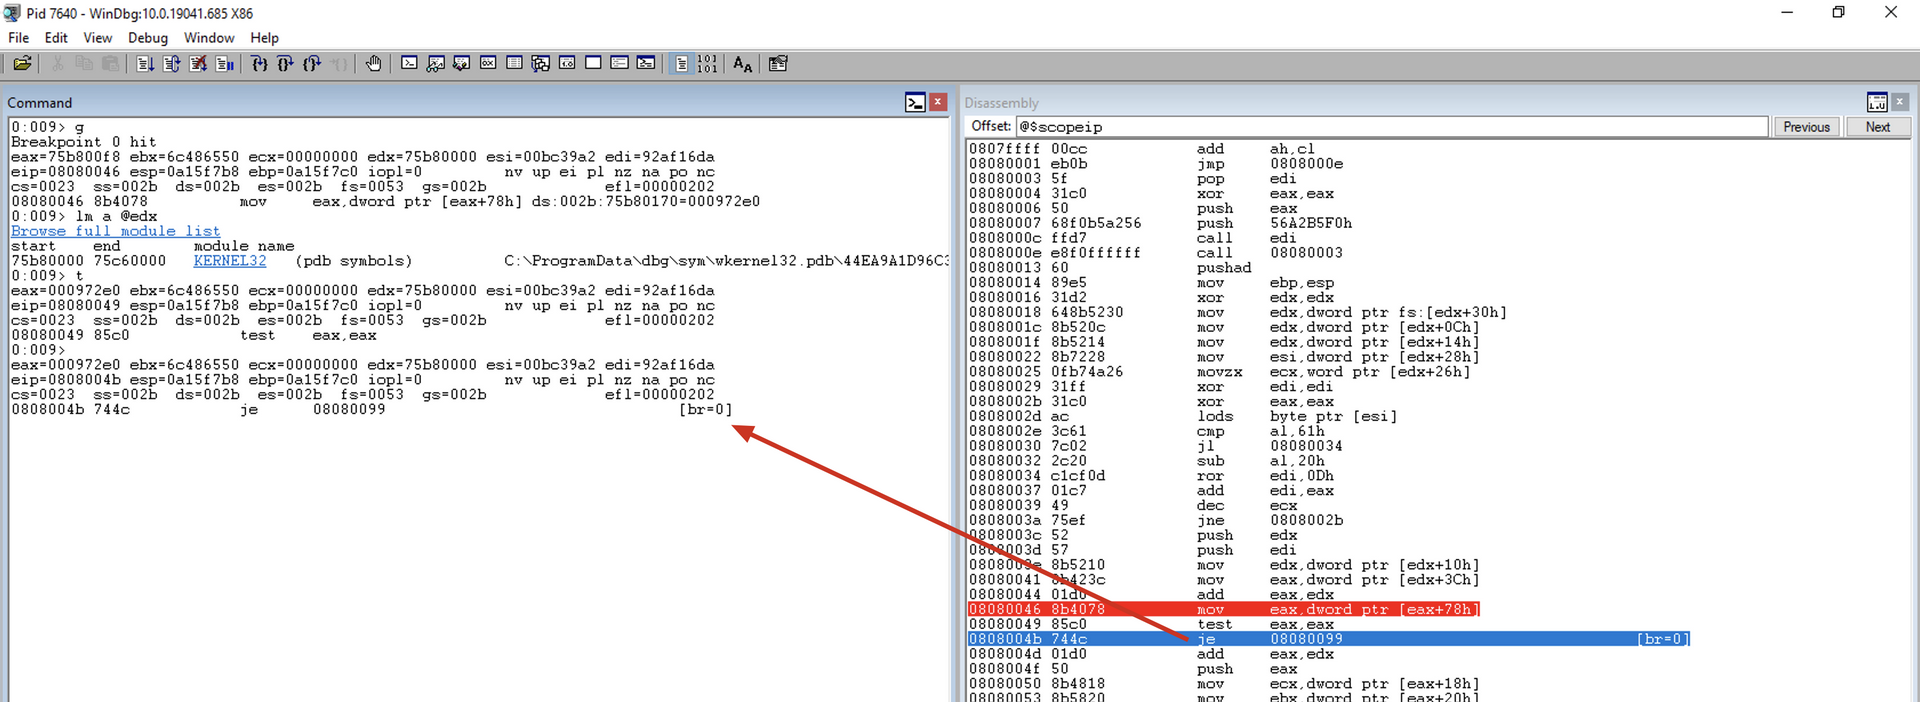
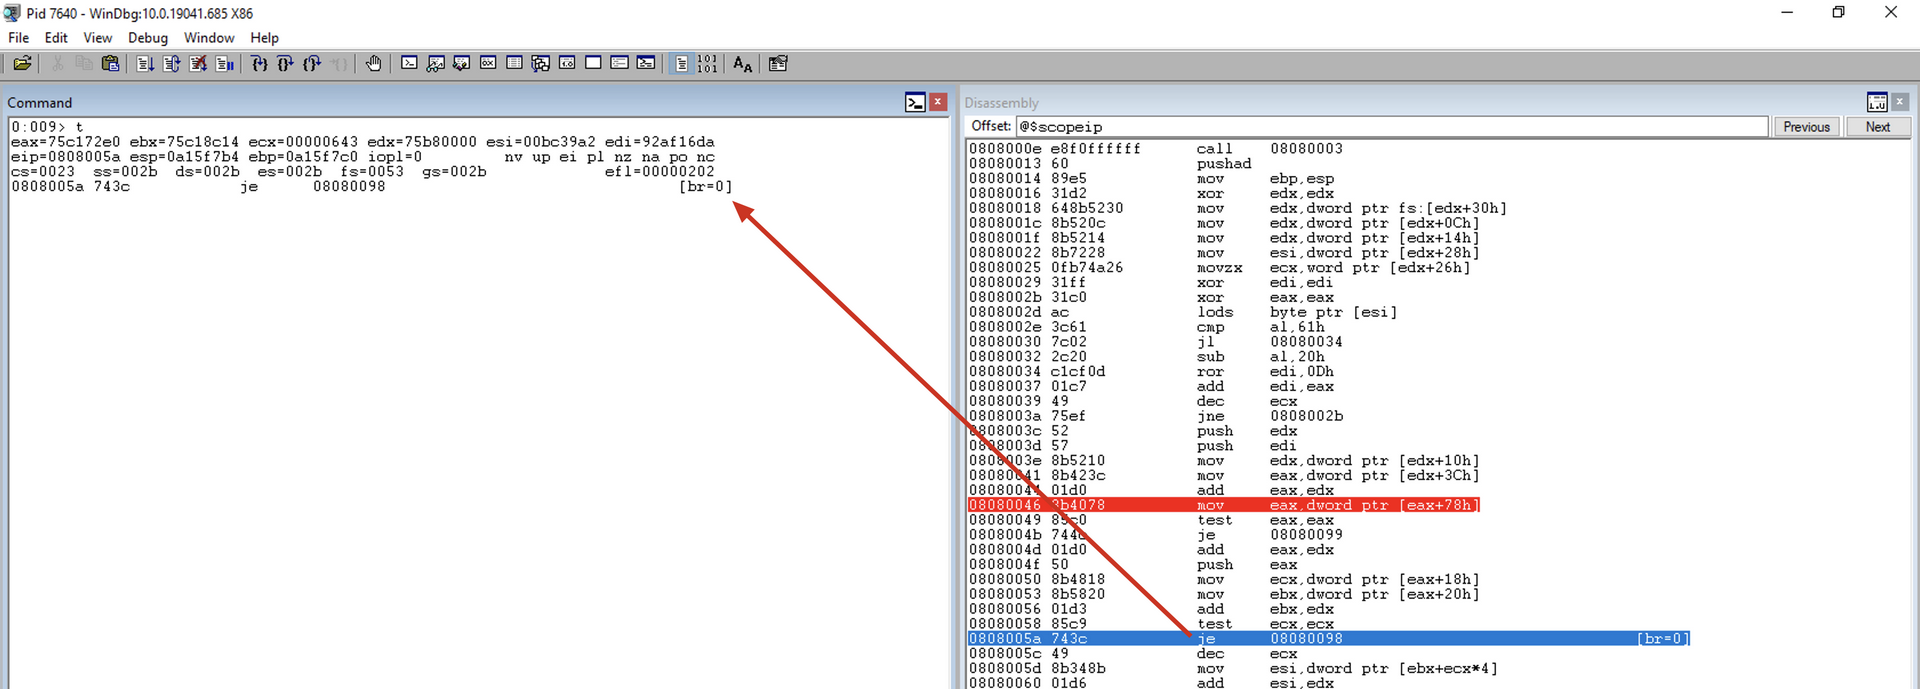
test eax, eax
Checks if there is an export table.
If the table exists, i.e., EAX is not zero, the JMP instruction will not occur.
jz get_next_mod1
Jump near if zero. It checks if the result of the last mathematical operation was zero. If yes, it performs the jump, verifying that there is no export table. Otherwise, it continues to the next instruction.
add eax, edx
Adds the RVA with the BaseAddress of the current module to obtain the VMA of the export table and saves it in the EAX register.

push eax
Saves the VMA of the export table of the current module on the stack.
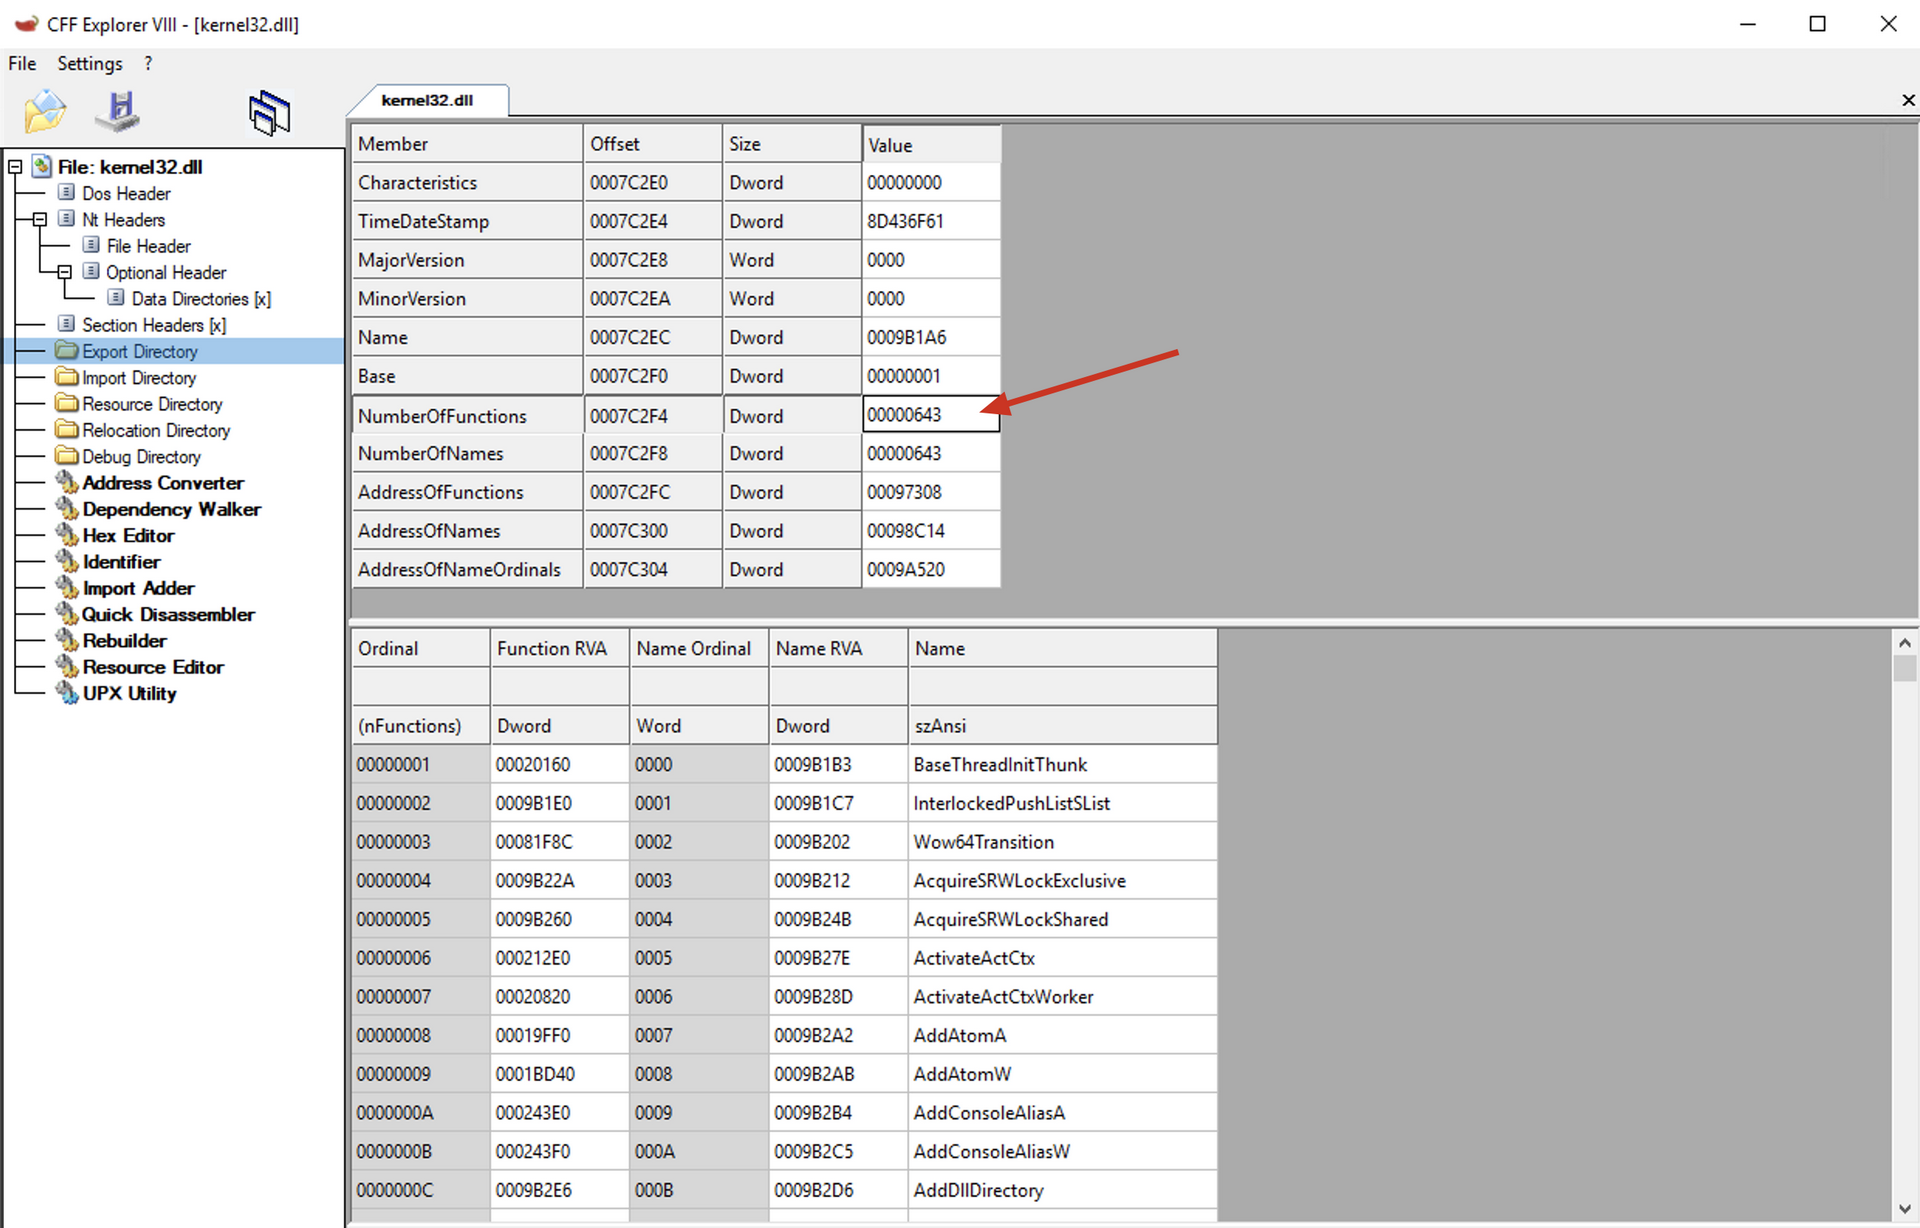
mov ecx, [eax+0x18]
Now that we have the VMA of the export table in EAX, it copies the number of exported functions to the ECX register.
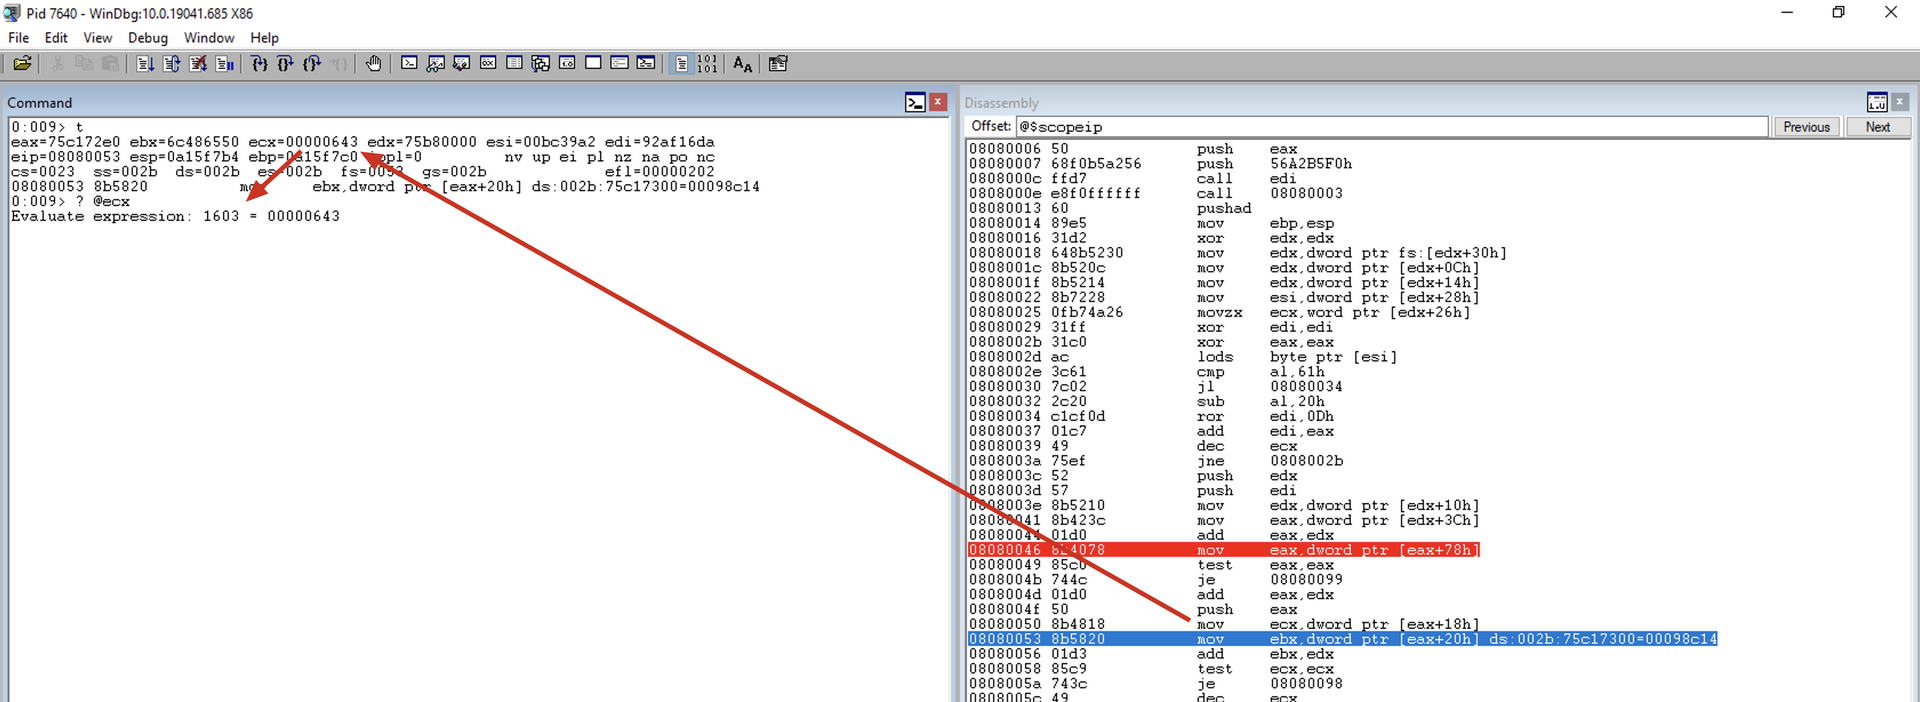
mov ebx, [eax+0x20]
It copies the RVA of the array containing the names of exported functions (AddressOfNames) to the EBX register.
add ebx, edx
Adds the RVA with the BaseAddress of the current module to obtain the VMA of the array containing the names of all functions exported by the current module and saves it in the EBX register.
At this point, we have the memory address with the name of the first function in EBX.
Function get_next_func
1
2
3
4
5
6
7
8
; Computing the module hash + function hash
get_next_func: ;
test ecx, ecx ; Changed from jecxz to accommodate the larger offset produced by random jumps below
jz get_next_mod ; When we reach the start of the EAT (we search backward), process the next module
dec ecx ; Decrement the function name counter
mov esi, [ebx+ecx*4] ; Get RVA of the next module name
add esi, edx ; Add the module's base address
xor edi, edi ; Clear EDI, which will store the hash of the function name
test ecx, ecx
Performs a comparison between ECX and ECX.
jz get_next_mod
Jump near if zero. It jumps to the get_next_mod function if the result of the last mathematical operation is zero, i.e., if ECX (our function counter) reaches zero, it jumps to the code responsible for starting the process of checking the next module. Otherwise, it continues to the next instruction.
ECX is not zero, so the JMP will not occur.
dec ecx
Decrements ECX by 1.
mov esi, [ebx + ecx *
4]
Retrieves the RVA of the function name. Where:
- EBX: Contains the VMA of the beginning of the array that holds the function names.
- ECX: Numeric index within the function.
- ECX * 4: Numeric index multiplied by 4 bytes (32 bits) representing each address containing the function name.
add esi, edx
Adds the RVA with the BaseAddress of the current module to obtain the VMA of the function name and saves it in the ESI register.
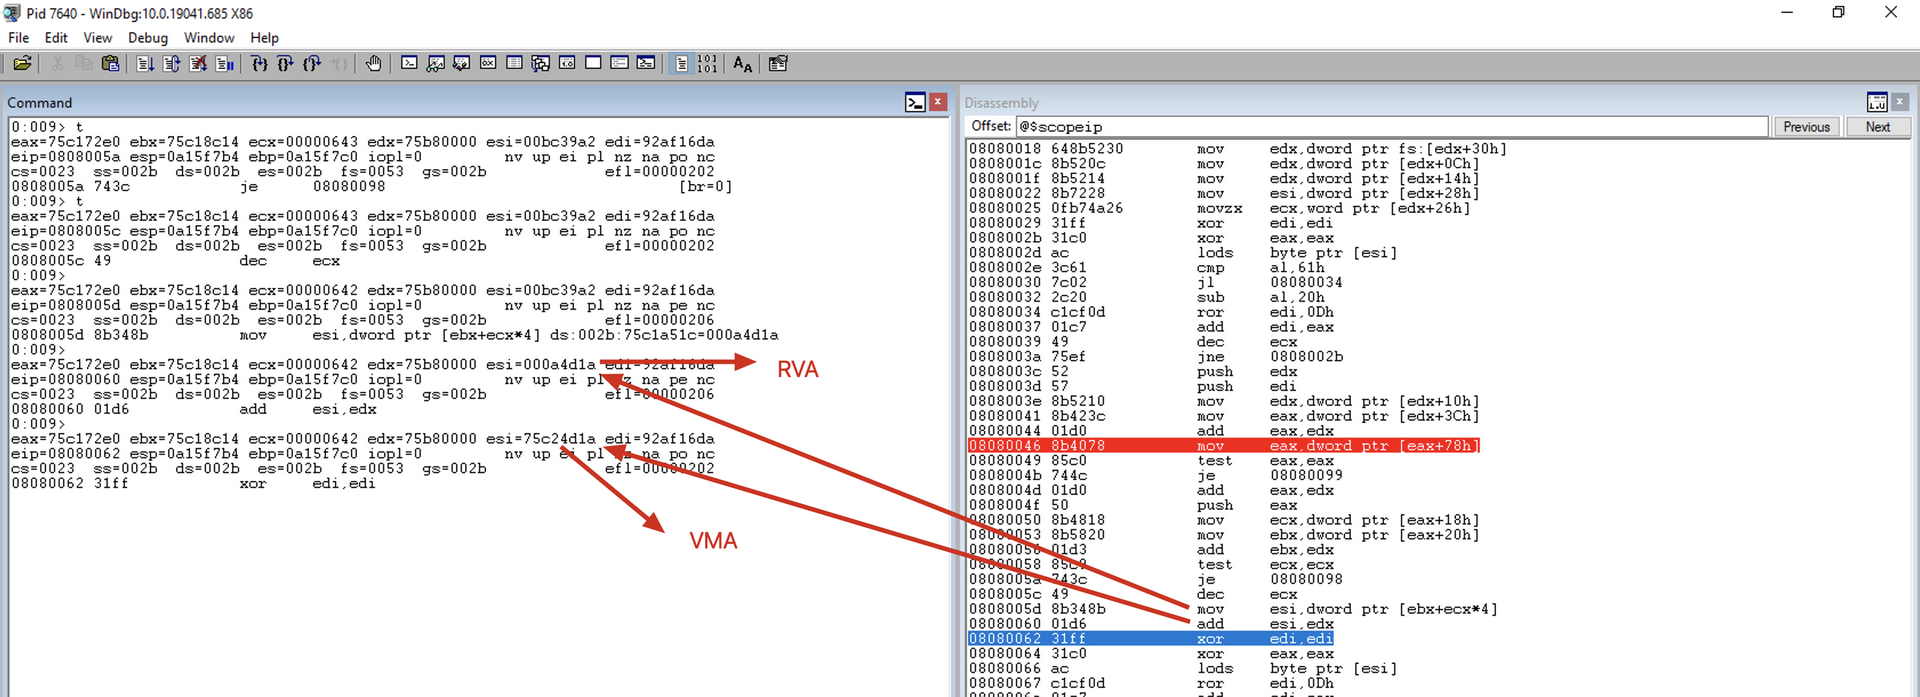
As we decrement ECX during this loop, we effectively traverse the list backward. So, in the first iteration, we have the name of the last function in the array.
xor edi, edi
Clears the EDI register for use as storage for the function hash.
Function loop_funcname
1
2
3
4
5
6
7
8
9
10
11
12
13
14
15
16
17
18
19
loop_funcname: ;
xor eax, eax ; Clear EAX
lodsb ; Read in the next byte of the ASCII function name
ror edi, 0xd ; Rotate right our hash value
add edi, eax ; Add the next byte of the name
cmp al, ah ; Compare AL (the next byte from the name) to AH (null)
jne loop_funcname ; If we have not reached the null terminator, continue
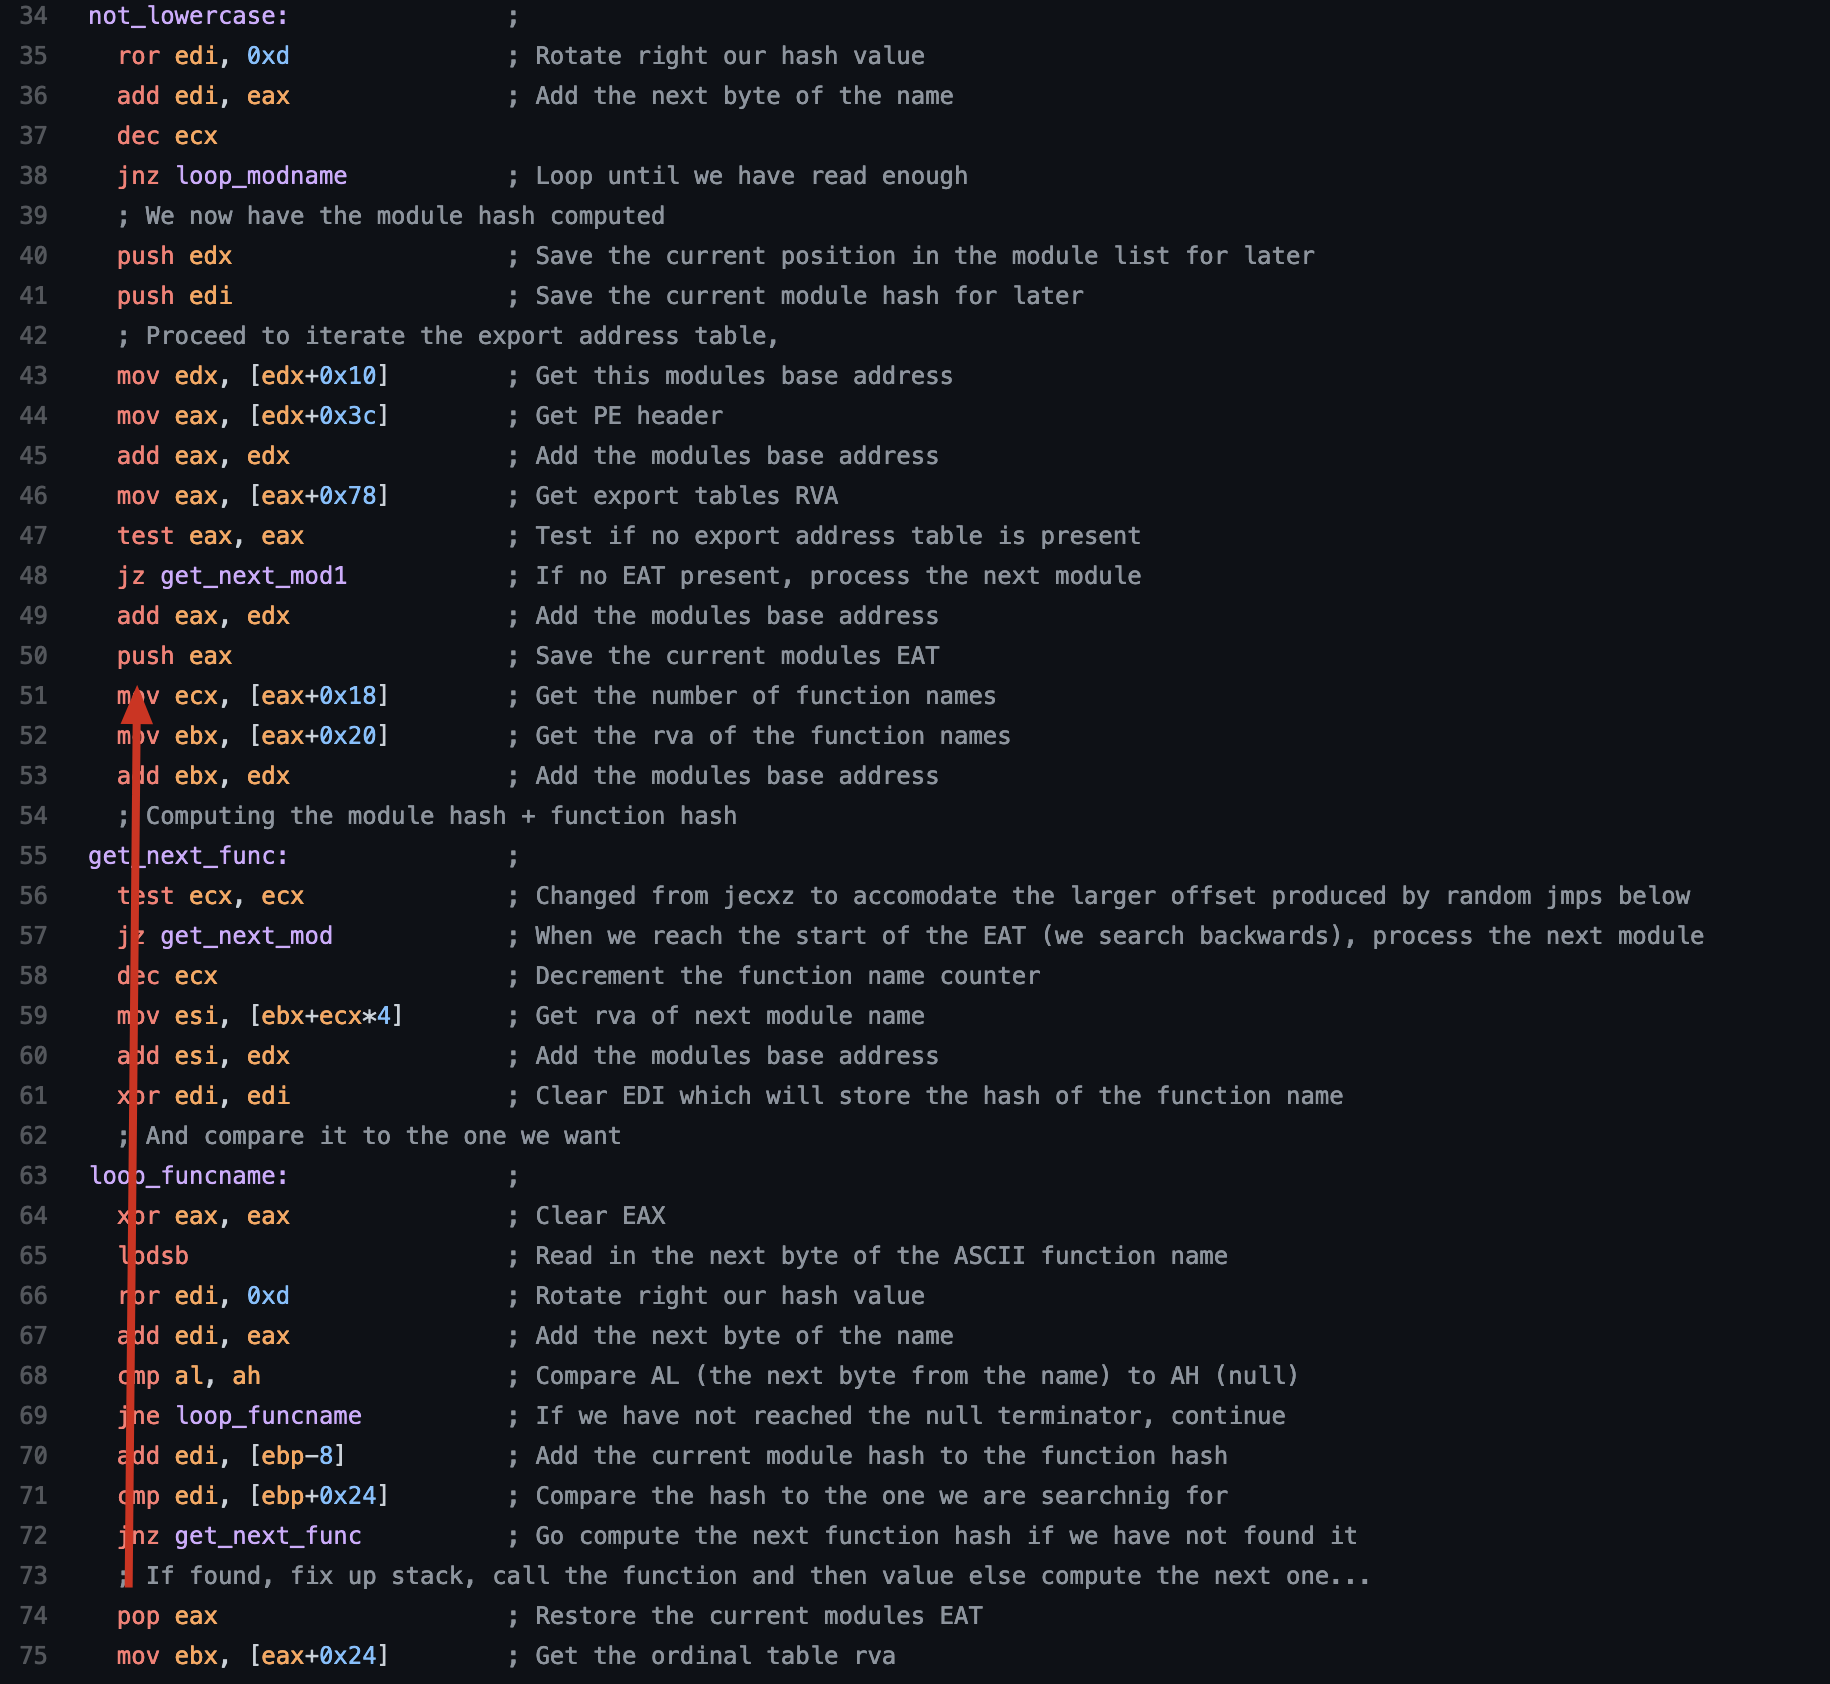
add edi, [ebp-8] ; Add the current module hash to the function hash
cmp edi, [ebp+0x24] ; Compare the hash to the one we are searching for
jnz get_next_func ; Go compute the next function hash if we have not found it
; If found, fix up stack, call the function, and then value else compute the next one...
pop eax ; Restore the current module's EAT
mov ebx, [eax+0x24] ; Get the ordinal table RVA
add ebx, edx ; Add the module's base address
mov cx, [ebx+2*ecx] ; Get the desired function's ordinal
mov ebx, [eax+0x1c] ; Get the function addresses table RVA
add ebx, edx ; Add the module's base address
mov eax, [ebx+4*ecx] ; Get the desired function's RVA
add eax, edx ; Add the module's base address to get the function's actual VA
xor eax, eax
Clears the EAX register.
lodsb
Loads the next byte from ESI into the AL register.
ror edi, 0xd
Rotates the hash value in EDI right by 0xd bits.
add edi, eax
Adds the next byte from the name to the value in EDI and saves the result in EDI.
cmp al, ah
Compares AL (the next byte from the name) to AH (null).
jne loop_funcname
Jump near if not equal. It checks if the result of the last comparison is not equal, i.e., if the last byte copied into AL is not zero. If it’s not zero, it returns to the beginning of the loop_funcname function to continue copying the bytes of the function name and thus calculate the hash. If it has reached the null terminator \0 (NULL Byte), it continues to the next instruction.
add edi, [ebp-8]
Adds the hash of the function name, which was just calculated, to the hash of the module name calculated earlier and saved in ebp-8, saving the result in the EDI register.
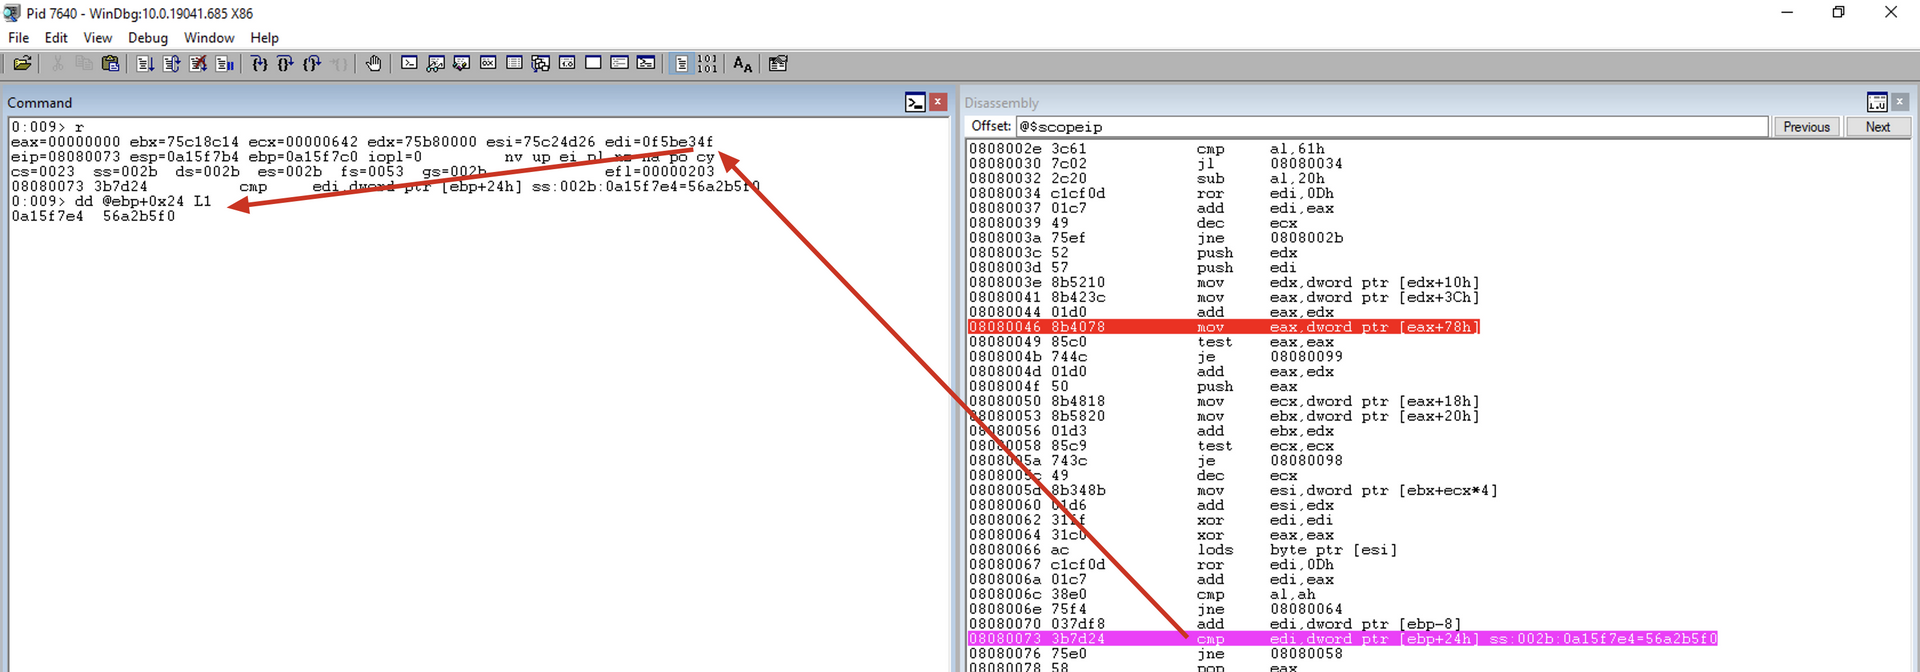
cmp edi, [ebp+0x24]
Compares if the calculated hash is equal to the desired hash. Where:
- EDI: Hash calculated with the module name + function name.
- EBP + 0x24: Memory location holding the hash of the desired function. In our example, this hash was added to the stack with the PUSH 0x56A2B5F0, which is the hash of the
ExitProcessfunction.
We will set a breakpoint in this function to check the final hash of the function after calculating the hash of each function name + the module hash to later verify if it matches the desired hash.
jnz get_next_func
Jump near if not zero. If the previous comparison indicates different hashes, the code will be directed to the get_next_func function, responsible for checking the next exported function of the current module. If the hashes are equal, it continues to the flow of the next instruction.
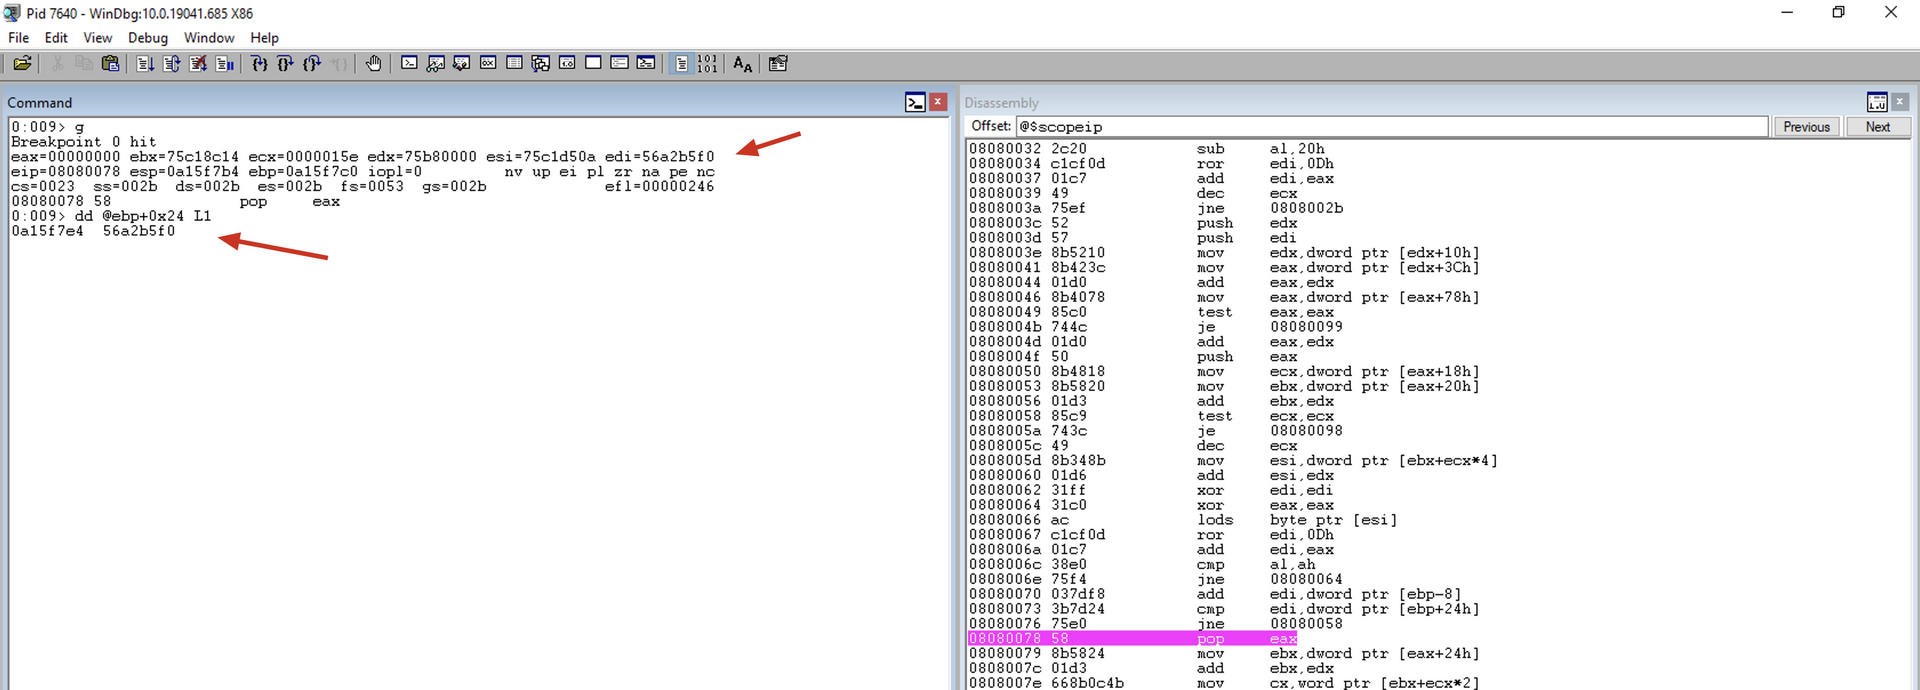
pop eax
Restores the VMA of the export table of the current module to the EAX register. This value was saved on the stack by the previous PUSH EAX.
We set a breakpoint at this instruction because we will only reach it when the hashes are equal, and we will release the execution afterward.
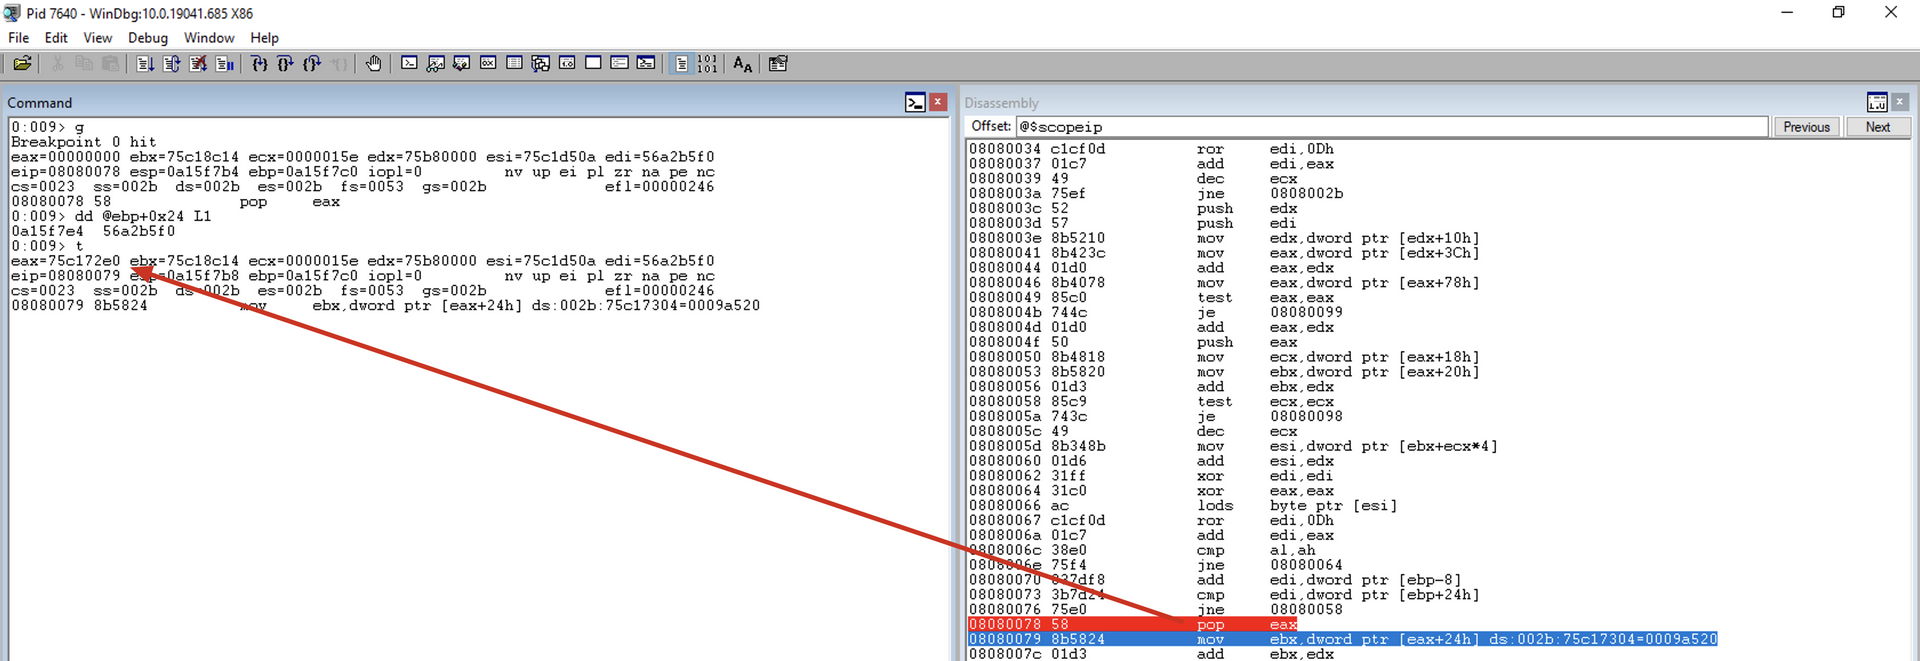
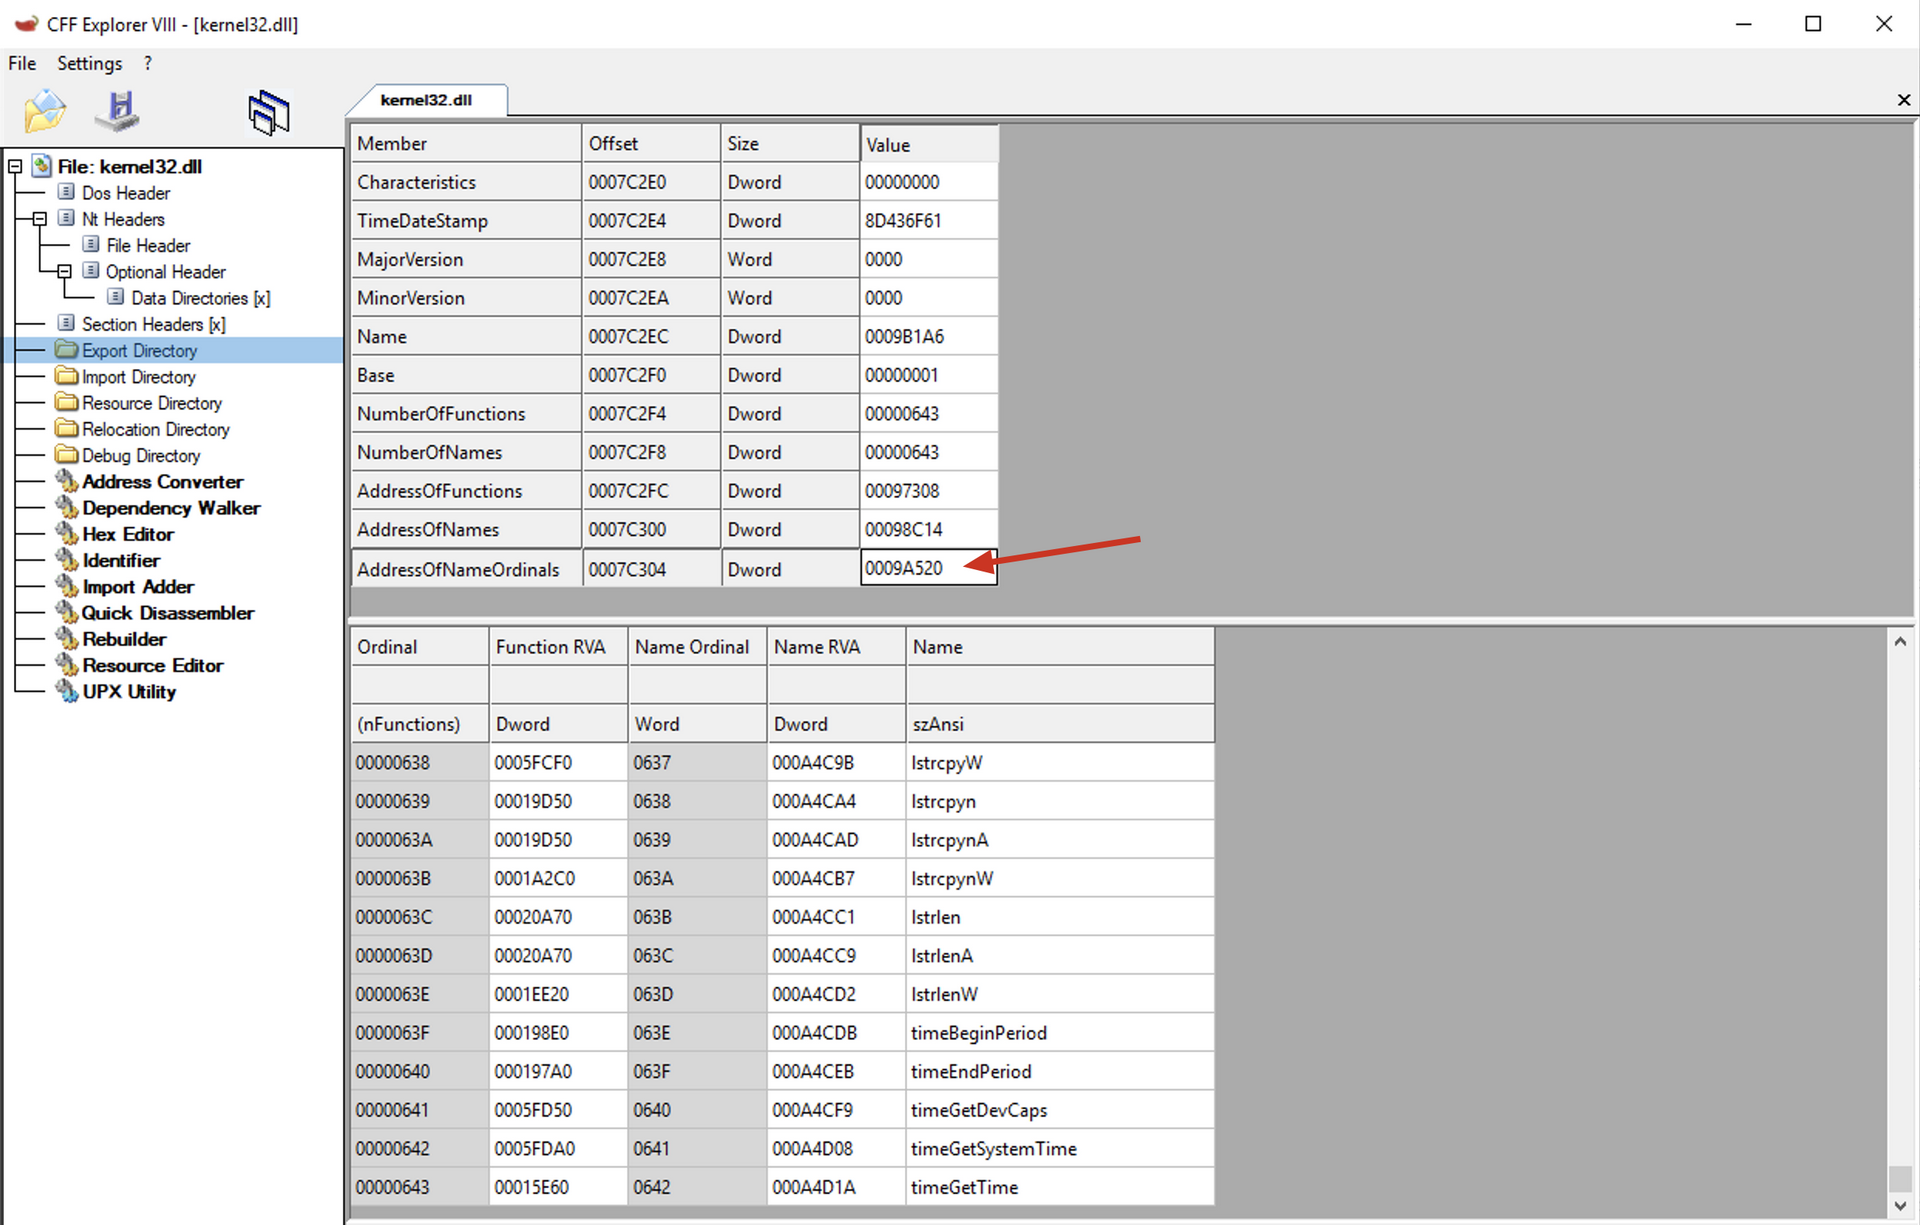
mov ebx, [eax+0x24]
Remembering the Export table structure

At offset 0x24, we have the AddressOfNameOrdinals array, so this instruction copies the VMA of the AddressOfNameOrdinals array into the EBX register.
add ebx, edx
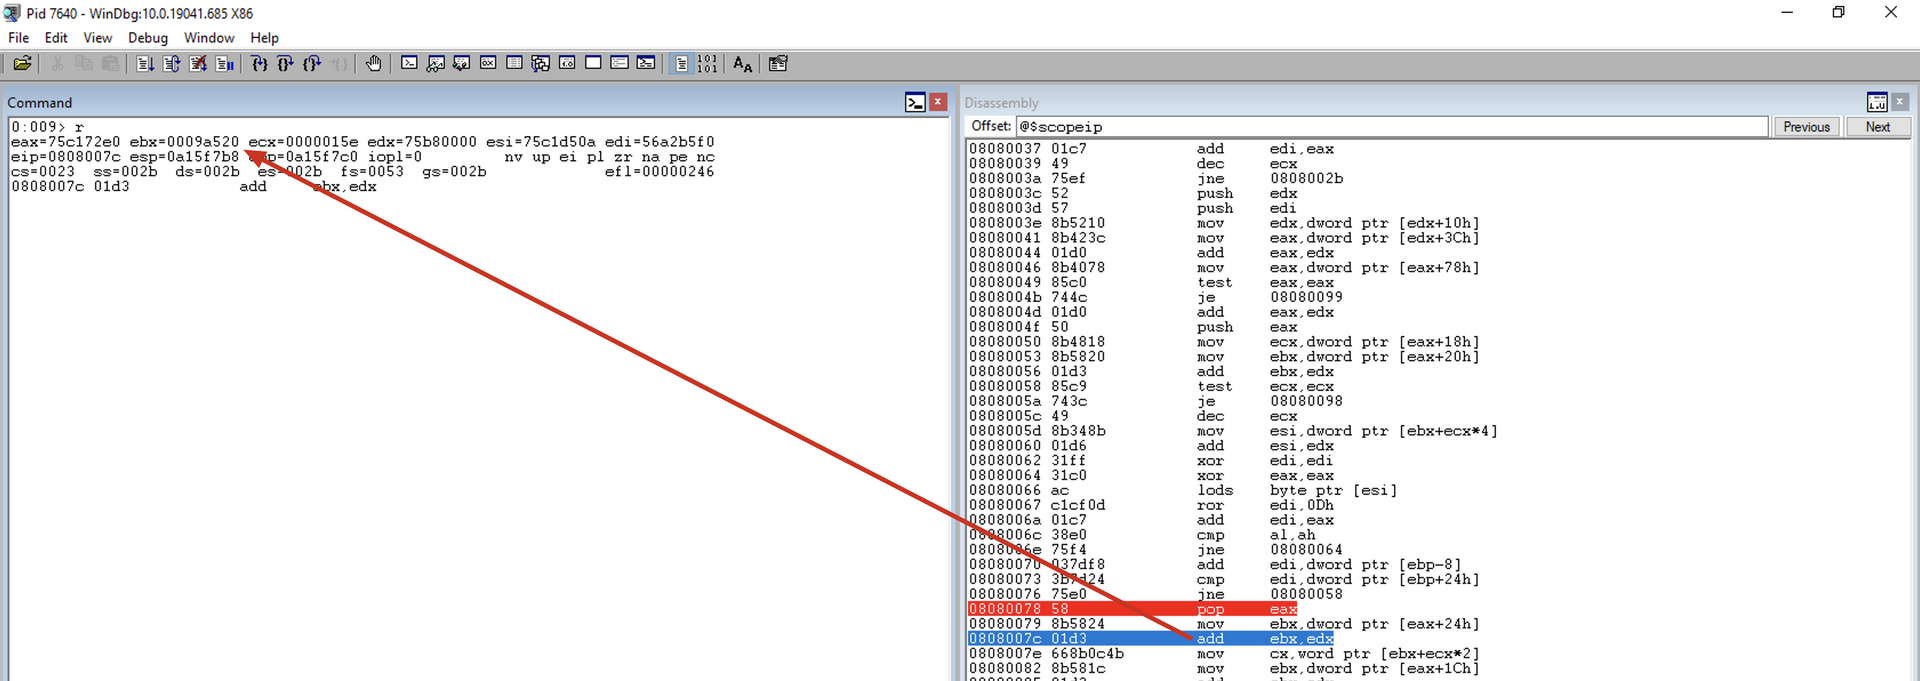
Adds the RVA with the BaseAddress of the current module to obtain the VMA of the AddressOfNameOrdinals array and saves it in the EBX register.
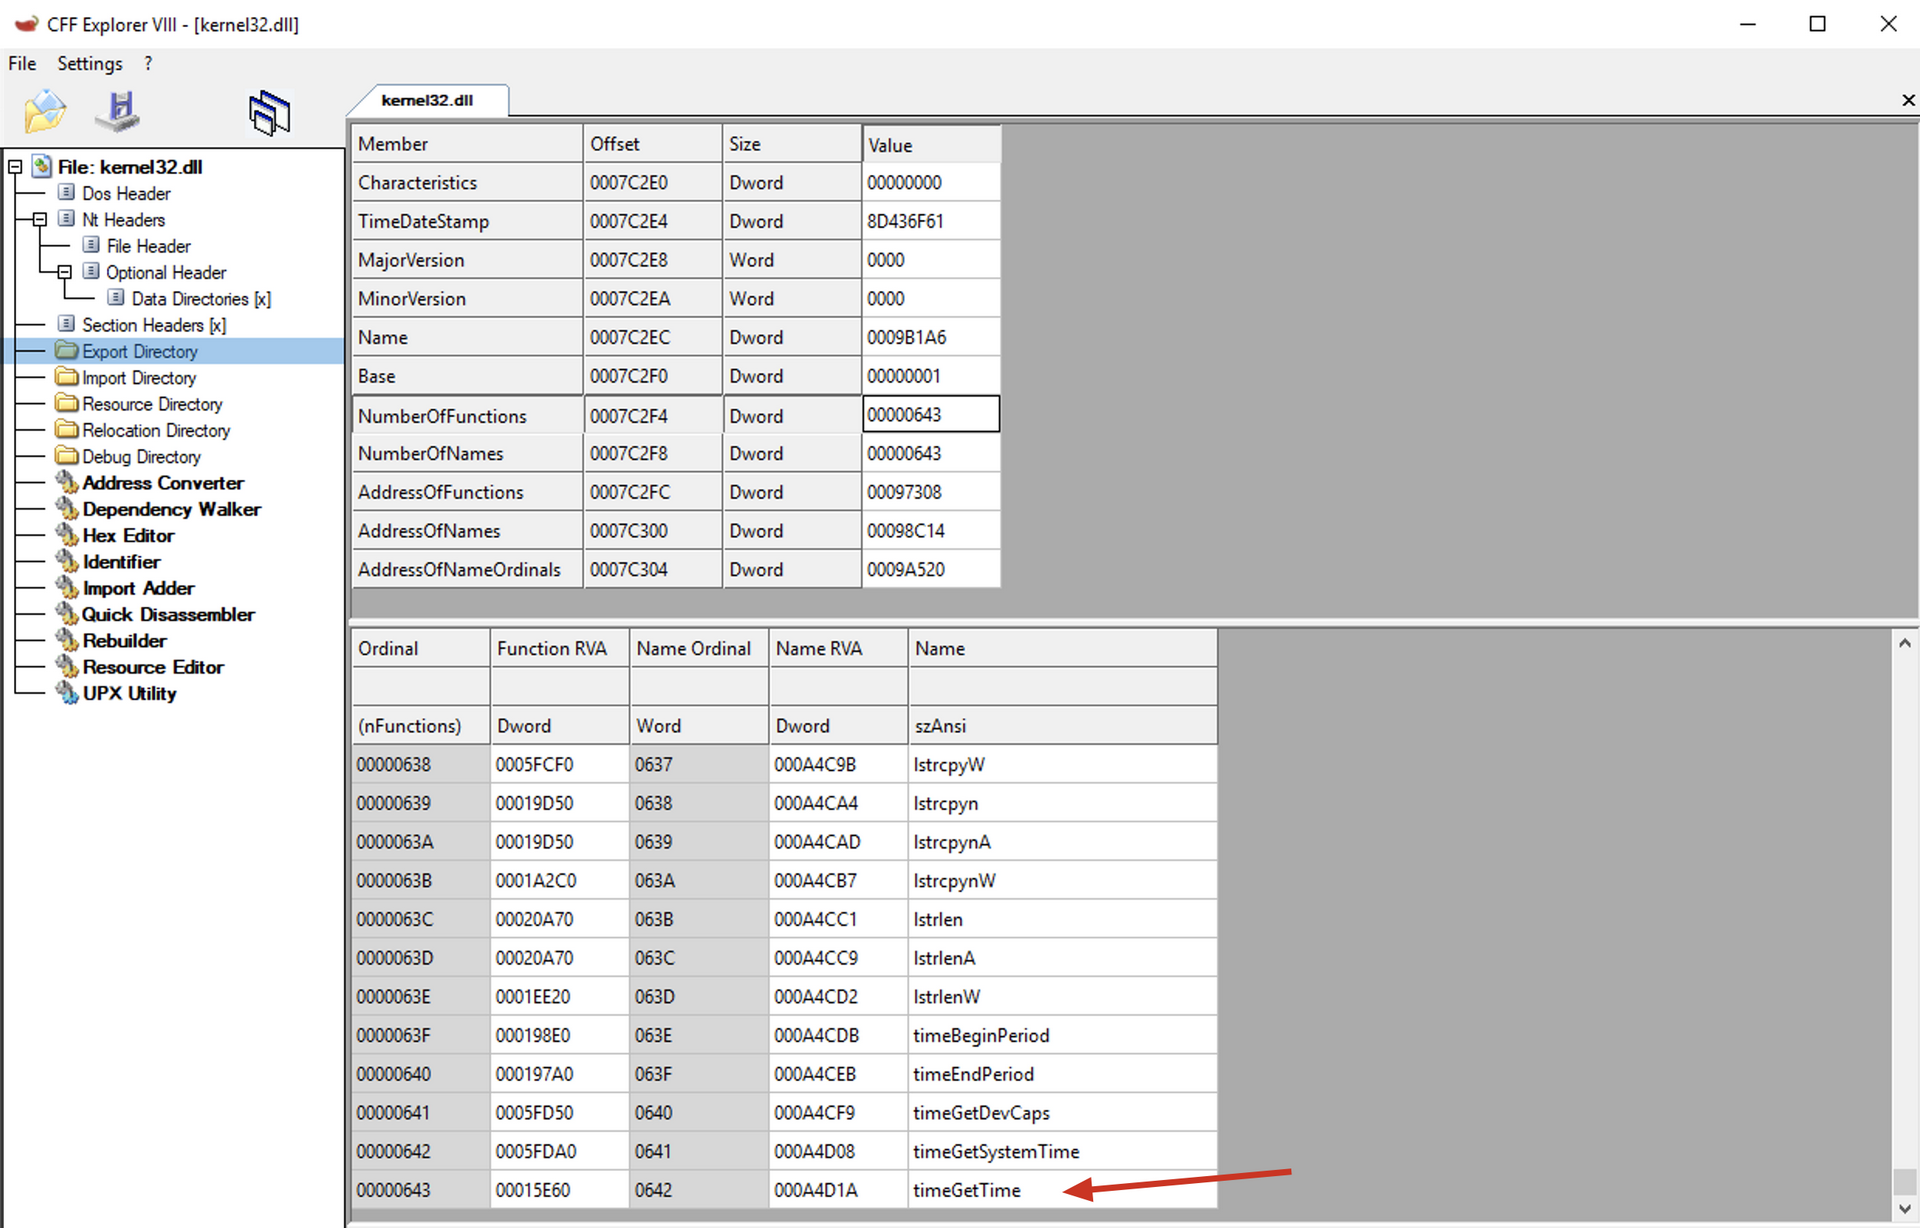
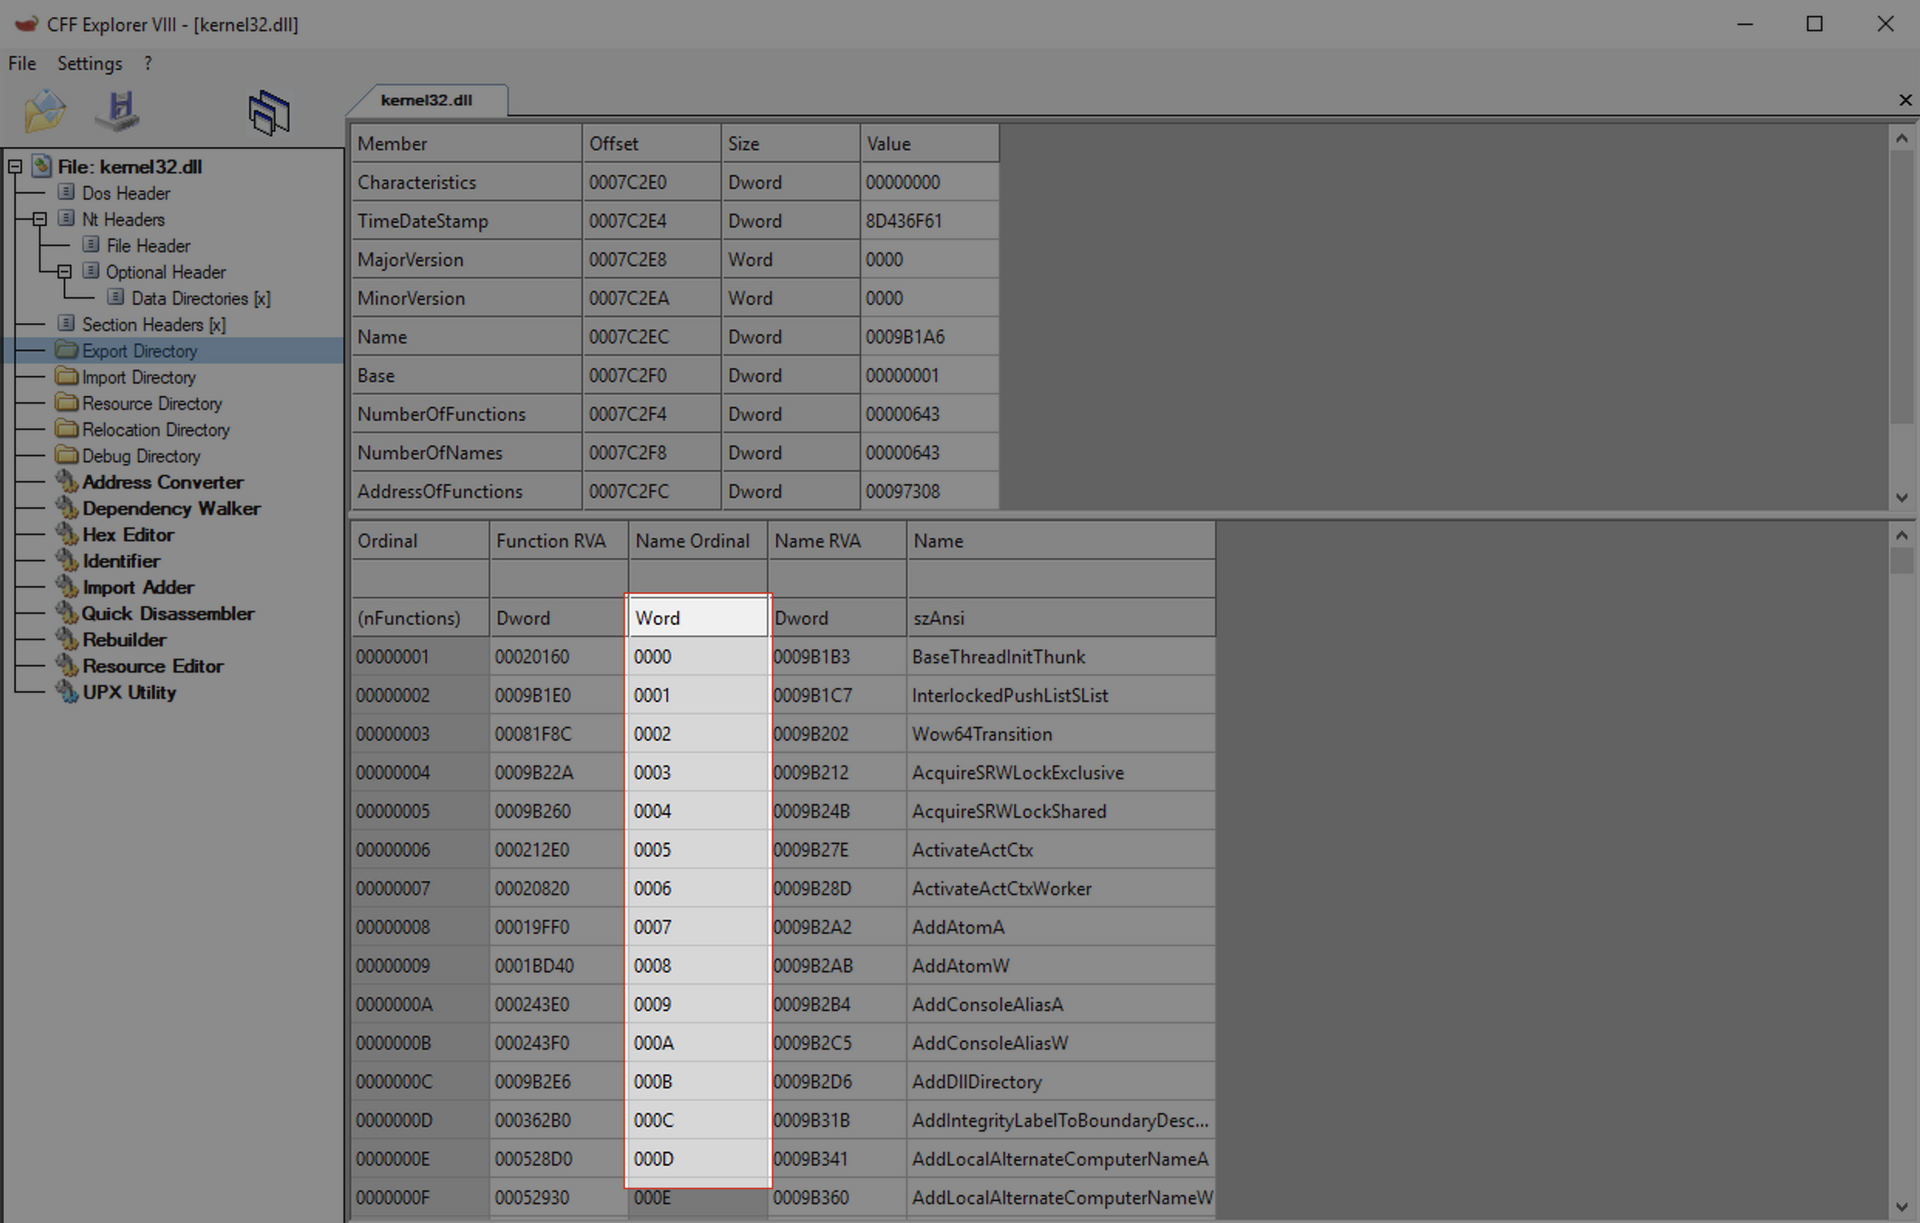
mov cx, [ebx + 2 * ecx]
In ECX, we have the index of the desired function within the AddressOfNames array. Since the AddressOfNames and AddressOfNameOrdinals arrays use the same index, we can reuse it to find the RVA of the function within the AddressOfNameOrdinals array. In the AddressOfNames array, we use ECX * 4 to jump to each of the records in the array because each record in AddressOfNames is a DWORD value, whereas in the AddressOfNameOrdinals array, each record is a WORD, so we multiply by 0x02 to jump to each record. As we can see in the exports table of the kernel32.dll module:
mov ebx, [eax + 0x1c]
Before using the newly calculated index, we obtain the RVA of the AddressOfFunctions at index 0x1c in the Export table and save it in the EBX register.
add ebx, edx
Adds the RVA with the BaseAddress of the current module to obtain the VMA of the AddressOfFunctions array and saves it in the EBX register.
mov eax, [ebx + 4 * ecx]
Retrieves the RVA of the desired function within the AddressOfFunctions array using the offset retrieved from the AddressOfNameOrdinals array. Where:
- EDX: Virtual address of AddressOfFunctions
- ECX: Index of the desired function (retrieved from the AddressOfNameOrdinals array)
- ECX * 4: Index of the function * 4 bytes for each address
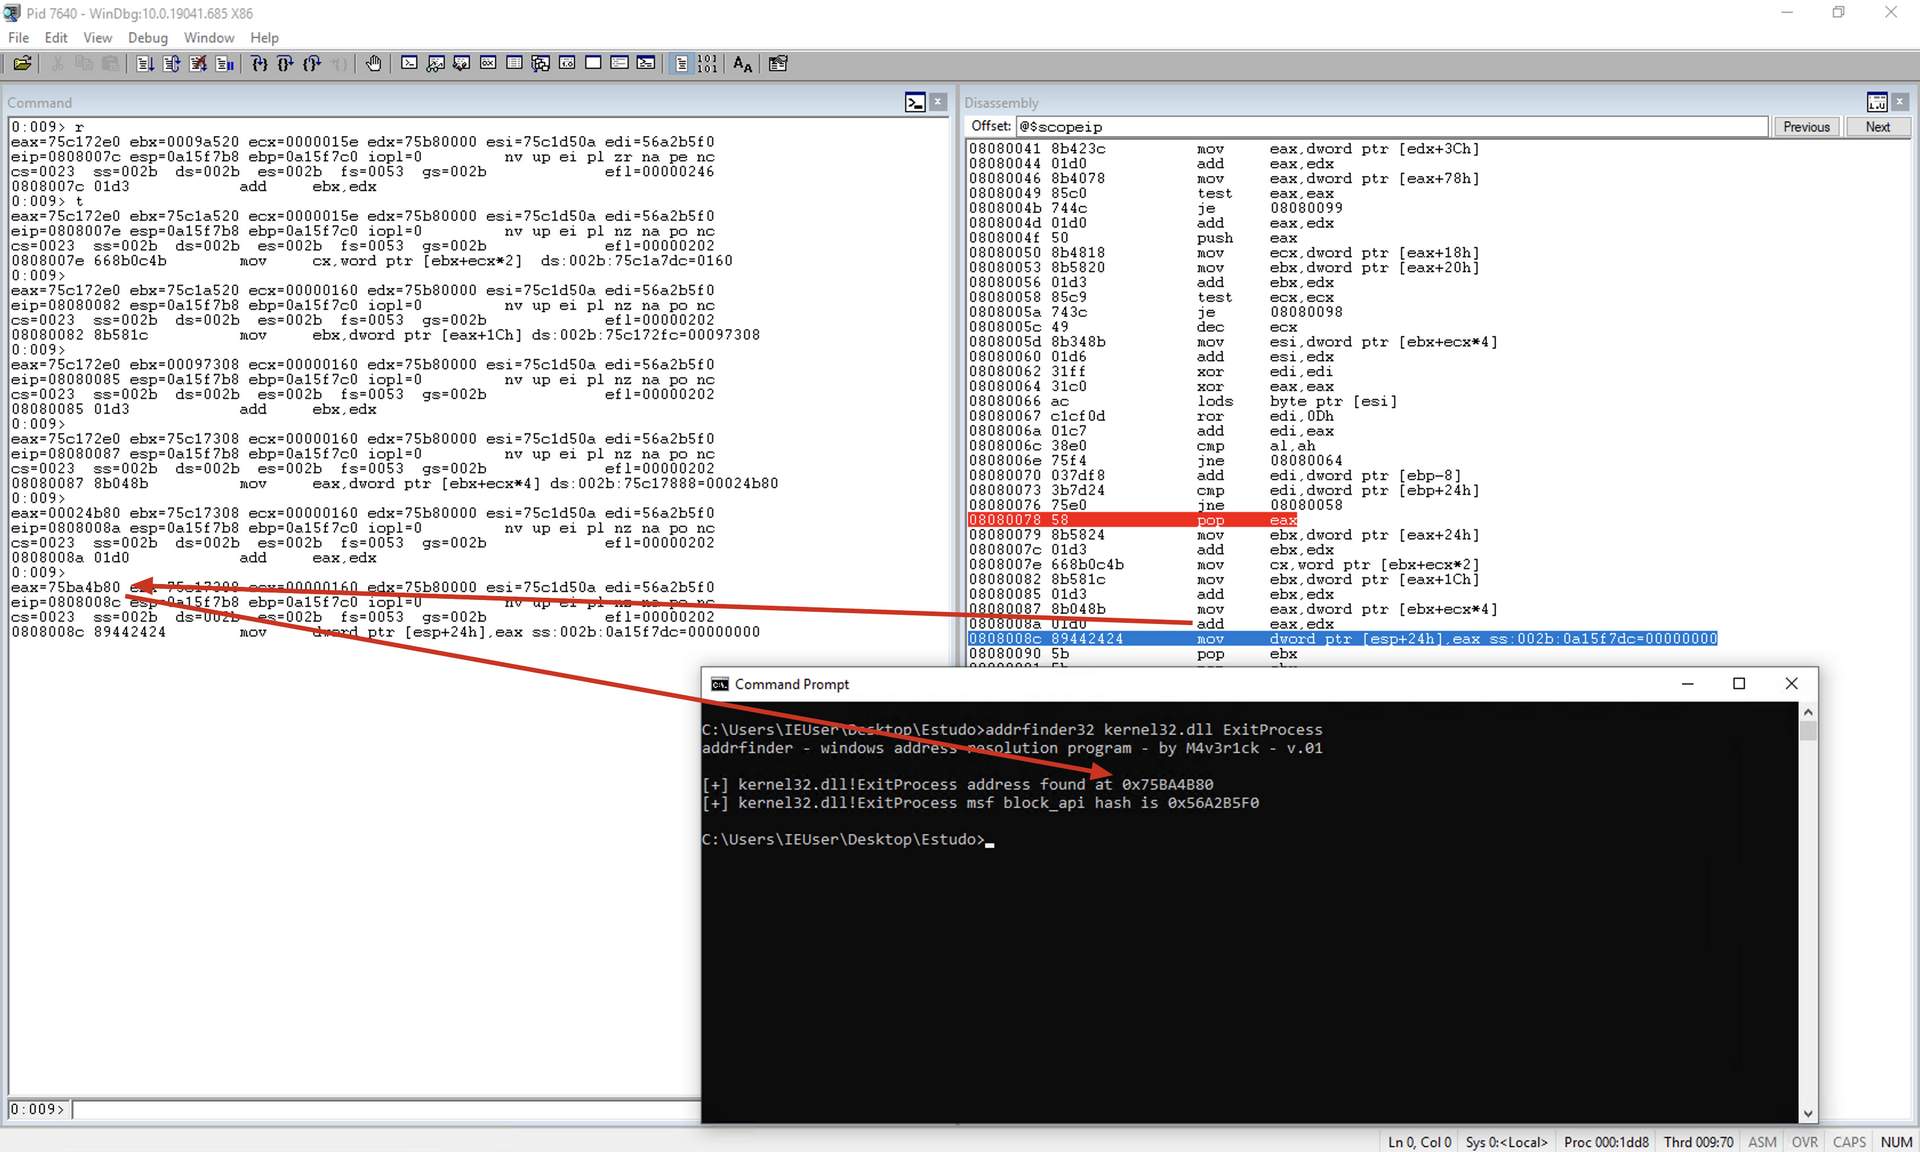
add eax, edx
Adds the RVA with the BaseAddress of the current module to obtain the VMA of the desired function and saves it in the EAX register.
This is the execution address of the function and can be used by the
call eaxinstruction, for example.
Finish function
1
2
3
4
5
6
7
8
9
finish:
mov [esp+0x24], eax ; Overwrite the old EAX value with the desired API address for the upcoming popad
pop ebx ; Clear the current module's hash
pop ebx ; Clear the current position in the module list
popad ; Restore all of the caller's registers, except EAX, ECX, and EDX, which are clobbered
pop ecx ; Pop off the original return address our caller will have pushed
pop edx ; Pop off the hash value our caller will have pushed
push ecx ; Push back the correct return value
jmp eax ; Jump to the required function
mov [esp+0x24], eax
Changes the original value of EAX added to the stack by “pushad” to the address of the desired function (which we just calculated). This process is necessary because in a few instructions, we will restore the registers to their initial values as they were at the time of the function call. At this point, EAX will contain the VMA of the function we want to call.
pop ebx
Removes the current module’s hash from the stack.
pop ebx
Removes the current position in the module list from the stack.
popad
Restores all registers to their initial values. Note that EAX will be restored with the value we overwrote two instructions ago.
pop ecx
Removes the stack and copies the original return address from our original execution flow to the ECX register. This address was automatically added to the stack at the time of the CALL instruction.
pop edx
Removes the hash of the function that we added before the CALL instruction from the stack.
push ecx
Adds the return address back to the stack so that after the execution of the desired function, the code can continue its execution normally.
jmp eax
Jumps to the address of the desired function to execute it. From the code flow perspective, we will not continue to the next instructions that will be studied next because once we jump to the desired function, it will finish with a RET instruction, which will return to our original execution flow.
Additional functions
1
2
3
4
5
6
7
get_next_mod: ;
pop eax ; Pop off the current (now the previous) module's EAT
get_next_mod1: ;
pop edi ; Pop off the current (now the previous) module's hash
pop edx ; Restore our position in the module list
mov edx, [edx] ; Get the next module
jmp next_mod ; Process this module
As we can see, there are other functions at the end of the library code that have already been referenced earlier and are part of the execution process.
Conclusion
As we have seen through the study of the block_api library, it is possible to dynamically locate all the modules loaded in the system, including those loaded at runtime, and their respective exported functions.
Training
Interested in learning step by step how to create a shellcode? Take a look at our Shellcoding training, where we cover everything from scratch to creating a reverse shell for both Windows and Linux, including shellcoding for 32 and 64-bit systems.
Training Link: https://sec4us.com.br/treinamentos/shellcoding-para-desenvolvimento-de-exploits/
References
- Pavel, Y at all. Windows Internals Part 1: 7th ed. Washington: Microsoft, 2017.
- Russinovich, M at all. Windows Internals: 5th ed. Washington: Microsoft, 2009.
- https://en.wikipedia.org/wiki/Win32_Thread_Information_Block
- https://docs.microsoft.com/en-us/windows/win32/api/winternl/ns-winternl-peb_ldr_data
- https://www.aldeid.com/wiki/PE-Portable-executable
- https://docs.microsoft.com/en-us/windows/win32/debug/pe-format
- https://infoslack.com/devops/linux-101-arquitetura
- https://en.wikipedia.org/wiki/Address_space_layout_randomization
- https://software.intel.com/content/www/us/en/develop/articles/intel-sdm.html
- https://www.youtube.com/watch?v=ySKEF8MHcZA
- https://github.com/rapid7/metasploit-framework/blob/master/external/source/shellcode/windows/x64/src/block/block_api.asm
- https://cheatsheet.sec4us.com.br/shellcoding